Chrysler Town And Country Serpentine Belt Diagram
The serpentine belt in your Chrysler Town & Country is a vital component responsible for powering numerous essential systems. Understanding its routing and proper tension is crucial for DIY repairs, preventative maintenance, and overall vehicle health. This article provides a detailed breakdown of the serpentine belt diagram for the Chrysler Town & Country, covering various model years and engine configurations, empowering you to confidently tackle belt-related tasks.
Purpose of the Serpentine Belt Diagram
The serpentine belt diagram serves as a roadmap for routing the belt around various engine accessories. Without it, replacing a worn or broken belt becomes a guessing game, potentially leading to incorrect installation and severe engine damage. The diagram offers the following benefits:
- Accurate Belt Routing: Ensures the belt is correctly routed around all pulleys, guaranteeing proper operation of each component.
- Troubleshooting Aid: Helps identify potential issues, such as misaligned pulleys or damaged components, based on belt wear patterns.
- Preventative Maintenance: Enables you to visually inspect the belt's condition and alignment, allowing for timely replacements and preventing unexpected breakdowns.
- DIY Repair Guide: Provides a clear reference point when replacing the belt, idler pulley, tensioner, or any other related component.
- Learning Tool: Facilitates understanding of the engine's accessory drive system and the function of each component.
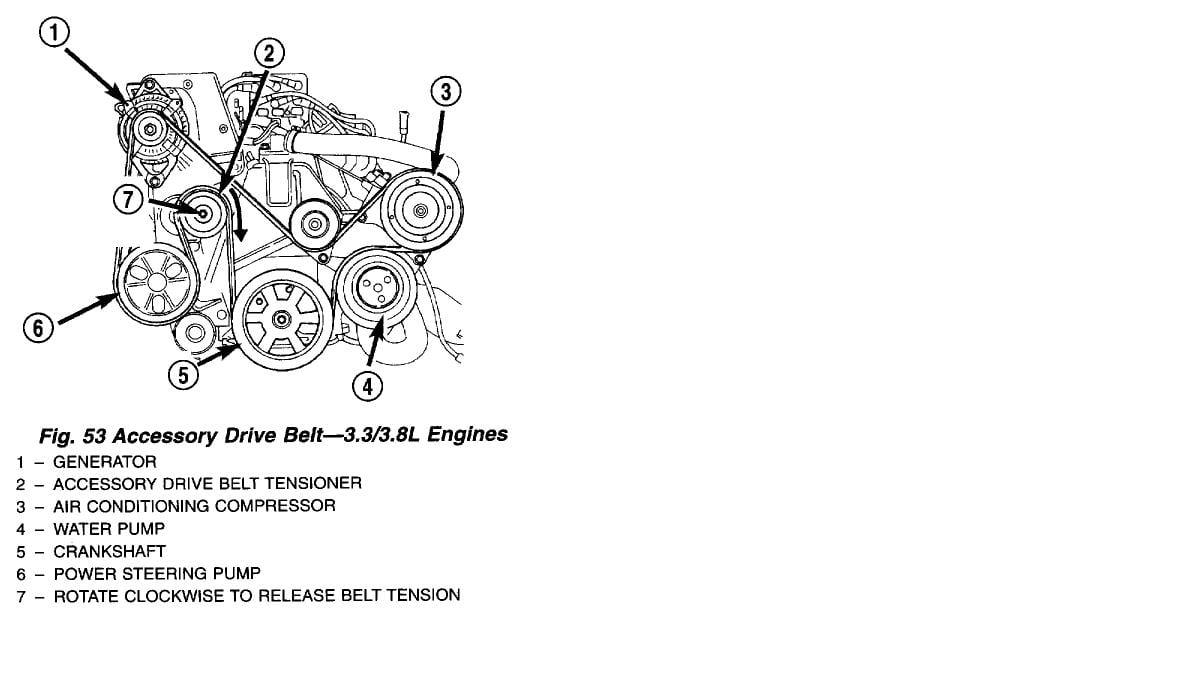
Key Specs and Main Parts of the Serpentine Belt System
Before diving into the diagram, let's define the key components involved in the serpentine belt system of a Chrysler Town & Country. Note that specific part locations and configurations may vary slightly depending on the model year and engine type (3.3L, 3.6L, 3.8L, 4.0L V6). However, the fundamental principles remain the same.
- Serpentine Belt: A single, long belt that drives multiple engine accessories. It’s made of reinforced rubber and designed to withstand high temperatures and constant flexing.
- Crankshaft Pulley (or Harmonic Balancer): Located at the bottom of the engine, it receives power directly from the engine's crankshaft and drives the serpentine belt.
- Alternator Pulley: The alternator generates electricity to power the vehicle's electrical system and charge the battery. The belt drives the alternator to accomplish this.
- Power Steering Pump Pulley: The power steering pump provides hydraulic assistance to the steering system, making it easier to turn the wheel.
- Air Conditioning (A/C) Compressor Pulley: The A/C compressor circulates refrigerant to cool the cabin air.
- Water Pump Pulley: The water pump circulates coolant throughout the engine to regulate its temperature.
- Idler Pulley(s): Smooth, bearing-mounted pulleys that provide belt tension and guide the belt around other components. They often serve to change the direction of the belt or provide needed clearance.
- Belt Tensioner: A spring-loaded device that automatically maintains the correct tension on the serpentine belt. It ensures proper grip on the pulleys and prevents slippage. A faulty tensioner is a common cause of belt noise and premature wear.
Understanding Serpentine Belt Diagram Symbols
The serpentine belt diagram employs various symbols to represent different components and belt routing characteristics. Understanding these symbols is essential for interpreting the diagram correctly.
- Solid Lines: Represent the serpentine belt itself. The thickness of the line might vary slightly depending on the diagram, but it always represents the belt's path.
- Arrows: Indicate the direction of belt rotation. Pay close attention to the arrows to ensure the belt is routed in the correct direction around each pulley.
- Circles/Pulleys: Represent the various pulleys driven by the serpentine belt. The diameter of the circle might roughly correspond to the actual pulley size.
- Text Labels: Identify each pulley, such as "Alternator," "Power Steering Pump," "A/C Compressor," etc. These labels are crucial for identifying each component in the engine bay.
- Tensioner Symbol: The tensioner is often represented by a unique symbol that indicates its spring-loaded nature. It may include an arrow indicating the direction of tension release.
How the Serpentine Belt System Works
The serpentine belt system is designed to efficiently transfer power from the engine's crankshaft to various accessories. The process is as follows:
- The engine's crankshaft rotates, turning the crankshaft pulley.
- The serpentine belt, wrapped around the crankshaft pulley, is driven by its rotation.
- The rotating belt drives all the other pulleys connected to it, including the alternator, power steering pump, A/C compressor, and water pump.
- The belt tensioner maintains constant tension on the belt, ensuring proper grip and preventing slippage. Slippage reduces the efficiency of the accessories and can cause the belt to overheat and wear prematurely.
- Idler pulleys guide the belt along the correct path and provide the necessary tension in specific areas.
Real-World Use: Basic Troubleshooting Tips
Using the serpentine belt diagram, you can diagnose and troubleshoot common issues related to the serpentine belt system. Here are some basic tips:
- Squealing or Chirping Noise: Often indicates a loose or worn belt. Check the belt tension and look for signs of cracking, glazing, or fraying. If the belt is in good condition, the tensioner may be failing.
- Belt Slippage: Can cause reduced performance of the accessories. Symptoms include dim headlights (alternator), difficult steering (power steering pump), or weak A/C (A/C compressor). Inspect the belt for wear and proper tension. Also check for oil or coolant leaks that could be contaminating the belt.
- Belt Breakage: A broken belt will cause the immediate failure of all the accessories it drives. This is a serious issue, as it can lead to overheating and other engine damage. Replace the belt immediately and inspect all pulleys for damage or misalignment.
- Visual Inspection: Regularly inspect the belt for cracks, fraying, missing chunks, or glazing. A worn belt should be replaced before it breaks. Use the diagram to ensure the new belt is routed correctly.
- Pulley Alignment: Use a straight edge to check the alignment of all pulleys. Misaligned pulleys can cause premature belt wear and noise.
Safety Considerations
Working on the serpentine belt system involves several safety risks. Always take the following precautions:
- Disconnect the Battery: Disconnect the negative battery terminal before working on any electrical components.
- Hot Engine: Allow the engine to cool completely before working on the serpentine belt system. The engine components can become extremely hot.
- Moving Parts: Never work on the serpentine belt system while the engine is running. The belt and pulleys are moving at high speeds and can cause serious injury.
- Tensioner Spring: Be careful when releasing the belt tensioner. The spring can be under considerable tension and can snap back forcefully. Use the correct tool for releasing the tensioner.
- Eye Protection: Wear safety glasses to protect your eyes from debris.
- Gloves: Wear gloves to protect your hands from sharp edges and hot surfaces.
By understanding the serpentine belt diagram and following these safety precautions, you can confidently diagnose and repair serpentine belt issues on your Chrysler Town & Country. Remember to always consult your vehicle's service manual for specific instructions and torque specifications.
We have a downloadable version of the serpentine belt diagram available for various Chrysler Town & Country model years and engine types. This diagram will provide you with a clear and concise reference point for all your serpentine belt-related tasks. Contact us to request the specific diagram for your vehicle.