Color Code 2002 Honda Accord Radio Wiring Diagram
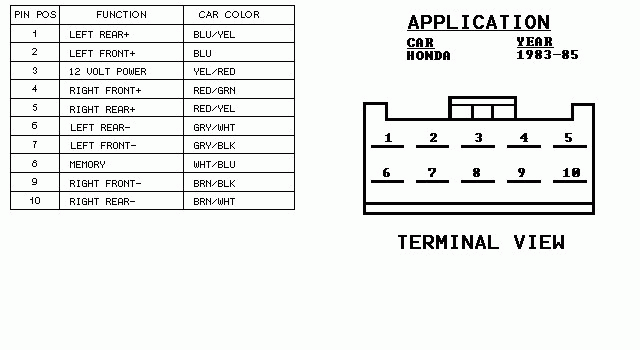
Working on your 2002 Honda Accord's radio system? Whether you're replacing a broken head unit, installing an aftermarket amplifier, or just trying to understand how everything is connected, a color-coded wiring diagram is your best friend. This guide will walk you through interpreting the diagram, understanding the components, and applying that knowledge in the real world. We have a printable version of the 2002 Honda Accord radio wiring diagram available for you to download later. This diagram is specific to the 2002 Honda Accord model year and trim and should be used as a reference.
Why a Wiring Diagram Matters
Imagine trying to rewire your car's entire audio system without knowing which wire does what. Disaster, right? A wiring diagram provides a visual representation of the electrical circuits in your radio system. It tells you which wire connects to which component, what each wire is for (power, ground, speaker output, etc.), and often, even the color of the wire. This is crucial for:
- Repairs: Quickly identify broken or shorted wires.
- Upgrades: Properly connect aftermarket amplifiers, subwoofers, or head units.
- Troubleshooting: Trace electrical problems and pinpoint the source.
- Learning: Gain a deeper understanding of your car's electrical system.
Without it, you're essentially guessing – a dangerous and potentially damaging approach when dealing with electrical systems.
Key Specs and Main Parts of the 2002 Honda Accord Radio System
The 2002 Honda Accord radio system, in its basic form, typically includes these key components:
- Head Unit (Radio): This is the control center, providing audio sources (AM/FM radio, CD player, sometimes tape player) and controlling volume, tone, and other settings.
- Speakers: Convert electrical signals into audible sound. Typically, the 2002 Accord has front (door) and rear (shelf or door) speakers.
- Antenna: Receives radio signals.
- Wiring Harness: A bundle of wires connecting all the components. This is where your wiring diagram is essential.
- Power Source: The car's battery provides the necessary power.
- Ground: Provides a return path for the electrical current.
Key specs to consider are the voltage (typically 12V DC in car audio systems) and the wattage of the speakers (to match amplifier output if you're upgrading). The impedance of the speakers (measured in ohms) is also crucial for amplifier compatibility.
Decoding the Symbols: Lines, Colors, and Icons
A wiring diagram uses a visual language. Understanding this language is critical for interpreting the diagram accurately.
- Lines: Each line represents a wire or electrical connection. Thicker lines often indicate power wires.
- Colors: Each wire is assigned a color, which is indicated on the diagram. Common colors include red (power), black (ground), yellow (memory/constant power), and various colors for speaker wires (e.g., white, green, gray, purple, often with a stripe of another color). Color codes are vital for identifying the correct wires in your car's harness.
- Icons: Icons represent specific components. For example:
- A circle with a resistor symbol inside might represent a speaker.
- A rectangle with labeled pins represents the head unit connector.
- A ground symbol (usually three horizontal lines descending in size) indicates a ground connection.
- Labels: Labels are used to identify what each wire is for. Common labels include "+12V" (positive power), "GND" (ground), "FL+" (front left speaker positive), "RR-" (rear right speaker negative), and "ACC" (accessory power).
Pay close attention to the legend or key on the wiring diagram. This will explain any specific symbols or abbreviations used.
How It Works: A Simplified Explanation
The radio system works by taking power from the car's battery and using it to amplify audio signals from a chosen source (radio, CD, etc.). The head unit processes the signal and sends it to the speakers. Each speaker requires two wires: a positive (+) and a negative (-) connection. The negative connection completes the circuit, allowing the current to flow back to the battery (through the ground connection).
The head unit also needs a constant 12V power source to retain memory (presets, settings) and an accessory power source that is only active when the ignition is turned on. The ground wire provides the return path for all circuits and is typically connected to the car's chassis.
The wiring diagram illustrates how all these components are interconnected, showing the path of electricity from the power source, through the components, and back to ground.
Real-World Use: Basic Troubleshooting Tips
Here are a few common troubleshooting scenarios where a wiring diagram can be invaluable:
- No Power to the Radio: Use the diagram to check the power and ground connections. Ensure the fuse for the radio is intact. Use a multimeter to verify that you're getting 12V at the power wire and that the ground wire has continuity to the car's chassis.
- Speaker Not Working: Check the speaker connections. Use the diagram to identify the correct speaker wires and test the speaker for continuity with a multimeter. If the speaker is good, trace the wiring back to the head unit, looking for breaks or shorts.
- Radio Turns Off When Car is Started: This could be a problem with the accessory power wire or the ground connection. Verify that the accessory power wire is providing power only when the ignition is on. Check the ground connection for looseness or corrosion.
- Aftermarket Head Unit Install Issues: Always match the wiring colors from the aftermarket head unit harness to the corresponding wires in the car's harness, using the wiring diagram as your guide. A wiring harness adapter can make this process easier and prevent you from cutting into the original wiring.
Remember to always disconnect the negative terminal of the car's battery before working on the electrical system.
Safety First: Highlighting Risky Components
Working with car electrical systems can be dangerous. Here are a few critical safety points:
- Battery: The car battery can deliver a significant electrical shock. Always disconnect the negative terminal before working on the electrical system.
- Airbag System: Some radio systems are integrated with the airbag system. Consult your car's service manual before disconnecting or modifying any wiring in this area. Improper handling can cause the airbags to deploy unexpectedly.
- Fuses: Never replace a fuse with one of a higher amperage. This can overload the circuit and cause a fire.
- Short Circuits: Avoid short circuits by carefully insulating all connections and using appropriate wiring techniques.
Always double-check your connections and use proper tools and techniques to avoid damage or injury. If you're not comfortable working with electrical systems, consult a qualified technician.
Ready to get your hands on the diagram? We have the complete, color-coded 2002 Honda Accord radio wiring diagram file available for you to download. This will make your radio repairs and upgrades significantly easier. Understanding and following these guidelines with the diagram will help you to navigate the intricate radio system and perform safe and effective modifications or repairs. Happy wiring!