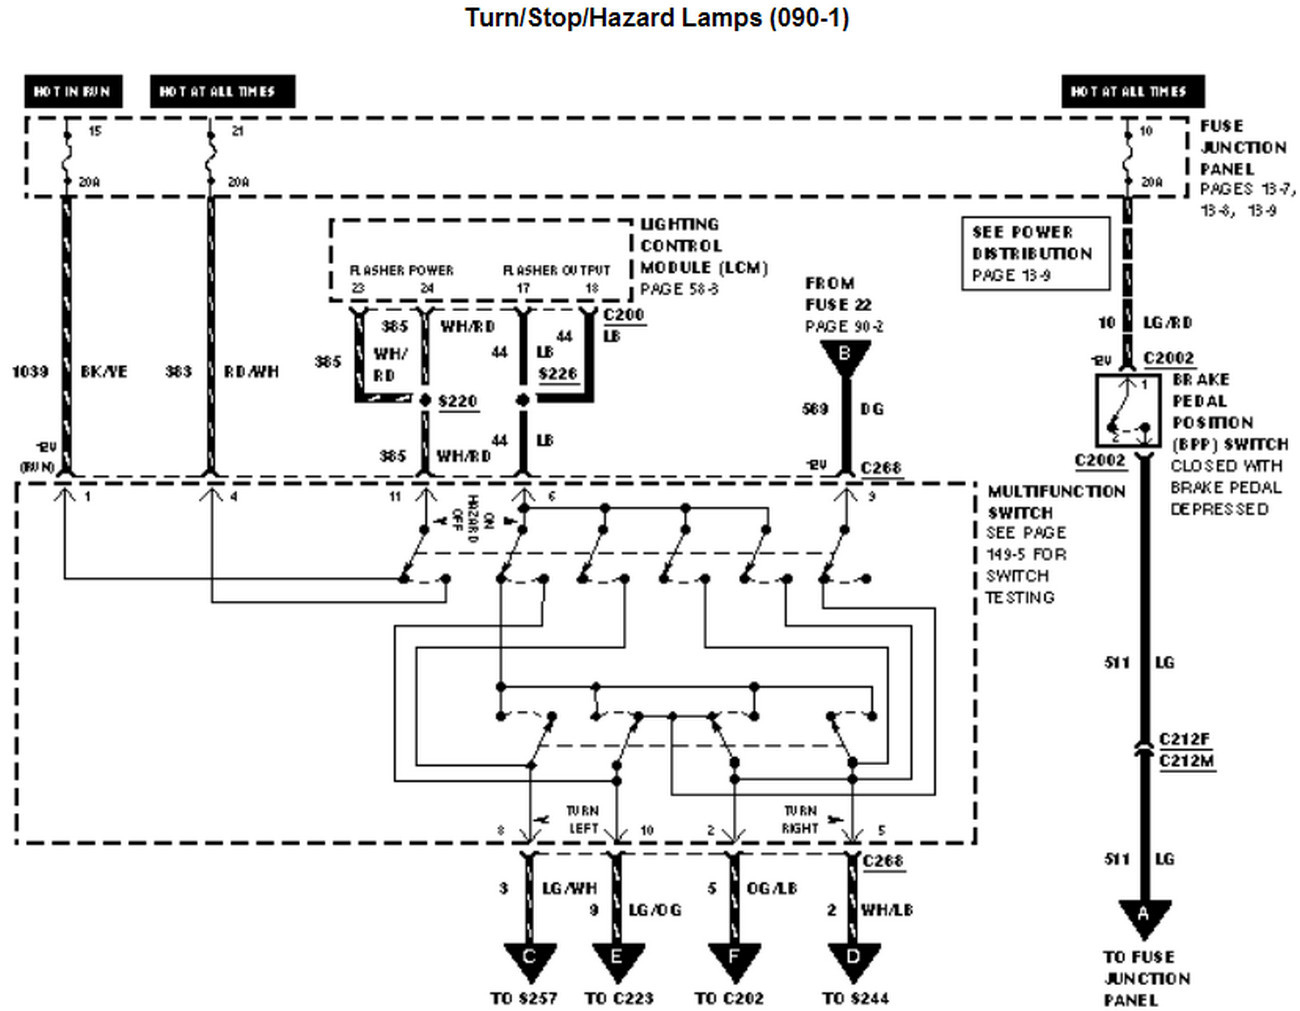
Combined Brake And Turn Signal Wiring Diagram
Understanding the combined brake and turn signal wiring diagram is crucial for any experienced DIYer or modder who wants to work confidently on their vehicle's electrical system. Whether you're diagnosing a faulty turn signal, upgrading your taillights, or just trying to understand the intricacies of your car's wiring, this knowledge is invaluable. This article will break down the diagram, explain its components, and provide practical advice for real-world use. We have the wiring diagram available for download, so you can follow along as we dissect it.
Purpose: Why You Need This Diagram
The combined brake and turn signal wiring diagram is essentially a roadmap for your vehicle's rear lighting system. It shows how the brake lights and turn signals are wired together, often sharing a single bulb filament. This setup is common in many vehicles to simplify wiring and reduce the number of bulbs needed. Understanding this diagram is essential for:
- Troubleshooting Electrical Issues: Identifying shorts, opens, and incorrect wiring.
- Performing Repairs: Replacing faulty wiring, bulbs, or sockets.
- Adding Aftermarket Accessories: Installing LED taillights, trailer wiring, or other modifications.
- Understanding Vehicle Electrical Systems: Gaining a deeper understanding of how your car's electrical system functions.
Key Specs and Main Parts
Before diving into the diagram itself, let's review the key components you'll encounter:
- Battery: The power source for the entire system. Typically 12V DC in automotive applications.
- Fuse/Circuit Breaker: A safety device that protects the wiring from overcurrent. The amperage rating of the fuse is critical.
- Ignition Switch: Controls power to various circuits when the key is turned.
- Turn Signal Switch: Located on the steering column, this switch directs power to the left or right turn signals.
- Brake Light Switch: Activated when the brake pedal is pressed, sending power to the brake lights.
- Flasher Unit (Turn Signal Flasher): An electromechanical or electronic device that causes the turn signals to blink on and off at a regulated rate. The flasher rate is usually specified.
- Bulbs (Incandescent or LED): The light source itself. Often dual-filament bulbs are used for combined brake/turn signals.
- Sockets: The physical housing for the bulbs, providing electrical contact.
- Wiring Harness: A bundle of wires that connects all the components together.
- Ground Connection (Chassis Ground): A connection to the vehicle's metal frame, providing a return path for the electrical current. Critical for proper operation.
Symbols: Decoding the Wiring Diagram
Wiring diagrams use standardized symbols to represent electrical components and connections. Understanding these symbols is crucial for interpreting the diagram correctly:
- Lines: Represent wires. Thicker lines may indicate wires carrying higher current. Dashed lines may represent wires that are optional or part of a sub-system.
- Colors: Each wire is assigned a color code (e.g., red, black, green). This helps you identify the correct wire in the wiring harness. Color abbreviations are also commonly used (e.g., RD for red, BK for black, GN for green).
- Ground Symbol: Usually represented by three horizontal lines stacked on top of each other, or a downward pointing triangle.
- Battery Symbol: Represented by a long and short parallel line, with the long line indicating the positive (+) terminal and the short line indicating the negative (-) terminal.
- Fuse Symbol: A squiggly line inside a rectangle.
- Switch Symbol: A line connecting to another line that can be opened or closed to allow or block current flow. Different switch configurations (e.g., SPST, SPDT, DPDT) have different symbols.
- Bulb Symbol: A circle with an 'X' inside it.
- Resistor Symbol: A zig-zag line.
- Connector Symbol: Two interlocking shapes.
Refer to the legend or key on the wiring diagram to understand the specific symbols and abbreviations used. These legends are usually at the bottom of the document. Pay attention to the gauge of the wire represented, as this indicates its current-carrying capacity.
How It Works: The Flow of Electricity
The combined brake and turn signal circuit works by sharing the same bulb filament for both functions. Here's a simplified explanation of the circuit operation:
- Power Source: The battery provides the electrical power.
- Ignition Switch: When the ignition is turned on, power is supplied to the turn signal flasher unit.
- Turn Signal Activation: When the turn signal switch is activated (left or right), the flasher unit sends pulsating power to the corresponding side's turn signal bulb filament. This causes the bulb to blink on and off.
- Brake Light Activation: When the brake pedal is pressed, the brake light switch closes, sending direct power to both brake light bulb filaments.
- Combination: The magic happens because the brake light circuit overrides the turn signal circuit when both are activated simultaneously. If you're signaling a left turn and also braking, the left brake light will still blink, while the right brake light will remain constantly on. This is achieved through a clever combination of relay and diode arrangements, or by specifically designed flasher modules.
- Ground Return: The electrical current returns to the battery through the ground connection.
Real-World Use: Basic Troubleshooting Tips
Here are some common issues and how to troubleshoot them using the wiring diagram:
- No Brake Lights: Check the brake light switch, fuse, bulbs, and wiring connections. Use a multimeter to test for voltage at each point in the circuit.
- No Turn Signals: Check the flasher unit, turn signal switch, bulbs, and wiring connections. Listen for the clicking of the flasher relay. If it's not clicking, the relay is likely faulty.
- Turn Signals Blink Too Fast: This often indicates a burned-out bulb, a corroded connection, or an incorrect flasher unit. An LED bulb can cause hyperflashing, so check this if you have converted to LED.
- One Turn Signal Works, the Other Doesn't: Check the bulb, socket, and wiring on the non-working side. Use the wiring diagram to trace the circuit back to the turn signal switch.
- Brake Lights Stay On: Check the brake light switch adjustment. It might be stuck in the closed position.
Always use a multimeter to check for voltage and continuity. A continuity test checks for a complete circuit path, while a voltage test verifies the presence of power.
Safety: Handle With Care
Working with automotive electrical systems can be dangerous. Here are some safety precautions:
- Disconnect the Battery: Always disconnect the negative (-) battery terminal before working on any electrical system. This prevents accidental shorts and potential electrocution.
- Use Proper Tools: Use insulated tools and a multimeter to avoid electrical shock.
- Protect Wiring: Use wire loom and electrical tape to protect wiring from damage and shorts.
- Fuses are Critical: Never replace a fuse with a higher amperage rating. This can overload the wiring and cause a fire.
- High-Current Components: Be especially cautious around components that handle high current, such as the battery, starter motor, and alternator. These can deliver a dangerous electrical shock.
Working with electricity requires respect and caution. If you are not comfortable working on your vehicle's electrical system, consult a qualified mechanic. Incorrect wiring can damage your vehicle's electrical system and create a fire hazard.
Now that you have a good understanding of the combined brake and turn signal wiring diagram, you're better equipped to diagnose and repair issues with your vehicle's rear lighting system. Remember to always prioritize safety and consult a professional if you're unsure about any aspect of the repair process.
As mentioned earlier, we have the wiring diagram available for download. You can [link to download here - placeholder]. This diagram will provide you with a visual reference and specific details for your vehicle's wiring.