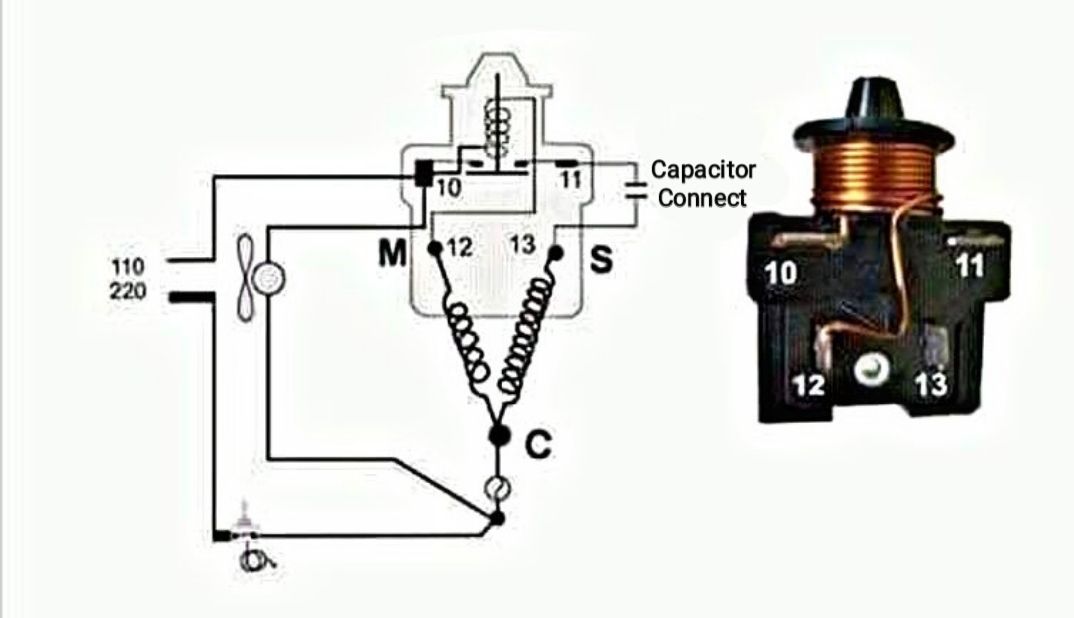
Compressor Start Relay Wiring Diagram
Alright, let's dive into compressor start relay wiring diagrams. Whether you're tackling an AC repair, upgrading your cooling system, or just expanding your automotive electrical know-how, understanding these diagrams is crucial. This isn't just about pushing buttons; it's about understanding the flow of electricity and controlling powerful components safely and effectively. We're going to break down everything you need to know, from the purpose of the diagram to real-world troubleshooting, so you can approach these systems with confidence.
Purpose of the Compressor Start Relay Wiring Diagram
Why bother with these diagrams? Simple: they're your roadmap. Imagine trying to navigate a city without a map – that's what working on a compressor circuit is like without a diagram. Specifically, the wiring diagram serves several key purposes:
- Troubleshooting: When your AC isn't blowing cold, the diagram helps you pinpoint the faulty component (relay, sensor, wiring) quickly and efficiently. Instead of blindly swapping parts, you can follow the circuit path to identify where the power stops flowing.
- Repair: Need to replace a damaged relay or wire? The diagram shows you exactly where each connection should be, ensuring a proper and safe repair. It prevents you from accidentally wiring things incorrectly, which can lead to damage or even fire.
- Modification/Upgrades: Planning to install a new compressor or modify the AC system for better performance? The diagram is essential for understanding the existing wiring and integrating new components seamlessly. This is especially important when dealing with aftermarket systems or custom setups.
- Education: Even if you're not actively working on your car, understanding the compressor start relay diagram gives you a deeper understanding of automotive electrical systems in general. It's a building block for more complex repairs and modifications.
Key Specs and Main Parts
Before we delve into the diagram itself, let's identify the main players in this circuit:
- Compressor: This is the heart of the AC system, responsible for compressing the refrigerant. It requires a significant amount of power to start and run.
- Compressor Clutch: An electromagnetic clutch that engages and disengages the compressor from the engine. When energized, the clutch engages, allowing the engine to drive the compressor.
- Compressor Start Relay: This is an electromagnetic switch. It's used to control the high-current circuit to the compressor clutch using a low-current signal from the car's computer or AC control system. This protects the sensitive control systems from the high current demands of the clutch.
- Pressure Switches: These safety devices monitor the refrigerant pressure in the system. There are typically a high-pressure switch and a low-pressure switch. If the pressure is too high or too low, these switches will open, cutting power to the compressor clutch to prevent damage. They're critical for system protection.
- AC Control Module (or ECU): The brain of the AC system. It receives input from various sensors (temperature, pressure, etc.) and controls the compressor clutch, blower motor, and other components to maintain the desired temperature.
- Fuses: Safety devices designed to protect the circuit from overcurrent. A blown fuse indicates a problem in the circuit that needs to be addressed.
- Wiring: The arteries of the system, carrying electrical current to all the components. Wire gauge (thickness) is important; the wrong gauge can lead to overheating and fire.
Key Specs to look for in the diagram include:
- Voltage: Typically 12V DC in automotive applications.
- Current Rating: The maximum current the relay can handle without being damaged. This is crucial for selecting the correct replacement relay.
- Wire Gauge: The thickness of the wires used in the circuit. Thicker wires can handle more current.
- Fuse Ratings: The amperage rating of the fuses protecting the circuit.
Symbols – Understanding the Language of the Diagram
Wiring diagrams use standardized symbols to represent different components and connections. Here's a breakdown of the common symbols you'll encounter:
- Lines: Represent wires. Solid lines usually indicate a direct connection, while dashed lines might indicate a connection through a connector or a different part of the circuit. Line thickness can sometimes indicate wire gauge.
- Colors: Wires are often color-coded. For example, red might indicate power, black might indicate ground, and other colors are used for signal wires. The diagram will usually include a key that identifies the color codes.
- Relay Symbol: Typically a rectangle with a coil symbol inside and several contact points. The coil represents the electromagnet that activates the switch. The contacts are the points that open and close the circuit. You'll see both Normally Open (NO) and Normally Closed (NC) contacts.
- Switch Symbol: A line with a small circle at the end, indicating a contact point. A switch can be normally open (the circuit is broken until the switch is closed) or normally closed (the circuit is complete until the switch is opened).
- Fuse Symbol: A squiggly line inside a rectangle or circle.
- Ground Symbol: Several variations exist, but they all represent a connection to the vehicle's chassis, providing a return path for the current. Look for a symbol that resembles an upside-down tree or a series of decreasing horizontal lines.
- Connector Symbol: Represented by interlocking shapes or circles, these show where wires are connected using a physical connector.
Pay close attention to the labels and notes on the diagram. They provide crucial information about component locations, wire sizes, and other important details.
How It Works – The Electrical Flow
Now, let's trace the flow of electricity in a typical compressor start relay circuit:
- The AC control module (or ECU) receives input from the driver (e.g., AC button pressed) and various sensors (temperature, pressure).
- If all conditions are met (e.g., engine running, refrigerant pressure within acceptable limits), the control module sends a low-current signal to the compressor start relay coil.
- This signal energizes the relay coil, creating an electromagnetic field.
- The electromagnetic field pulls the relay's contacts closed, completing the high-current circuit to the compressor clutch.
- With the high-current circuit complete, the compressor clutch engages, connecting the engine to the compressor.
- The compressor begins compressing the refrigerant, and the AC system starts cooling the vehicle.
- The pressure switches are in series with the relay coil, so if pressure is too high or low, power to the coil is cut and the compressor disengages to protect the system.
It's important to note that different vehicles may have slightly different implementations, but the fundamental principle remains the same: a low-current signal activates a relay, which then controls a high-current circuit to the compressor clutch.
Real-World Use – Basic Troubleshooting Tips
Let's say your AC isn't working. Here's how you can use the wiring diagram to troubleshoot the problem:
- Check the Fuse: The fuse is the first line of defense. Use the diagram to locate the fuse for the AC compressor clutch and check if it's blown. If it is, replace it with a fuse of the correct amperage rating. If it blows again immediately, there's a short circuit in the system that needs to be investigated.
- Check the Relay: Use the diagram to locate the compressor start relay. You can test the relay by swapping it with a known good relay (e.g., from the horn circuit, if it has the same part number). If the AC starts working, the relay is the problem. Alternatively, you can use a multimeter to test the relay's coil and contacts for continuity and resistance.
- Check the Pressure Switches: Use a multimeter to check for continuity across the pressure switches. If a switch is open, it's preventing the compressor clutch from engaging. You may need to have the system professionally diagnosed and recharged if a pressure switch is faulty.
- Check the Wiring: Visually inspect the wiring and connectors for any signs of damage, corrosion, or loose connections. Use a multimeter to check for continuity and voltage at various points in the circuit, following the diagram as your guide.
Important: Always disconnect the negative battery terminal before working on any electrical system to prevent accidental shorts and shocks.
Safety – Handle with Care
Working with automotive electrical systems can be dangerous. Here are some key safety precautions:
- Disconnect the Battery: As mentioned, always disconnect the negative battery terminal before working on any electrical system.
- High Voltage Components: While the compressor circuit itself is 12V DC, be aware that other parts of the car, like the ignition system, operate at much higher voltages. Avoid touching these components.
- Refrigerant Handling: Do not attempt to open the refrigerant lines yourself. Refrigerant is a hazardous substance and must be handled by a qualified technician.
- Proper Tools: Use properly insulated tools and wear appropriate safety gear, such as safety glasses and gloves.
- If in Doubt, Consult a Professional: If you're not comfortable working on the electrical system, consult a qualified mechanic. It's better to be safe than sorry.
Specifically, the compressor clutch and its associated wiring carry significant current. A short circuit in this area can quickly overheat wires and cause a fire. Always ensure that the wiring is properly insulated and that the fuse is the correct amperage rating.
Understanding the compressor start relay wiring diagram is a valuable skill for any car owner. With a little knowledge and the right tools, you can diagnose and repair many common AC problems yourself. However, always prioritize safety and consult a professional if you're unsure about anything.
We have a detailed compressor start relay wiring diagram file that you can download. It contains specific schematics and further details. This resource is a perfect supplement to this article, providing visual aid to enhance your understanding of the system!