Connection 3 Speed Fan Motor Wiring Diagram
Alright, let's talk about 3-speed fan motor wiring diagrams. If you're diving into automotive electrical work, understanding these diagrams is crucial. Whether you're fixing a busted blower motor, upgrading your HVAC system, or just trying to understand how your car's ventilation actually *works*, this knowledge is going to be invaluable. We're going to cover the key specs, how the system functions, some common problems, and crucial safety precautions.
Purpose and Relevance
Why bother learning about this? Well, a 3-speed fan motor controls the speed of the blower fan, which pushes air through your car's vents. A malfunctioning fan motor leads to discomfort – no air conditioning in the summer, no defrosting in the winter, and a generally unpleasant driving experience. The wiring diagram is your roadmap for diagnosing and fixing problems like a fan that only works on one speed, doesn't work at all, or has intermittent operation. Beyond repairs, understanding the wiring lets you customize your system, perhaps adding a more powerful fan or integrating an aftermarket climate control system.
Key Specs and Main Parts
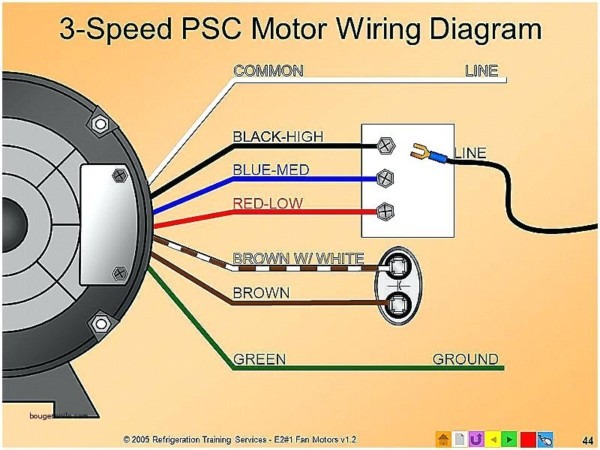
Let's break down the core components involved in a typical 3-speed fan motor circuit:
- Blower Motor: The heart of the system. It's a DC (Direct Current) electric motor that spins the fan. Horsepower and current draw (measured in Amps) are two important specs to note. A higher horsepower motor moves more air, but also draws more current.
- Blower Motor Resistor Pack: This is a key player. It's a series of resistors wired in such a way that each resistor provides a different level of resistance. These resistors are what control the fan speed. Higher resistance means lower voltage to the motor, resulting in a slower fan speed. The resistor pack is often located in the air duct, allowing the airflow to cool it down. Common failure points include burnt-out resistors due to overheating. Resistance values (Ohms) are critical for diagnostics.
- Fan Speed Switch: This is the control in your dashboard. It allows you to select the desired fan speed (Low, Medium, High). The switch essentially selects which resistor (or none in the case of High) is connected in series with the blower motor.
- Fuse: A crucial safety device. It's designed to protect the circuit from overcurrent situations. If too much current flows, the fuse blows, breaking the circuit. Knowing the fuse amperage rating is essential.
- Relay (Sometimes): In some vehicles, a relay is used to control the power to the blower motor, particularly on the "High" speed. This is because the "High" speed draws the most current, and the switch might not be able to handle that current directly. A relay acts as an electrically controlled switch.
- Wiring Harness: Connects all the components. Wire gauge (thickness) is important; smaller gauge wires can't handle high current loads.
Symbols and Diagram Interpretation
Understanding the symbols on the wiring diagram is essential for proper troubleshooting. Here's a breakdown:
- Solid Lines: Represent wires. Thicker lines generally indicate wires with higher current carrying capacity.
- Dashed Lines: May represent ground connections, or sometimes represent wires that exist but may not be used in every configuration.
- Colors: Wires are color-coded (e.g., Red for power, Black for ground, etc.). The diagram will have a key explaining these color codes. Always refer to the key as color codes can vary between manufacturers.
- Resistor Symbol: A zig-zag line. In the resistor pack, you'll see multiple resistor symbols, each with a different Ohm value.
- Switch Symbol: Represents the fan speed switch. It will show the different positions (Low, Medium, High, Off) and how they connect the circuit.
- Motor Symbol: A circle with an "M" inside.
- Fuse Symbol: A wavy line inside a rectangle.
- Ground Symbol: Usually a series of horizontal lines decreasing in length.
Important: Pay close attention to the node points where wires connect. These connections are common failure points due to corrosion or loose connections.
How It Works
Here's how the 3-speed fan motor circuit functions:
- Power Source: Power comes from the battery, typically through a fuse.
- Switch Selection: When you select a fan speed on the switch, you're choosing a specific path for the current to flow.
- Resistor Pack Action:
- Low Speed: The current flows through the resistor with the highest resistance, reducing the voltage to the motor the most, resulting in the slowest fan speed.
- Medium Speed: The current flows through a resistor with less resistance than the low-speed resistor, so the voltage to the motor is higher, and the fan spins faster.
- High Speed: The current bypasses the resistors entirely, sending full battery voltage to the motor, resulting in the highest fan speed. Sometimes this path involves a relay.
- Motor Activation: The voltage applied to the blower motor determines its speed.
- Ground Connection: The circuit is completed when the current flows back to the battery through a ground connection.
Real-World Use - Basic Troubleshooting Tips
Let's look at some common problems and how to diagnose them using the wiring diagram:
- Fan doesn't work at all:
- Check the fuse first! This is the most common culprit.
- Use a multimeter to check for voltage at the blower motor connector. If there's no voltage, trace the circuit back towards the fuse box, checking for breaks in the wiring or a faulty switch.
- If there *is* voltage, the motor itself might be bad.
- Fan only works on high speed: This is a classic symptom of a failed blower motor resistor pack. The "High" speed bypasses the resistors, so if that's the only speed that works, the resistors are likely the problem. Use a multimeter to check the resistance of each resistor in the pack. If any are open (infinite resistance), the resistor pack needs to be replaced.
- Fan only works on one low speed: Similar to the previous problem, but only one resistor might be working. Again, test the resistors in the pack.
- Intermittent operation: Could be a loose connection, a failing switch, or a motor that's starting to go bad. Check all connections for corrosion or looseness. A visual inspection can sometimes reveal burned or melted wires.
Safety – Highlight Risky Components
Working with automotive electrical systems can be dangerous. Here are some key safety precautions:
- Disconnect the Battery: Always disconnect the negative battery cable before working on the electrical system. This prevents accidental shorts and electrical shocks.
- Handle the Resistor Pack Carefully: Blower motor resistor packs can get extremely hot, especially after prolonged use. Allow them to cool down before handling them.
- Use a Multimeter Properly: Learn how to use a multimeter safely and accurately. Incorrect use can damage the meter or the vehicle's electrical system.
- Don't Exceed Fuse Ratings: Never replace a fuse with a higher amperage rating. This can overload the circuit and cause a fire.
- Be Aware of Airbag Systems: Airbag systems are sensitive to electrical changes. If you're working near an airbag, consult the vehicle's service manual for specific safety precautions.
- Proper Insulation: Ensure all wiring connections are properly insulated to prevent shorts. Use heat shrink tubing or electrical tape.
Remember that electrical faults can cause fires. If you are not comfortable working with electrical systems, it is best to consult a qualified technician.
I hope this overview of 3-speed fan motor wiring diagrams is helpful. This knowledge empowers you to troubleshoot problems, perform repairs, and even customize your car's ventilation system.
Now, you need a copy of a real diagram, right? We've got a generic 3-speed fan motor wiring diagram file ready for you to download. It’s a great resource to have on hand while you’re working on your car.