Coolant Flow Jeep Cherokee Coolant Hose Diagram
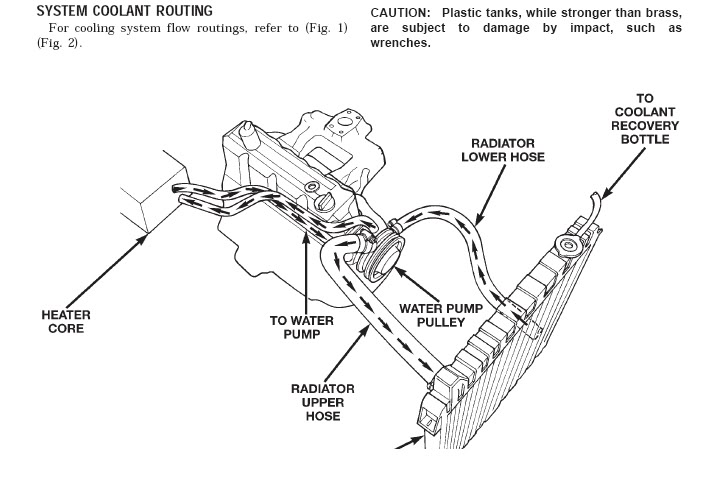
Alright, let's dive into the cooling system of your Jeep Cherokee, specifically focusing on the coolant hose diagram. Whether you're tackling a repair, trying to understand how your engine avoids overheating, or planning some performance modifications, knowing your way around this diagram is crucial. We'll break it down in a way that makes sense, even if you're not a professional mechanic.
Purpose of Understanding the Coolant Hose Diagram
Why bother understanding this diagram? Several reasons. First, for repairs. A leak can cause overheating and lead to serious engine damage. The diagram helps you pinpoint the exact hose that's gone bad. Second, it’s essential for diagnostics. Is the engine running hot? Is the heater blowing cold? The coolant flow path, as shown in the diagram, can help you trace the problem. Third, it's vital for maintenance. When flushing the coolant, you need to know where to drain from and where to fill. Finally, for modifications, especially if you're adding an auxiliary cooler or rerouting hoses, understanding the stock setup is paramount to avoid creating bottlenecks or leaks. Think of it as the roadmap for your cooling system.
Key Specs and Main Parts of a Jeep Cherokee Cooling System
Before we jump into the diagram itself, let's familiarize ourselves with the main components of the Jeep Cherokee cooling system. While specific layouts can vary slightly depending on the year and engine (e.g., inline-6 4.0L, V6 3.7L, or 2.4L I4), the basic principle remains the same. Here's a rundown:
- Radiator: This is the primary heat exchanger. Coolant flows through it, and the radiator fins dissipate heat into the atmosphere with the help of the radiator fan(s).
- Radiator Cap: This pressurized cap maintains the system's pressure, raising the boiling point of the coolant and preventing cavitation (formation of vapor bubbles). The specified pressure rating is critical for proper operation.
- Thermostat: A temperature-sensitive valve that regulates coolant flow to the radiator. When the engine is cold, it remains closed, allowing the engine to warm up quickly. Once the engine reaches operating temperature, the thermostat opens, allowing coolant to flow to the radiator.
- Water Pump: This pump, typically driven by the serpentine belt, circulates coolant throughout the engine and cooling system. Its health is crucial for proper coolant flow.
- Coolant Hoses: These rubber hoses connect all the components, carrying the coolant from one part of the system to another. They are of various shapes and sizes, each with its specific purpose.
- Heater Core: A small radiator located inside the vehicle's dashboard. Coolant flows through the heater core, and the blower motor forces air across it, providing heat for the cabin.
- Expansion Tank (or Overflow Tank): A reservoir that allows coolant to expand as it heats up and contracts as it cools down. This prevents pressure buildup and coolant loss.
- Cooling Fan(s): These fans, either mechanically driven (older models) or electrically driven, increase airflow through the radiator, improving cooling efficiency.
- Engine Block Coolant Passages: Internal channels within the engine block and cylinder head that allow coolant to circulate and absorb heat directly from the engine's critical components.
Key Specs: The coolant is usually a 50/50 mix of antifreeze (ethylene glycol or propylene glycol) and distilled water. The system pressure is typically around 16-18 PSI, but always consult your specific vehicle's specifications. Always verify your radiator cap and thermostat's specs align with OEM requirements.
Understanding Coolant Hose Diagram Symbols
A coolant hose diagram uses a combination of lines, colors, and icons to represent the system. Here's what you need to know:
- Solid Lines: These usually represent the main coolant hoses. The thickness of the line might indicate the hose diameter.
- Dotted Lines: These can represent vacuum lines related to the cooling system, such as those connected to the heater control valve (if equipped). They might also show internal passages within the engine.
- Arrows: Arrows indicate the direction of coolant flow. Crucially, pay attention to which way they point!
- Colors: Some diagrams use colors to differentiate between supply and return lines, or hot and cold coolant. Common color schemes include red for hot and blue for cold, but always check the diagram's legend.
- Icons: Icons are used to represent the various components, such as the radiator (often depicted as a grid-like structure), the water pump (usually a circle with blades), the thermostat housing, and the heater core (a smaller radiator symbol).
Example: A solid red line with an arrow pointing from the engine to the radiator usually represents the hot coolant supply line.
How the Cooling System Works
The cooling system operates in a closed loop. Here's a simplified explanation of the coolant flow:
- The water pump circulates coolant from the radiator, through the engine block's coolant passages, and into the cylinder head.
- As the coolant flows through the engine, it absorbs heat generated by combustion.
- The heated coolant exits the engine through the thermostat housing.
- If the engine is cold, the thermostat remains closed, and the coolant bypasses the radiator, circulating only within the engine block and heater core (for cabin heating).
- Once the engine reaches operating temperature, the thermostat opens, allowing the hot coolant to flow to the radiator.
- In the radiator, the coolant dissipates heat to the atmosphere with the aid of airflow.
- The cooled coolant flows back to the water pump, completing the cycle.
- The expansion tank accommodates coolant expansion and contraction, maintaining proper system pressure.
The heater core is connected in parallel with the main cooling loop. A separate valve (often vacuum-operated) controls coolant flow to the heater core, allowing you to adjust the cabin temperature.
Real-World Use: Basic Troubleshooting Tips
Here are some basic troubleshooting tips using the coolant hose diagram as a guide:
- Overheating: Check for leaks in hoses or at connections. Look for signs of coolant around the water pump or radiator. A blocked radiator (internal or external) can also cause overheating. Use the diagram to check the hose order to ensure a previous repair or replacement has not been done incorrectly
- Coolant Leaks: Visually inspect all hoses and connections for cracks, swelling, or leaks. Use the diagram to trace the source of the leak. Remember that coolant can sometimes travel some distance before dripping, so be thorough. Pressure test the system if you cannot find the source of the leak.
- No Heat: Check the coolant level. If low, top it off and check for leaks. If the coolant level is fine, check the heater control valve and the hoses leading to and from the heater core. A clogged heater core can also cause no heat.
- Low Coolant Level: Inspect the coolant hose connections and radiator seams for leaks. Check the oil for signs of coolant, indicating a head gasket leak. Consider a coolant pressure test to pinpoint hard-to-find leaks.
When replacing hoses, always use the correct type and size. Make sure the hose clamps are properly tightened, but avoid overtightening, which can damage the hose. Consider replacing all the hoses if one has failed, as others are likely nearing the end of their life as well.
Safety Considerations
Working on the cooling system can be dangerous if you're not careful. Here are some key safety considerations:
- Never open the radiator cap when the engine is hot. The system is pressurized, and opening the cap can result in a scalding spray of hot coolant. Let the engine cool down completely before attempting to remove the cap.
- Coolant is toxic. Avoid skin contact and never ingest it. Clean up any spills immediately and dispose of used coolant properly (recycle it).
- Be careful around the serpentine belt. When the engine is running, the serpentine belt and pulleys can cause serious injury. Keep your hands and tools clear of these moving parts.
- Pressure testing can reveal weak spots. Apply pressure slowly and carefully.
Always disconnect the negative battery cable before working on any part of the electrical system, including electric cooling fans.
We have a detailed coolant hose diagram file specifically for your Jeep Cherokee. You can download it from [Insert Download Link Here]. This diagram will be an invaluable resource for any cooling system work you undertake.