
Cooling System Honda Crv Hoses Diagram
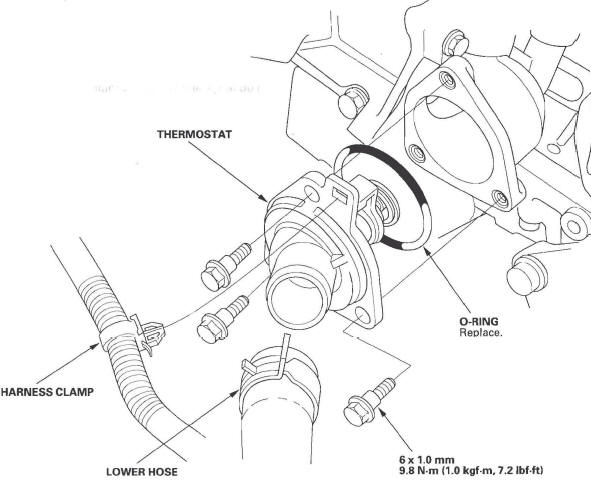
Let's dive deep into the cooling system of your Honda CR-V. This article isn't just about identifying hoses; it's about understanding the entire cooling circuit and how to use a hose diagram effectively. Whether you're tackling a leak, flushing the system, or just expanding your automotive knowledge, a good grasp of this system is invaluable. This guide is aimed at the intermediate DIYer, so we'll cover the essential technical details without getting bogged down in overly complex theory. And yes, we have a downloadable hose diagram at the end to make things even easier!
Purpose of the Honda CR-V Cooling System Hose Diagram
Why bother with a diagram? Because it’s the roadmap to your CR-V's cooling health. Here's what it allows you to do:
- Accurate Repairs: Identifying the correct hose, its routing, and its connections is crucial when replacing a leaking or damaged hose. Avoid costly mistakes by using the right part.
- Efficient Troubleshooting: When diagnosing overheating issues or coolant leaks, the diagram helps trace the flow of coolant and pinpoint potential problem areas like a failing thermostat or a clogged radiator.
- Preventative Maintenance: Understanding the system allows for better preventative maintenance. You can inspect hoses for wear and tear, check for proper coolant levels, and identify potential issues before they become major problems.
- System Modification: For those looking to modify their CR-V, such as adding an aftermarket cooler or rerouting hoses, a diagram is essential for planning and executing the modification safely and effectively.
Key Specs and Main Parts
Before we jump into the diagram, let's review the core components of the CR-V's cooling system. These components are connected by the hoses we will be looking at in the diagram:
- Radiator: This is where heat is dissipated from the coolant into the atmosphere. It's usually located at the front of the engine bay. It consists of a core with many fins and tanks on either side.
- Water Pump: The heart of the system. The water pump circulates coolant throughout the engine block and radiator. It's driven by the engine via a belt (often the serpentine belt).
- Thermostat: This valve regulates the engine's operating temperature. It opens and closes based on coolant temperature, controlling the flow of coolant to the radiator. A stuck-closed thermostat is a common cause of overheating.
- Coolant Reservoir (Expansion Tank): This tank allows for the expansion and contraction of coolant as it heats up and cools down. It prevents air from entering the system.
- Heater Core: Located inside the dashboard, the heater core is a small radiator that provides heat for the cabin. Coolant flows through it, and a blower motor directs air across it to warm the interior.
- Hoses: These flexible tubes connect all the components, allowing the coolant to flow. They are made of rubber or silicone and are subject to degradation over time due to heat and pressure.
- Radiator Cap: Maintains pressure within the cooling system, raising the boiling point of the coolant. It also incorporates a pressure relief valve.
- Coolant Temperature Sensor (CTS): Measures the coolant temperature and sends this data to the engine control unit (ECU). The ECU uses this information to adjust fuel injection and ignition timing.
Understanding Hose Diagram Symbols
Hose diagrams use a standardized set of symbols to represent components and the flow of coolant. Here’s a breakdown of the common symbols:
- Solid Lines: Represent the main coolant hoses. The thickness of the line might indicate the hose diameter.
- Dashed Lines: Often indicate vacuum lines or smaller hoses, such as overflow tubes.
- Arrows: Show the direction of coolant flow within the hoses. Pay close attention to these when tracing the circuit.
- Component Icons: Simplified drawings of the radiator, water pump, thermostat housing, heater core, and other components are used to identify them.
- Color Coding: While not always present, some diagrams use color to differentiate between hoses. For example:
- Red: Might indicate the hot coolant leaving the engine.
- Blue: Might indicate the cooler coolant returning to the engine.
- Clamps: Represented by small lines or circles, indicating hose clamp locations. Crucial for proper sealing.
How the Cooling System Works
The cooling system is a closed loop that circulates coolant to regulate the engine's temperature. Here’s the basic process:
- The water pump pushes coolant through the engine block, where it absorbs heat generated by combustion.
- The heated coolant flows towards the thermostat. If the coolant is below the thermostat's opening temperature (typically around 195°F or 90°C), the thermostat remains closed, and the coolant is recirculated back into the engine block.
- Once the coolant reaches the thermostat's opening temperature, the thermostat opens, allowing coolant to flow to the radiator.
- In the radiator, the coolant flows through thin tubes surrounded by fins. Air flowing through the fins dissipates heat from the coolant.
- The cooled coolant returns to the water pump, completing the cycle.
- The coolant reservoir accommodates changes in coolant volume due to temperature fluctuations. When the coolant heats up and expands, excess coolant flows into the reservoir. As the coolant cools down, it is drawn back into the system.
- The heater core taps into the cooling system, allowing hot coolant to circulate through it. A fan blows air across the heater core, providing heat for the cabin.
Real-World Use and Basic Troubleshooting
Knowing the hose diagram can significantly improve your diagnostic and repair skills. Here are some common troubleshooting scenarios:
- Coolant Leaks: Follow the diagram to trace the source of the leak. Check hose connections, look for cracks or swelling in the hoses, and inspect the radiator and water pump for signs of leakage. Pay attention to the type of coolant leak as the diagram won't help you determine if it's the head gasket versus a simple hose.
- Overheating: The diagram can help you check the flow of coolant. Feel the radiator hoses after the engine has warmed up. Both the upper and lower hoses should be hot. If one is significantly cooler, it could indicate a blockage in the radiator or a stuck thermostat.
- No Heat in Cabin: Check the heater hoses leading to and from the heater core. If they are cold or lukewarm, it could indicate a blockage in the heater core or a problem with the heater control valve.
- Hose Inspection: Regularly inspect your hoses for signs of wear, such as cracks, bulges, or softness. Squeeze the hoses to check for internal deterioration. Replace any hoses that show signs of damage.
Example: You notice a puddle of coolant under your CR-V. Using the diagram, you can identify the lower radiator hose as a likely suspect due to its proximity to the ground. You inspect the hose and find a small crack near the clamp. Replacing the hose and clamp resolves the leak.
Safety Considerations
Working on the cooling system involves some risks. Keep these points in mind:
- Never open the radiator cap when the engine is hot. The system is under pressure, and hot coolant can erupt, causing severe burns. Wait for the engine to cool down completely before opening the cap.
- Be careful when working with coolant. Coolant is toxic and should be handled with care. Wear gloves and eye protection, and avoid spills. Clean up any spills immediately.
- Dispose of used coolant properly. Do not pour it down the drain or into the environment. Take it to a recycling center or auto parts store.
- The water pump and thermostat are located near the timing belt/chain. If you are replacing these components, be extra careful not to disturb the timing belt/chain. Improperly installed timing can cause severe engine damage.
- Electric cooling fans can activate even when the engine is off. Disconnect the negative battery cable before working near the fan to prevent accidental injury.
Hoses are under significant pressure when the engine is running. A weak or failing hose can burst, spraying hot coolant. Regularly inspect the hoses and replace them preventatively to avoid this scenario. Always use high-quality replacement hoses designed for automotive use.
With a solid understanding of your CR-V's cooling system and a reliable hose diagram, you'll be well-equipped to tackle cooling system maintenance and repairs with confidence. Always remember to prioritize safety and consult the service manual for specific procedures and torque specifications.
We have the detailed Honda CR-V cooling system hose diagram available for download. Use it wisely!