Cub Cadet Ultima Zt1 Drive Belt Diagram
Maintaining your Cub Cadet Ultima ZT1 zero-turn mower involves understanding its various systems. One of the most critical is the drive system, powered by a belt that transfers engine power to the wheels. A clear understanding of the drive belt diagram is invaluable for repairs, maintenance, and even gaining a deeper understanding of how your mower operates. This guide will walk you through the intricacies of the ZT1 drive belt diagram, empowering you to tackle common issues with confidence.
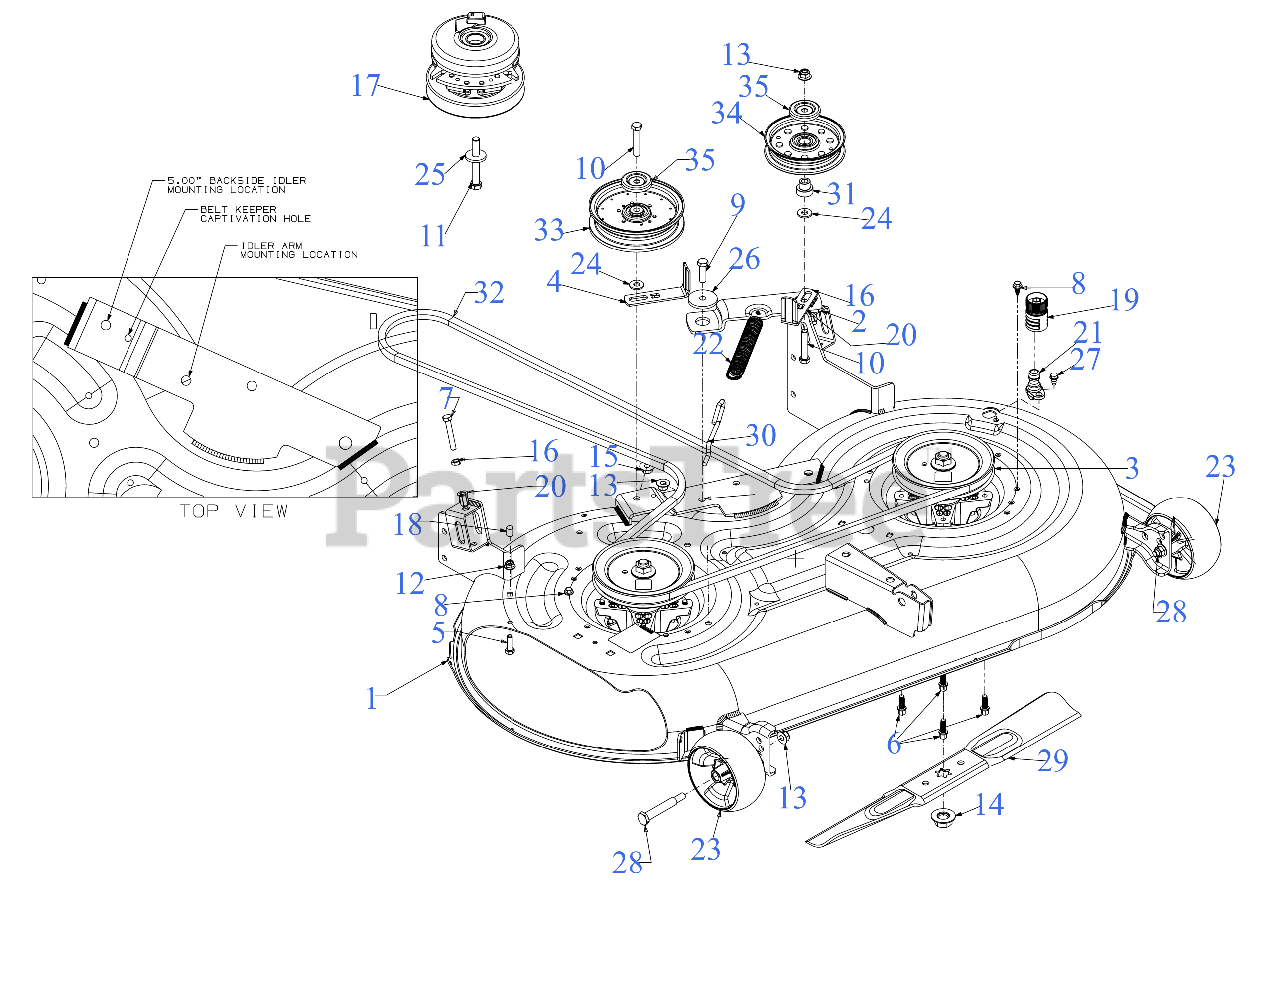
Purpose of the Drive Belt Diagram
The drive belt diagram serves as a roadmap for the Ultima ZT1's propulsion system. Its primary purposes include:
- Repair and Maintenance: When the drive belt breaks, slips, or shows signs of wear, the diagram helps you identify the correct replacement belt and ensures proper installation.
- Troubleshooting: By visualizing the belt's path and associated components (pulleys, idlers, tensioners), you can diagnose issues such as belt slippage, lack of drive power, or unusual noises.
- Parts Identification: The diagram assists in locating and ordering replacement parts by illustrating the relationship between the belt and other drive system components.
- Understanding Operation: Even if you're not actively repairing the mower, studying the diagram provides a clearer understanding of how the Ultima ZT1 translates engine power into movement.
Key Specs and Main Parts of the Ultima ZT1 Drive System
The Cub Cadet Ultima ZT1 drive system consists of several key components working in concert. Understanding these parts and their specifications is crucial for effective maintenance.
- Engine Pulley: This pulley is directly connected to the engine's crankshaft and is the starting point for power transmission. Its diameter and RPM directly impact the belt speed.
- Drive Belt: This is the main power transmission component. It's typically a reinforced rubber V-belt, designed to withstand high tension and friction. The belt length and cross-sectional profile (e.g., A-section, B-section) are critical specifications when sourcing a replacement.
- Idler Pulleys: These pulleys guide the belt along its path and maintain proper tension. They are usually mounted on bearings and can be fixed or spring-loaded.
- Tensioner Pulley: This pulley is specifically designed to maintain the correct tension on the drive belt. It's often spring-loaded or adjustable to compensate for belt stretch and wear. The tensioner is crucial for preventing slippage and ensuring optimal performance.
- Transmission Pulleys: These pulleys are connected to the individual hydrostatic transmissions (one for each wheel). They receive power from the drive belt and convert it into hydraulic pressure, which drives the wheels.
- Hydrostatic Transmissions: These are the heart of the zero-turn drive system. They use hydraulic fluid to transfer power and allow for independent speed and direction control of each wheel.
Specifications like belt length, width, and angle are critical when replacing the belt. Using the incorrect belt can lead to slippage, premature wear, and even damage to other components. Always refer to the Ultima ZT1 service manual or parts list for the correct specifications.
Understanding the Drive Belt Diagram Symbols
Drive belt diagrams use a standardized set of symbols to represent different components and their relationships. Here's a breakdown of common symbols:
- Solid Lines: Represent the drive belt itself. The thickness of the line may indicate the belt's cross-sectional size.
- Dashed Lines: Can indicate the belt path behind other components or a section of the belt that is less critical to observe in the diagram.
- Circles: Represent pulleys. A solid circle typically indicates a fixed pulley, while a circle with an arrow or other symbol inside may indicate an idler pulley or tensioner.
- Arrows: Show the direction of belt travel. This is important for ensuring proper installation and understanding how power is transmitted.
- Spring Symbols: Indicate the presence of a spring-loaded tensioner.
- Component Labels: Each component is usually labeled with a code or number that corresponds to the parts list in the service manual.
Colors, if present, may be used to differentiate between different belt sections or to highlight specific components. However, most diagrams are black and white, relying on line style and labels for clarity.
How the Drive System Works
The Ultima ZT1 drive system operates on a relatively simple principle: engine power is transferred to the wheels via a belt and hydrostatic transmissions.
- The engine's crankshaft rotates the engine pulley.
- The drive belt, wrapped around the engine pulley, is driven by its rotation.
- The belt travels around idler pulleys, which guide it along the optimal path and maintain contact with the transmission pulleys.
- The tensioner pulley ensures that the belt remains taut, preventing slippage.
- The belt turns the transmission pulleys, which are connected to the hydrostatic transmissions.
- The hydrostatic transmissions convert the rotational energy into hydraulic pressure, which drives the individual wheels.
- By controlling the hydraulic pressure to each wheel independently, the operator can steer the mower with precision, including executing zero-radius turns.
The hydrostatic transmissions are *critical* to the mower's maneuverability. They allow for independent speed and direction control of each wheel, enabling the zero-turn capability.
Real-World Use: Basic Troubleshooting Tips
Understanding the drive belt diagram can significantly aid in troubleshooting common issues. Here are a few examples:
- Belt Slippage: If the mower is losing power or struggling to climb hills, the belt may be slipping. Check the belt tensioner to ensure it's applying adequate force. Inspect the belt for wear, cracks, or glazing. If the belt is loose or damaged, replace it. Use the diagram to ensure the belt is routed correctly.
- Unusual Noises: Squealing or chirping noises can indicate a worn or misaligned belt, or a faulty pulley bearing. Use the diagram to identify each pulley and check for smooth rotation. Replace any pulleys with excessive play or noise.
- Lack of Drive Power: If one or both wheels aren't turning, the problem could lie in the hydrostatic transmission or the drive belt itself. Inspect the belt for breakage or disengagement. If the belt is intact, the problem is likely within the transmission and may require professional repair.
- Belt Wear: Regularly inspect your drive belt for signs of wear such as cracks, fraying, or glazing. Early detection and replacement can prevent a catastrophic failure.
Important Note: Before working on the drive system, always disengage the blades, turn off the engine, and remove the key. Allow the engine and exhaust system to cool down completely to avoid burns.
Safety Considerations
The drive system operates under high tension and involves rotating components. Exercise extreme caution when working on this system.
- Rotating Pulleys: Keep hands, clothing, and tools clear of rotating pulleys. Even a slow-moving pulley can cause serious injury.
- Belt Tension: The drive belt is under significant tension. Releasing the tensioner incorrectly can cause the belt to snap back with considerable force.
- Hot Components: The engine and exhaust system can become extremely hot during operation. Allow these components to cool down completely before working on the mower.
- Eye Protection: Wear safety glasses to protect your eyes from debris.
- Gloves: Wear work gloves to protect your hands from sharp edges and hot surfaces.
The hydrostatic transmissions contain high-pressure hydraulic fluid. If you suspect a leak, do not attempt to repair it yourself. Seek professional assistance. Hydraulic fluid injection injuries can be extremely serious.
We have the drive belt diagram file available for download. Having a readily accessible copy will make maintenance and repairs much easier.