
Dayco Serpentine Belt Routing Diagrams
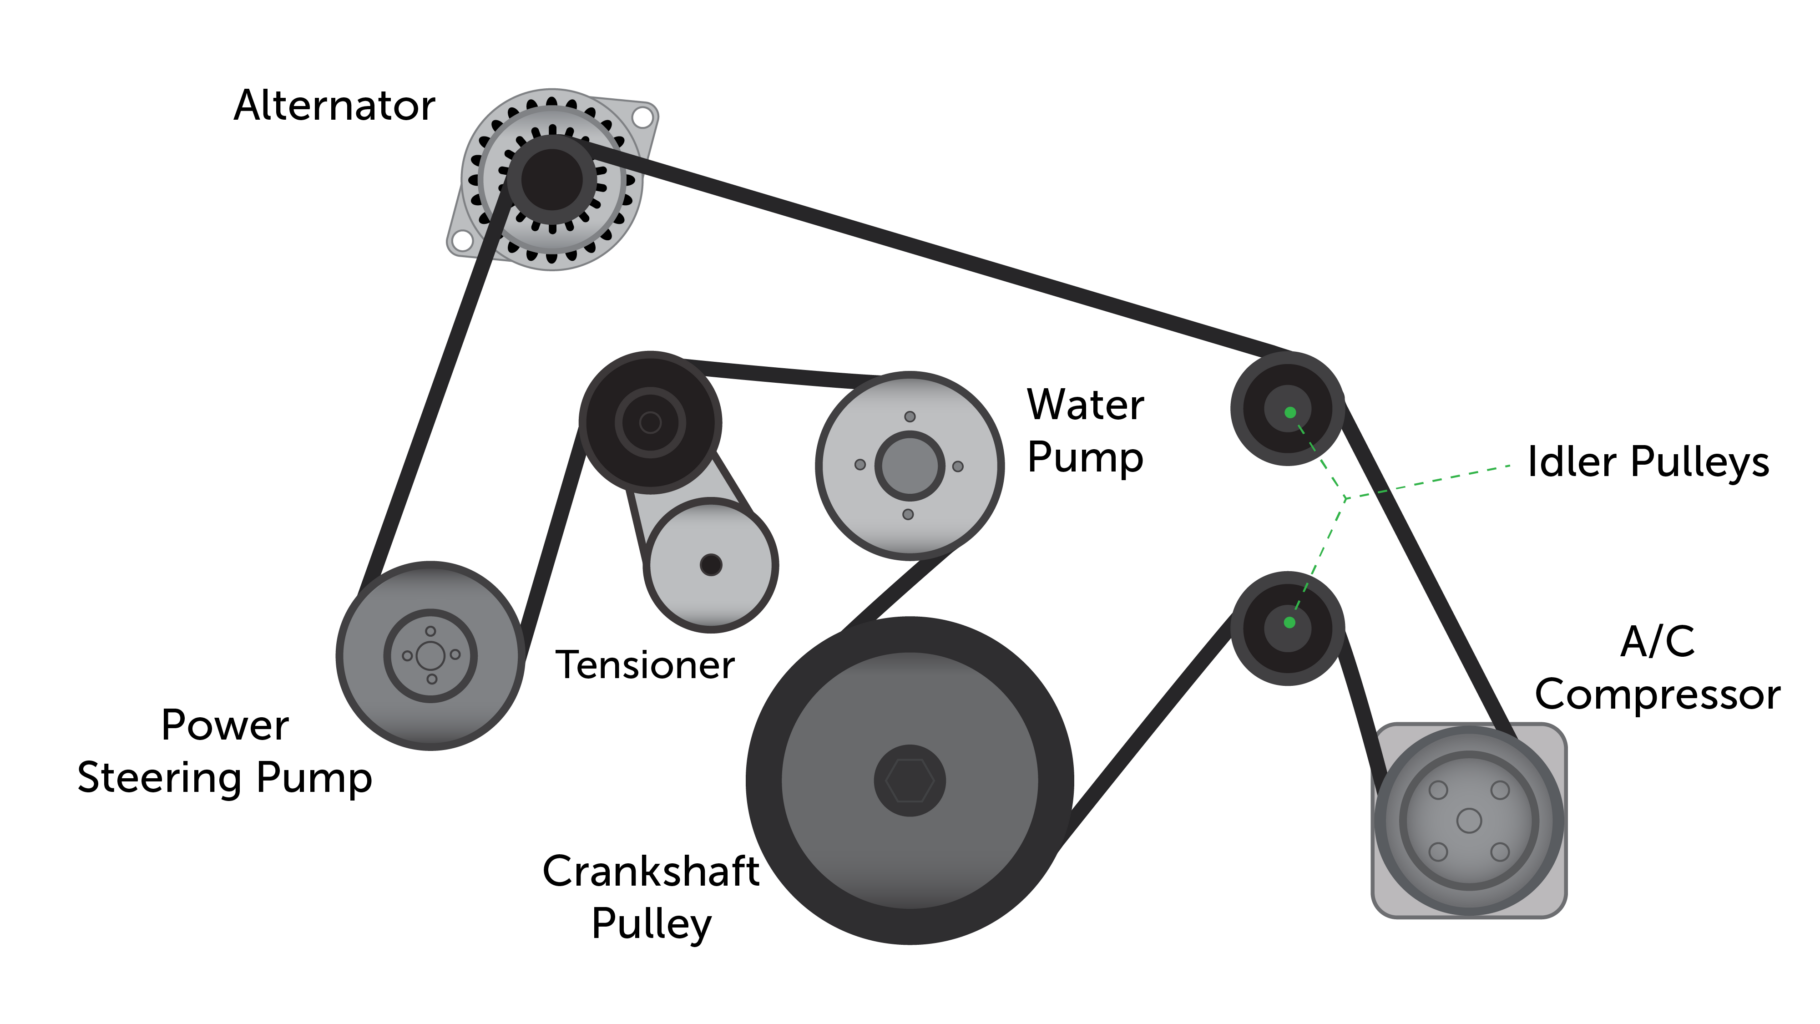
So, you're tackling a serpentine belt replacement or perhaps tracing down a mystery squeal under the hood? A Dayco Serpentine Belt Routing Diagram is about to become your best friend. This seemingly simple piece of paper (or increasingly, a digital file) is absolutely essential for correctly installing and maintaining your vehicle's serpentine belt. Trust me, getting this wrong can lead to serious headaches, from a dead battery to a seized engine. We've got the diagrams available for download, but first, let's dive into the nitty-gritty of how to read and use them effectively.
Purpose of a Serpentine Belt Routing Diagram
The primary purpose of a Dayco serpentine belt routing diagram, or any serpentine belt diagram for that matter, is to illustrate the precise path the serpentine belt must follow around the various engine accessories. It's not just a suggestion; it's the definitive guide to ensure each component (alternator, power steering pump, AC compressor, idler pulley, etc.) is driven at the correct speed and in the correct direction. Think of it like a roadmap for your belt. You need to know where to turn, when to accelerate, and where your destination is.
These diagrams are invaluable for several reasons:
- Repairs and Replacements: The most obvious use. When replacing a serpentine belt, the old one might be snapped or missing, leaving you with no visual reference. The diagram provides the definitive routing.
- Troubleshooting: A diagram can help you identify if the belt is installed incorrectly, which can be a major cause of squealing, slippage, and reduced performance of engine accessories.
- Learning and Understanding: Studying the diagram allows you to understand how the serpentine system works, how each component interacts, and the importance of proper belt tension.
- Engine Swaps and Modifications: If you're swapping engines or modifying the accessory drive system, you’ll need a diagram to ensure everything is correctly aligned and driven.
Key Specs and Main Parts
Before we dissect the diagram, let's define some key terms and components you'll encounter:
- Serpentine Belt: A single, continuous belt that drives multiple engine accessories. Unlike older V-belts, it's flat and ribbed to provide better grip.
- Crankshaft Pulley (Harmonic Balancer): The main pulley connected to the crankshaft, providing the rotational force to drive the belt. Often larger than other pulleys.
- Alternator Pulley: Drives the alternator, which charges the battery and powers the electrical system.
- Power Steering Pump Pulley: Drives the power steering pump, which provides hydraulic assistance for steering.
- AC Compressor Pulley: Drives the AC compressor, responsible for cooling the cabin. Typically has an electromagnetic clutch.
- Idler Pulley: A smooth pulley used to guide the belt and maintain proper tension. Doesn't drive any accessory.
- Tensioner Pulley: A spring-loaded pulley that automatically maintains the correct tension on the serpentine belt. Crucial for proper operation. A faulty tensioner can cause slippage and premature belt wear.
- Water Pump Pulley: Drives the water pump, which circulates coolant through the engine to prevent overheating. Note that some vehicles have the water pump driven by the timing belt instead of the serpentine belt.
Key Specifications:
- Belt Length: The total length of the serpentine belt, usually measured in inches or millimeters. Using the correct length is critical. Too short and you won't be able to install it. Too long and you won't be able to get the correct tension.
- Belt Width: The width of the belt, which must match the width of the grooves on the pulleys.
- Rib Count: The number of ribs on the belt, which must match the number of grooves on the pulleys.
- Belt Material: Most modern serpentine belts are made of EPDM (ethylene propylene diene monomer) rubber, known for its durability and resistance to heat and cracking.
Symbols: Decoding the Diagram
Dayco and other manufacturers use specific symbols and conventions to represent the serpentine belt routing. Understanding these symbols is crucial for interpreting the diagram correctly:
- Solid Lines: Represent the path of the outside of the serpentine belt.
- Dotted or Dashed Lines: Often indicate the inside of the belt, particularly when it wraps around a pulley from the back. This is important to visualize the belt's orientation.
- Arrows: Indicate the direction of rotation of each pulley. Pay close attention to these, as incorrect rotation can damage accessories. A reverse-rotating water pump, for example, will not pump coolant effectively.
- Pulleys: Circular shapes represent the pulleys. They are often labeled with abbreviations indicating the component they drive (e.g., ALT for Alternator, P/S for Power Steering).
- Tensioner: Usually depicted as a pulley with a spring or an arrow indicating the direction of tension. Some diagrams show the direction in which the tensioner needs to be rotated to release tension for belt installation.
- Idler Pulley: Depicted as a smooth pulley, usually with the abbreviation "IDL" or "IDLER".
Color coding is less common on serpentine belt diagrams, but if present, it might highlight specific sections of the belt path or differentiate between different engine configurations. Always refer to the legend of the diagram if color is used.
How It Works: Following the Path
The serpentine belt's job is to transfer rotational power from the crankshaft to the various engine accessories. The routing diagram dictates the most efficient and effective path for this power transfer.
Here's how it works:
- The crankshaft pulley initiates the motion. The belt wraps around this pulley, and its rotation drives the entire system.
- The belt then snakes its way around each accessory pulley (alternator, power steering pump, AC compressor, water pump - depending on the vehicle design).
- The tensioner pulley maintains constant tension on the belt, preventing slippage and ensuring all accessories are driven at the correct speed. Without proper tension, the belt will slip, causing reduced performance, noise, and premature wear.
- Idler pulleys guide the belt, preventing it from rubbing against other components and optimizing its path.
The diagram provides the crucial information needed to replicate this path correctly. By carefully following the lines and arrows, you can ensure the belt is routed correctly, and each accessory receives the necessary power.
Real-World Use: Troubleshooting Tips
Using a serpentine belt routing diagram can help you diagnose and fix common problems:
- Squealing Belt: If the belt is squealing, check the diagram to ensure it's routed correctly. Also, inspect the tensioner pulley for proper operation. A weak tensioner can cause slippage and noise. Look for cracks, glazing, or wear on the belt itself.
- Accessory Failure: If an accessory (e.g., alternator, power steering pump) isn't working correctly, verify that the belt is properly routed around its pulley. An incorrectly routed belt can cause the pulley to rotate in the wrong direction or at an incorrect speed.
- Belt Wear: Examine the belt for signs of wear, such as cracks, fraying, or missing ribs. Compare the belt's condition to the diagram to identify any potential alignment issues or rubbing points.
- New Belt Installation Issues: If you're having trouble installing a new belt, double-check the diagram to ensure you're following the correct routing. Make sure the belt is seated properly in all the pulley grooves before releasing the tensioner.
When diagnosing, remember to check the pulleys themselves for damage, such as bent flanges or worn bearings. A damaged pulley can cause belt wear and noise.
Safety: A Word of Caution
Working on the serpentine belt system involves potential hazards:
- Moving Parts: Never work on the serpentine belt system with the engine running. The rotating belt and pulleys can cause serious injury.
- Hot Components: The engine and its components can be extremely hot. Allow the engine to cool down completely before working on the serpentine belt system.
- Spring-Loaded Tensioner: The tensioner pulley is spring-loaded and can snap back forcefully when released. Use the correct tools and techniques to safely release the tension before removing the belt. Wear safety glasses.
- Battery Disconnect: Before starting any work on the electrical system (including the alternator), disconnect the negative battery cable to prevent electrical shock or damage.
Always use proper safety precautions and wear appropriate personal protective equipment (PPE) when working on your vehicle.
Armed with this knowledge and the right Dayco Serpentine Belt Routing Diagram (which we have available for download), you'll be well-equipped to tackle serpentine belt replacements and troubleshooting with confidence. Just remember to take your time, double-check your work, and prioritize safety!