Diagram Audi 3.0 Tdi Serpentine Belt
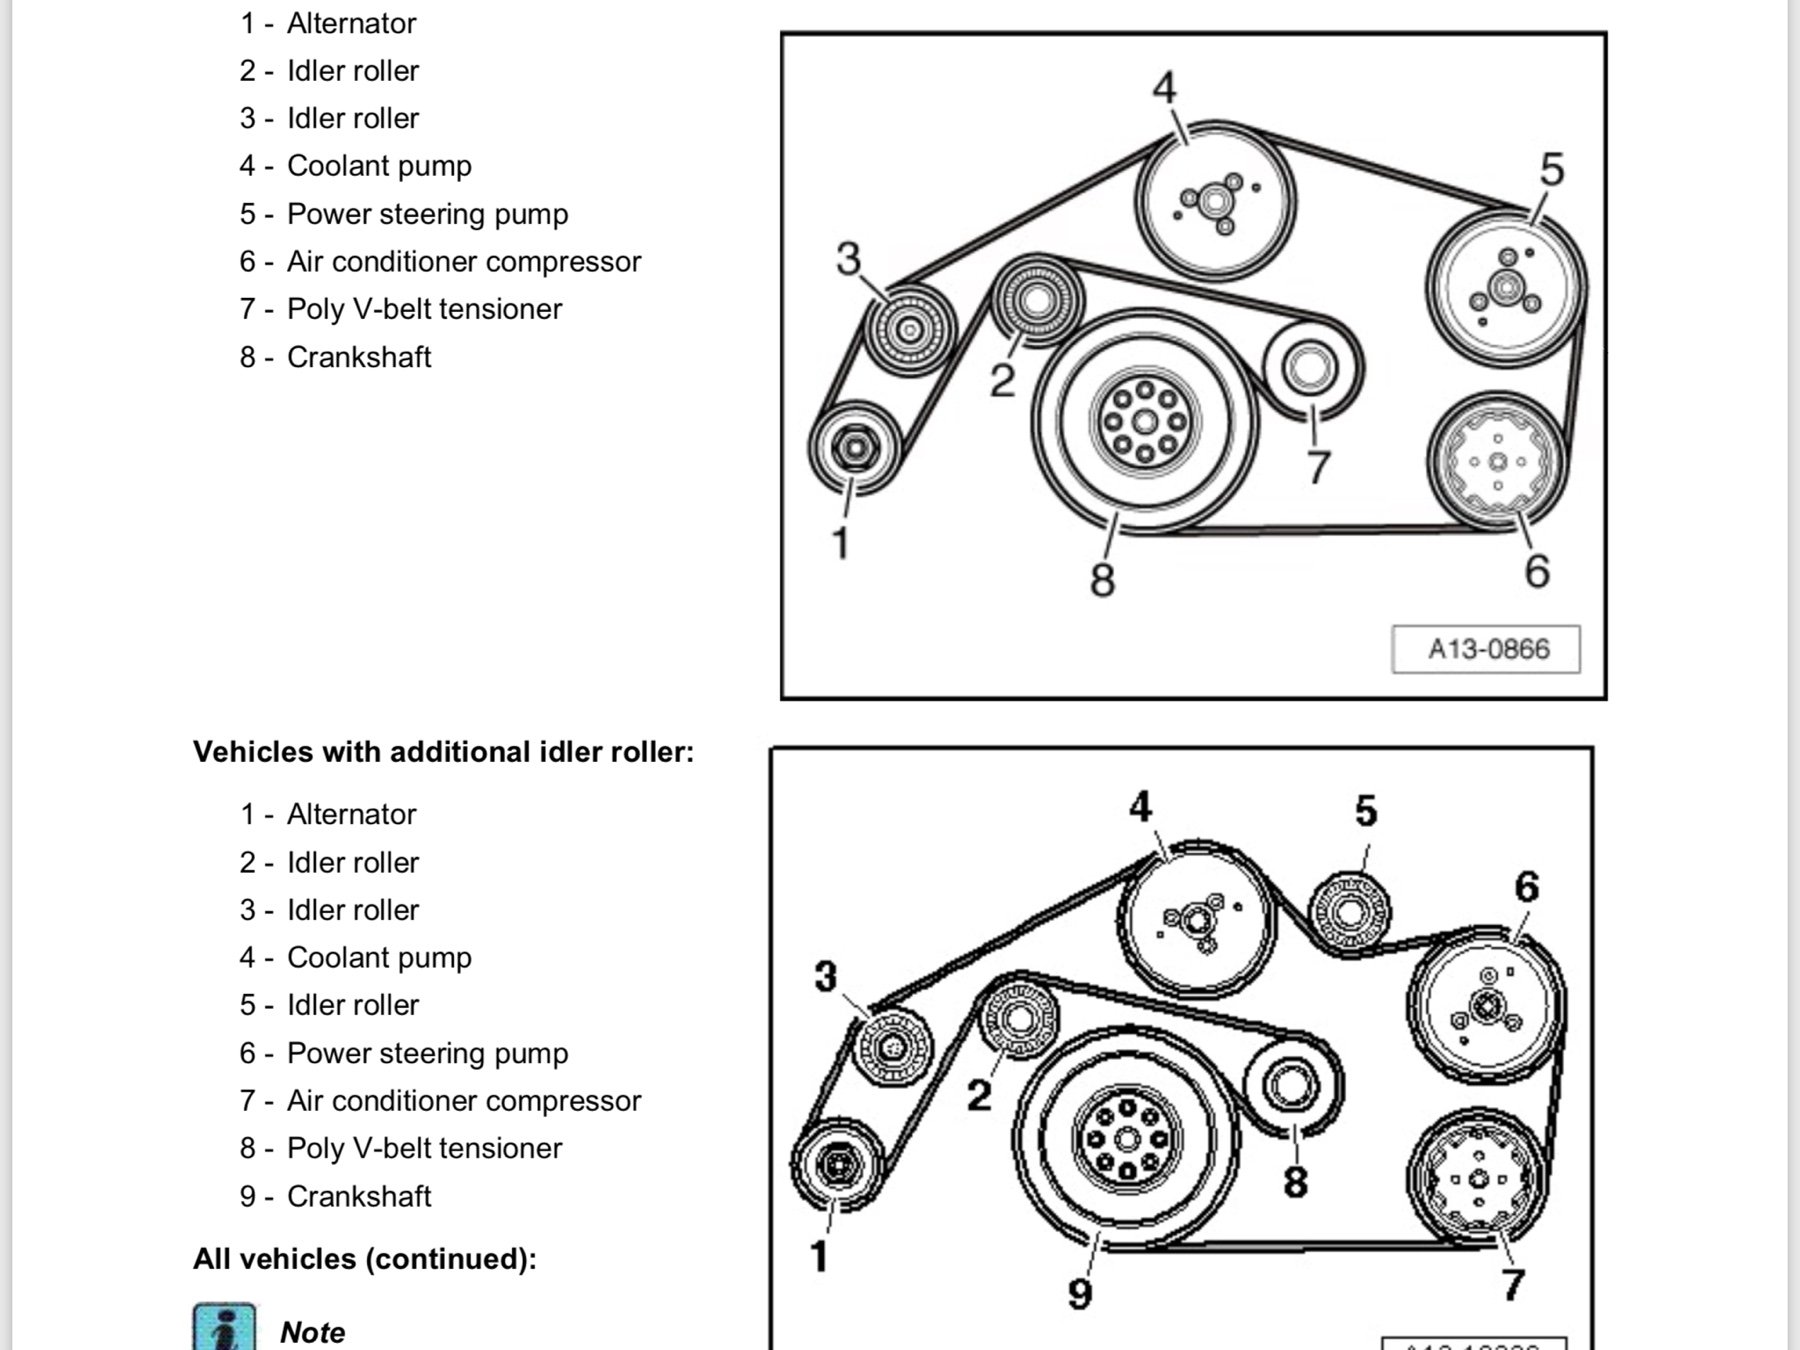
Alright, let's dive into the serpentine belt diagram for your Audi 3.0 TDI. Whether you're tackling some preventative maintenance, troubleshooting a squealing noise, or just wanting to understand the belt routing on your engine, this guide will break down the diagram and give you the knowledge to confidently approach the task. We'll keep the jargon reasonable and focus on practical understanding. And remember, we have the full diagram available for you to download – just look for the link at the end of this article.
Purpose of a Serpentine Belt Diagram
The serpentine belt diagram is your roadmap for replacing or inspecting the belt on your 3.0 TDI engine. Without it, you're essentially guessing at the correct routing, which can lead to serious problems. Incorrect routing can cause components to malfunction, excessive wear and tear on the belt, and even catastrophic engine damage. The diagram is essential for:
- Belt Replacement: Ensures you route the new belt correctly.
- Troubleshooting: Helps identify which component a failing belt is impacting.
- Preventative Maintenance: Allows you to visually inspect the belt's alignment and condition.
- Understanding Engine Layout: Familiarizes you with the location and function of various engine accessories.
Key Specs and Main Parts of the Serpentine Belt System
Before we delve into diagram specifics, let's quickly review the key components that make up the serpentine belt system on the 3.0 TDI:
- Serpentine Belt: A single, long belt that snakes around multiple engine accessories. Made typically of EPDM rubber, designed to withstand high temperatures and constant flexing.
- Crankshaft Pulley (Harmonic Balancer): This is the driving force behind the entire system. Connected directly to the crankshaft, it transfers rotational energy to the belt. It also acts as a vibration damper, reducing torsional vibrations in the crankshaft.
- Alternator Pulley: Driven by the belt, the alternator generates electrical power for the vehicle.
- Power Steering Pump Pulley: Powers the power steering system, assisting in steering effort.
- Air Conditioning Compressor Pulley: Engages and disengages to drive the A/C compressor, providing cooling for the cabin.
- Idler Pulleys: Smooth, non-driven pulleys used to guide the belt and maintain proper tension. They are crucial for ensuring the belt has the correct wrap angle around other pulleys and avoids rubbing against engine components.
- Tensioner Pulley: This is the most critical component. It applies constant tension to the belt, preventing slippage and ensuring proper operation of all driven accessories. Tensioners can be manual (adjusted with a bolt) or automatic (spring-loaded). The 3.0 TDI typically uses an automatic tensioner.
Understanding Diagram Symbols
Serpentine belt diagrams aren't always the most intuitive at first glance. Here's a breakdown of common symbols and what they represent:
- Solid Lines: Represent the path of the serpentine belt. Pay close attention to how the line weaves around each pulley.
- Dashed Lines: Often indicate the rear (hidden) portion of the belt as it passes behind a pulley or engine component.
- Arrows: Show the direction of belt rotation around each pulley. This is vital for correct routing.
- Circles: Represent pulleys. The diagrams typically label each pulley (e.g., "ALT" for alternator, "P/S" for power steering).
- Icons: May be used to represent specific components. For example, a radiator symbol might indicate the location of the water pump (if driven by the serpentine belt). While less common on serpentine belt diagrams, they provide additional context.
- Color Coding (Less Common): Some diagrams may use color coding to differentiate belt segments or highlight specific components. However, most diagrams rely on line styles and labels.
How the Serpentine Belt System Works
The serpentine belt system is a relatively simple but crucial system. The crankshaft pulley, driven by the engine, provides the power to turn the serpentine belt. This belt then wraps around and drives all the various accessory pulleys. The tensioner maintains the correct amount of tension on the belt, ensuring that it doesn't slip. Think of it as a precisely choreographed dance. If any of the pulleys are not turning at the correct speed or if the belt tension is too low, then the accessories won't function properly.
The automatic tensioner is critical because the belt stretches over time. Without the tensioner, the belt would become loose, and the accessories it drives would not work correctly. Automatic tensioners use a spring-loaded arm to maintain constant tension on the belt, compensating for wear and stretching.
Real-World Use: Basic Troubleshooting Tips
Here's how you can use the serpentine belt diagram to troubleshoot common issues:
- Squealing Noise: Often indicates a slipping belt. Check the belt tension, condition of the belt (cracks, fraying), and alignment of the pulleys. Use the diagram to ensure the belt is routed correctly and that the tensioner is functioning properly.
- Accessory Failure: If a specific accessory (e.g., alternator, power steering) is not working, check the belt's path to that accessory. Is the belt properly engaged with the pulley? Is the pulley itself damaged? A loose belt may cause the accessory pulley to spin intermittently or not at all.
- Visual Inspection: Regularly inspect the belt for signs of wear, such as cracks, fraying, or missing chunks. Use the diagram to ensure the belt is seated correctly in all the pulley grooves. Check the tensioner for proper operation – it should move freely but with significant resistance.
- Belt Jumping Off: If the belt repeatedly jumps off the pulleys, suspect a misaligned pulley, a worn tensioner, or a damaged belt. Use a straight edge to check the alignment of the pulleys. The diagram will help you identify the correct position of each pulley.
Safety Considerations
Working on the serpentine belt system involves working in close proximity to the engine, which can be dangerous if you aren't careful.
- Hot Engine: Never work on the serpentine belt system when the engine is hot. Allow the engine to cool completely before starting any work.
- Moving Parts: Never start the engine with the serpentine belt removed or while working on the system. Accidental contact with the spinning crankshaft pulley can cause serious injury.
- Battery Disconnect: Disconnect the negative terminal of the battery before working on the system, especially if you are near the alternator. This will prevent accidental electrical shocks.
- Tools: Use the correct tools for the job. For example, a specific serpentine belt tool is often required to relieve tension on the tensioner for belt removal and installation.
- Eye Protection: Always wear safety glasses when working on the engine. Debris can easily fly into your eyes.
Specifically, the crankshaft pulley (harmonic balancer) poses a significant risk. It's a heavy rotating mass, and any contact while the engine is running can be catastrophic. Treat it with respect and maintain a safe distance.
Understanding your Audi 3.0 TDI's serpentine belt diagram is a crucial step in maintaining your vehicle and performing repairs safely and effectively. Remember to take your time, double-check your work, and prioritize safety above all else.
You can download the full serpentine belt diagram for the Audi 3.0 TDI here.