
Diagram Car Audio Dual Battery Setup
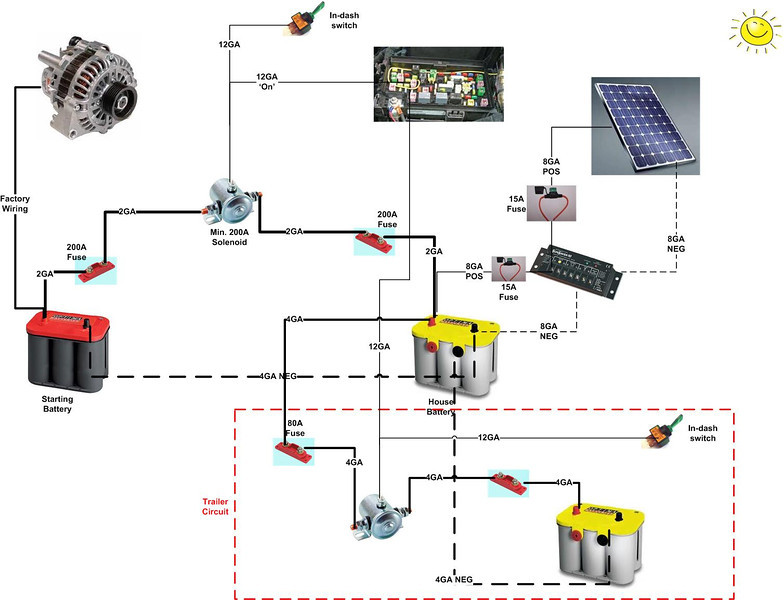
So, you're thinking about installing a dual battery system for your car audio? That's a smart move if you're serious about your sound and want to avoid draining your starting battery while bumping tunes. This article dives deep into understanding a typical dual battery setup diagram, giving you the knowledge to confidently tackle installations, troubleshoot existing systems, or simply understand how it all works. We've got a detailed diagram file available for download too; more on that later.
Purpose: Why Understand the Diagram?
Let's be clear: a well-documented diagram is the backbone of any successful dual battery installation or repair. Whether you're:
- Upgrading your system: Planning the optimal placement and wiring configuration for your new batteries, isolator, and accessories.
- Troubleshooting issues: Identifying faulty components or wiring problems that cause voltage drops, charging issues, or parasitic drain.
- Performing maintenance: Ensuring proper connections and preventing corrosion that can lead to system failure.
- Simply learning: Gaining a deeper understanding of automotive electrical systems and how a dual battery setup integrates with your car.
Understanding the diagram provides a clear roadmap, minimizing errors and potential damage to your vehicle's electrical system. It also enables you to communicate effectively with professionals if you need assistance.
Key Specs and Main Parts
Before we dissect the diagram, let's quickly review the core components of a dual battery system:
- Starting Battery: Your car's primary battery, responsible for starting the engine and powering essential vehicle systems.
- Auxiliary Battery (Deep Cycle): The powerhouse dedicated to running your car audio system and other accessories without draining the starting battery. Deep cycle batteries are designed for repeated discharging and recharging cycles, unlike starting batteries which are designed to deliver a short burst of high current.
- Battery Isolator (Automatic Charging Relay - ACR or Solenoid): The heart of the system. This device isolates the starting and auxiliary batteries, allowing them to charge independently but connects them in parallel when the engine is running. ACRs are preferred as they are automatic and voltage sensitive, turning on and off depending on the voltage of the primary battery.
- Fuses: Critical safety devices that protect wiring and components from overcurrent. Properly sized fuses are absolutely essential.
- Wiring (Cables and Connectors): High-quality, appropriately sized cables are crucial for delivering power efficiently and safely. Wire gauge (AWG) is a critical specification – larger gauge numbers indicate thinner wires, and you need thicker wires for higher current loads.
- Grounding Points: Solid, clean grounding points are essential for a stable and reliable electrical system. A poor ground can lead to voltage drops, noise, and even damage to components.
Key Specifications:
- Voltage (V): Typically 12V in automotive applications.
- Ampere-Hour (Ah): A measure of a battery's capacity – how much current it can deliver over a specific period. Choose an auxiliary battery with sufficient Ah capacity for your audio system's power requirements.
- Cold Cranking Amps (CCA): Primarily relevant for the starting battery, indicating its ability to deliver a high current at cold temperatures.
- Wire Gauge (AWG): The thickness of the wires. Important for carrying the required current without excessive voltage drop or overheating.
- Fuse Rating (Amps): The maximum current a fuse can handle before blowing. Should be slightly higher than the expected current draw of the connected components.
Symbols: Decoding the Diagram
Understanding the symbols used in the diagram is crucial for accurate interpretation. Here's a breakdown of common symbols:
- Straight Lines: Represent wires or cables. Thicker lines often indicate larger gauge wires for higher current capacity.
- Dashed Lines: May indicate connections on the underside or within a component, or sometimes shielded wires.
- Battery Symbol: A series of alternating long and short lines. The longer line represents the positive (+) terminal, and the shorter line represents the negative (-) terminal.
- Ground Symbol: Typically a series of horizontal lines decreasing in length or a symbol resembling a downward-pointing tree. Indicates a connection to the vehicle's chassis, which serves as the common ground.
- Fuse Symbol: A zigzag line enclosed in a rectangle or a simple rectangle with a line through it.
- Battery Isolator Symbol: Varies depending on the type, but often includes a relay symbol or a rectangle with input and output terminals.
- Switch Symbol: Indicates a manual on/off switch.
- Voltmeter/Ammeter Symbol: A circle with a "V" (voltmeter) or "A" (ammeter) inside.
- Colors: Typically, red represents positive (+) connections, and black represents negative (-) connections or ground. Other colors may be used to distinguish different circuits.
The diagram will also include labels indicating the components and their connections. Pay close attention to these labels to ensure correct wiring.
How It Works
The fundamental principle of a dual battery system is to isolate the auxiliary battery from the starting battery, preventing the audio system from draining the starting battery and leaving you stranded. Here's a simplified explanation of how it works:
- Engine Off: The battery isolator is open, disconnecting the auxiliary battery from the starting battery. Your audio system draws power solely from the auxiliary battery.
- Engine Running: The alternator charges the starting battery first. Once the starting battery reaches a certain voltage (typically around 13.2-13.8V), the battery isolator closes, connecting the auxiliary battery in parallel with the starting battery. Both batteries are now charged by the alternator.
- Charging Process: The alternator provides power to both batteries simultaneously. ACRs often have advanced charging algorithms to optimize charging for different battery types.
This setup ensures that your starting battery remains fully charged to start the engine, while the auxiliary battery powers your audio system without risk of draining the starting battery.
Real-World Use: Basic Troubleshooting Tips
Here are a few common problems and troubleshooting tips related to dual battery systems:
- Auxiliary Battery Not Charging:
- Check the battery isolator: Ensure it's functioning correctly. Use a multimeter to check for voltage across the isolator when the engine is running.
- Check fuses: Blown fuses are a common cause of charging problems.
- Check wiring: Inspect for loose connections, corrosion, or damaged cables.
- Check ground: Ensure a solid ground connection for the auxiliary battery.
- Starting Battery Draining:
- Check the battery isolator: It may be faulty and allowing the auxiliary battery to draw power from the starting battery when the engine is off.
- Check for parasitic drain: Use an ammeter to measure the current draw on the starting battery when the engine is off. Identify and eliminate any excessive current draw.
- Voltage Drops:
- Check wire gauge: Ensure the wires are adequately sized for the current load.
- Check connections: Loose or corroded connections can cause voltage drops. Clean and tighten all connections.
Remember to always disconnect the negative terminal of both batteries before working on the electrical system.
Safety: Highlight Risky Components
Working with automotive electrical systems can be dangerous. Here are some critical safety considerations:
- Batteries: Batteries contain corrosive acid and can produce explosive gases. Wear safety glasses and gloves when handling batteries. Never smoke or work near open flames.
- High Current: The car's electrical system can deliver high currents that can cause severe burns or electric shock. Always disconnect the negative terminal of both batteries before working on the system.
- Fuses: Never replace a fuse with a higher amperage rating. This can overload the wiring and cause a fire.
- Wiring: Use appropriately sized, high-quality wiring and connectors. Improper wiring can lead to overheating, short circuits, and fires.
If you are not comfortable working with automotive electrical systems, it is best to seek professional assistance.
You now have a solid understanding of diagramming car audio dual battery setups, from the purpose of understanding the diagram, down to the safety considerations. Remember to always plan, take precautions, and double-check your work for safety and reliability.
Ready to put this knowledge into practice? As promised, we have a detailed dual battery system diagram available for you to download. It illustrates a typical setup and provides a visual aid for your installations and troubleshooting. Use it as a reference, but always adapt it to your specific vehicle and equipment. Happy wiring!