Diagram John Deere Starter Solenoid Wiring
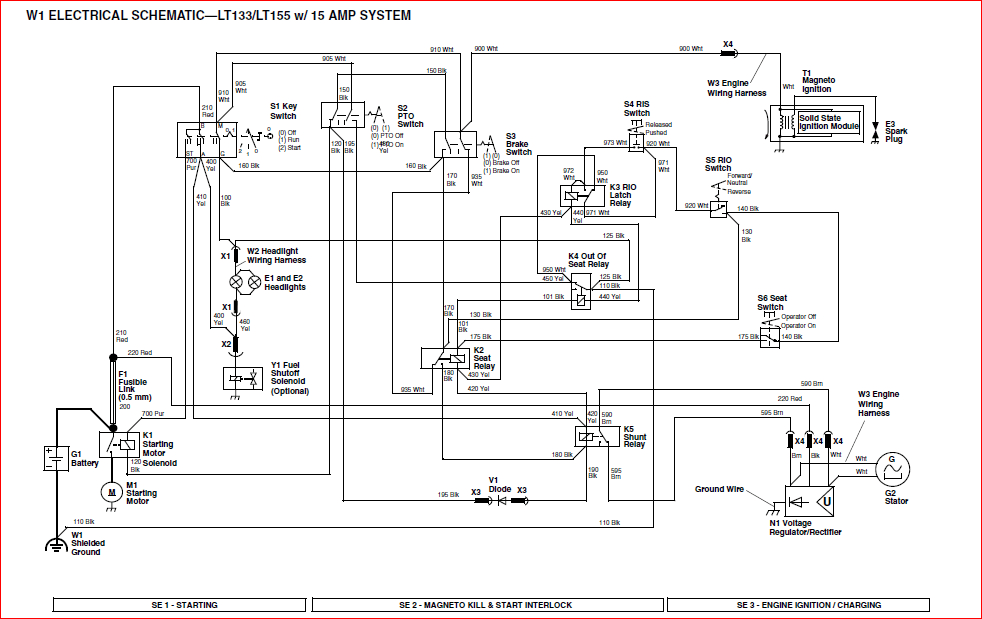
Understanding the wiring of a John Deere starter solenoid is crucial for anyone looking to maintain, repair, or even modify their equipment. A clear diagram isn't just a visual aid; it's your roadmap to diagnosing electrical problems, ensuring correct component replacement, and potentially saving significant time and money on professional repairs. Whether you're dealing with a no-start issue, upgrading your electrical system, or simply expanding your knowledge of agricultural machinery, this guide will walk you through the intricacies of a typical John Deere starter solenoid wiring diagram.
Key Specs and Main Parts
Before diving into the diagram itself, let's identify the key components involved. A starter solenoid, also known as a starter relay, is an electromagnetic switch responsible for engaging the starter motor. It receives a small electrical signal from the ignition switch and uses it to energize a larger circuit, providing the high current required to crank the engine. Here's a breakdown of the main parts:
- Solenoid Body: The physical housing of the solenoid, typically made of metal or durable plastic. It contains the internal coil and contacts.
- Coil: A winding of wire that, when energized, creates a magnetic field. This magnetic field pulls a plunger, closing the high-current contacts.
- Plunger: A movable component within the solenoid. It's drawn inwards by the magnetic field when the coil is energized.
- Contacts: Heavy-duty electrical contacts that connect the battery directly to the starter motor when the solenoid is activated. These are designed to handle high amperage.
- Small Terminal (S Terminal): The terminal that receives the signal from the ignition switch (or starter button). This is sometimes labeled "S" or "Start."
- Battery Terminal (B Terminal): The terminal connected directly to the positive (+) terminal of the battery. It usually has a large-gauge cable attached.
- Starter Motor Terminal: The terminal connected to the starter motor. When the solenoid is activated, it allows current to flow from the battery to the starter motor, causing it to spin.
- Ground Connection (Optional): Some solenoids have a separate ground terminal. Others ground through their mounting.
Typical voltage specifications are 12V or 24V DC, depending on the John Deere model. Wire gauge is also critical; the battery and starter motor cables require thick gauge wire (e.g., 4 AWG or larger) to handle the high current draw. The S terminal wire can be of a much smaller gauge (e.g., 16 AWG or 18 AWG) because it only carries a small control current.
Understanding the Symbols
A wiring diagram utilizes a standardized set of symbols to represent electrical components and connections. Understanding these symbols is vital for interpreting the diagram correctly.
- Solid Lines: Represent wires. Thicker lines typically indicate larger gauge wires carrying higher current.
- Dashed Lines: Can indicate wires hidden behind other components or, less commonly, control lines for diagnostic equipment.
- Color Coding: Wire colors are usually indicated either directly on the lines or in a legend. Common colors include:
- Red: Typically indicates power wires (connected to the battery positive terminal).
- Black: Typically indicates ground wires (connected to the chassis or battery negative terminal).
- Yellow, Green, Blue, White: Often used for signal or control wires.
- Circles or Dots: Indicate wire junctions or splices.
- Rectangles: Usually represent components like relays, switches, or control modules. Within the rectangle, there might be a symbol that indicates the device it represent (e.g., for relay you would see a coil and contacts inside the rectangle).
- Solenoid Symbol: The solenoid is generally represented by a coil symbol and switch symbol inside a circle or rectangle. The coil represents the energizing coil and the switch represents the heavy duty contacts.
- Ground Symbol: Looks like an inverted triangle or a series of descending parallel lines.
It's crucial to refer to the diagram's legend or key, if available, to ensure you correctly interpret any specific symbols or color codes used in that particular diagram.
How It Works
The starter solenoid's operation is relatively straightforward. When the ignition switch is turned to the "start" position:
- A low-current signal is sent from the ignition switch to the S terminal of the solenoid.
- This signal energizes the solenoid coil, creating a strong magnetic field.
- The magnetic field pulls the plunger inwards.
- The plunger mechanically closes the heavy-duty contacts within the solenoid.
- Closing these contacts completes a high-current circuit between the battery terminal (B terminal) and the starter motor terminal.
- The large current flowing through this circuit energizes the starter motor, causing it to spin and engage the engine's flywheel, initiating the starting process.
- Once the engine starts and the ignition switch is released, the signal to the S terminal is removed, de-energizing the coil, opening the contacts, and stopping the starter motor.
The solenoid acts as a heavy-duty relay, allowing a small current from the ignition switch to control a large current to the starter motor. This protects the ignition switch from the high amperage demands of the starter and also allows for better placement of the starter motor in the engine compartment.
Real-World Use – Basic Troubleshooting Tips
A starter solenoid wiring diagram is invaluable for troubleshooting starting problems. Here are a few common issues and how to approach them using the diagram:
- Engine Won't Crank (Clicking Sound): This often indicates a weak battery, poor connections, or a failing solenoid. Check the battery voltage and the connections at the battery, solenoid, and starter motor. A multimeter can be used to check for voltage drop across connections and within the solenoid itself. Use the wiring diagram to identify the correct terminals for testing.
- Engine Won't Crank (No Sound): This could be a problem with the ignition switch, the wiring to the S terminal, or a completely dead solenoid. Use the wiring diagram to trace the voltage from the ignition switch to the S terminal while the key is in the start position. If there's no voltage, the problem lies upstream (ignition switch or wiring). If there is voltage, the solenoid is likely the culprit.
- Starter Motor Stays Engaged: This is a serious issue that can damage the starter and flywheel. It often indicates a stuck solenoid. Immediately disconnect the battery to prevent further damage. Replacement of the solenoid is usually necessary. Refer to the diagram to ensure correct re-wiring.
- Slow Cranking: Can be from a weak battery, corroded connections, or a worn starter motor. Use the diagram to verify the wiring path and test the voltage at the starter while cranking. Low voltage indicates a problem in the wiring or the battery's ability to deliver current.
Before any troubleshooting, always visually inspect all wiring for damage, corrosion, or loose connections. A clean and secure connection is essential for proper operation.
Safety Considerations
Working with electrical systems, especially those involving high current, can be dangerous. Always follow these safety precautions:
- Disconnect the Battery: Before working on any part of the electrical system, disconnect the negative (-) battery cable. This prevents accidental short circuits and potential electrocution.
- Use Insulated Tools: Use tools with insulated handles to minimize the risk of electric shock.
- Be Aware of High Current: The starter circuit carries very high current. Even a brief short circuit can generate a lot of heat and potentially start a fire.
- Fuel Lines: Be aware of proximity to fuel lines. Sparks can ignite fuel.
- Avoid Working Alone: It's always safer to have someone else nearby in case of an emergency.
The battery and starter motor cables are particularly risky components due to the high current they carry. Handle these cables with care and ensure they are properly insulated and securely connected.
With a clear understanding of the John Deere starter solenoid wiring diagram and proper safety precautions, you can confidently diagnose and resolve many starting problems. Remember to always consult the specific diagram for your model of John Deere equipment, as wiring configurations can vary.
We have a detailed starter solenoid wiring diagram file ready for you. It includes color-coded wires and clear labels for each terminal. This resource will further assist you in your diagnostic and repair endeavors.