
Diagram Nissan 2.4 Timing Chain Marks
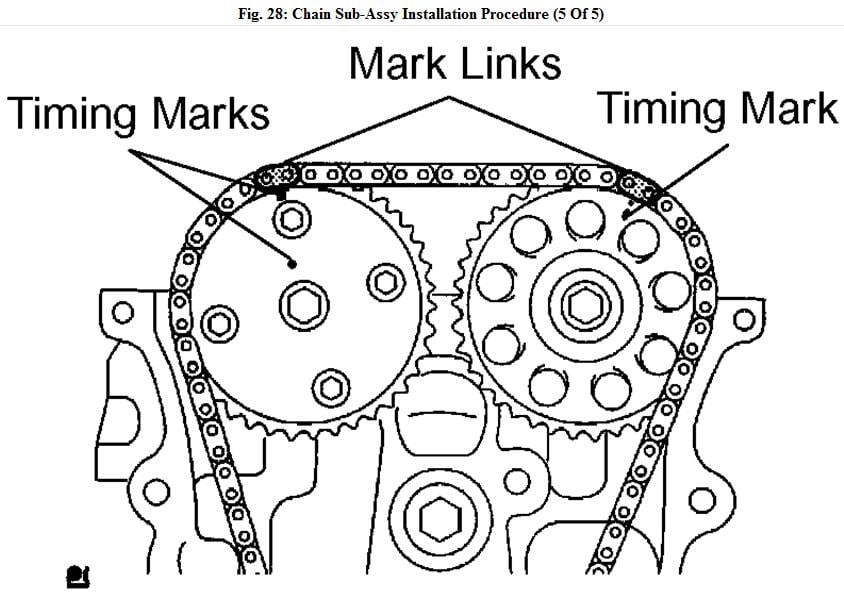
Let's talk about timing chains on the Nissan 2.4 engine, specifically focusing on understanding and interpreting the timing chain marks. This is crucial knowledge whether you're replacing a worn chain, performing head work, or just wanting a deeper understanding of your engine's internals. This guide will break down the timing chain diagram, explaining its purpose, components, and practical application.
Purpose of the Timing Chain Diagram
The timing chain diagram serves as a critical visual reference for ensuring proper engine timing. Incorrect timing can lead to a variety of problems, ranging from poor performance and fuel economy to severe engine damage like bent valves or piston damage. The diagram illustrates the correct alignment of the crankshaft sprocket, camshaft sprockets (intake and exhaust), and any intermediate sprockets or guides. In essence, it tells you how to put the engine back together correctly after disassembly or when installing a new timing chain.
Understanding the timing marks allows you to:
- Verify existing timing: Check if the timing is correct before performing other maintenance.
- Install a new timing chain correctly: Ensures proper synchronization of engine components.
- Diagnose timing-related issues: Helps identify if the timing chain has stretched or jumped a tooth.
- Perform head work safely: Allows you to correctly reassemble the engine after head removal and installation.
Key Specs and Main Parts
Before diving into the diagram, let's identify the key components involved in the timing chain system of a typical Nissan 2.4 engine (like those found in some Altima and Frontier models – but always verify the specific diagram applies to your exact engine):
- Crankshaft Sprocket: The gear attached to the crankshaft, driven directly by the engine's rotation. It initiates the timing chain's movement.
- Camshaft Sprockets (Intake & Exhaust): Gears attached to the camshafts. The timing chain drives these, controlling the opening and closing of the intake and exhaust valves. Many 2.4s have dual overhead cams (DOHC), hence the two sprockets.
- Timing Chain: The chain itself, connecting the crankshaft and camshaft sprockets, ensuring synchronized rotation. It's typically a roller chain for durability.
- Tensioner: A device (usually hydraulically or mechanically operated) that maintains proper tension on the timing chain, preventing slack and vibration.
- Guides/Sliders: Plastic or metal components that guide the timing chain along its path, preventing it from rubbing against other engine parts and reducing noise.
- Timing Marks: The most important part for our discussion! These are typically indentations, painted links on the chain, or raised marks on the sprockets used for alignment.
Key specifications you might encounter when working on the timing chain include:
- Timing Chain Length: While you likely won't measure this directly, a significantly stretched chain indicates wear and the need for replacement.
- Tensioner Extension: Measuring the amount of extension on the tensioner can give you an indication of timing chain wear. Excessive extension means the chain has stretched.
- Torque Specifications: Critical for tightening the bolts that hold the sprockets and tensioner in place. Always use a torque wrench and consult your service manual for the correct values.
Symbols and Conventions in the Diagram
Nissan timing chain diagrams usually employ a standardized set of symbols and conventions:
- Solid Lines: Typically represent the timing chain itself. Thicker lines might indicate the visible portion of the chain in the diagram's view.
- Dotted Lines: Often used to represent the hidden parts of the timing chain or components behind other parts.
- Circles or Arcs: Represent the sprockets. They'll be labeled indicating which sprocket they are (e.g., "Crank Sprocket," "Intake Cam Sprocket").
- Triangles or Arrows: These typically point to the timing marks on the sprockets. The apex of the triangle or the tip of the arrow indicates the precise location of the mark.
- Colored Links on Chain: Sometimes, the timing chain will have specific colored links (e.g., gold, silver) that must align with the timing marks on the sprockets. The diagram will explicitly show the color sequence and their alignment.
- Numbers: May be used to indicate a specific step in the procedure, or to reference notes elsewhere in the diagram or repair manual.
- Abbreviations: Expect abbreviations like "CRK" for crankshaft, "CAM" for camshaft, "EX" for exhaust, and "IN" for intake.
Understanding these symbols is crucial for accurately interpreting the diagram and ensuring correct engine timing.
How It Works: The Timing Chain Principle
The fundamental principle is simple: the timing chain synchronizes the rotation of the crankshaft and camshaft(s). The crankshaft's rotation dictates the piston movement, while the camshaft's rotation controls the opening and closing of the valves. The timing chain ensures these events happen in perfect harmony. The camshaft opens and closes the valves at precise moments relative to the piston's position (top dead center or TDC, bottom dead center or BDC) within the cylinder.
The timing marks are there to help you achieve this synchronization during reassembly. The diagram shows the correct orientation of the sprockets relative to each other when the engine is at a specific point (usually TDC on cylinder #1). When the timing marks on the crankshaft and camshaft sprockets are aligned according to the diagram, the valves will open and close at the correct times during the engine's four-stroke cycle (intake, compression, power, exhaust).
A common mistake is aligning the timing marks without ensuring the engine is at the correct initial position (TDC on cylinder #1). Consult your service manual for the correct procedure to find TDC.
Real-World Use and Basic Troubleshooting
Here are some practical scenarios and troubleshooting tips:
- Timing Chain Replacement: Use the diagram to correctly align the sprockets during installation. Always replace the tensioner and guides when replacing the timing chain, as these components wear together.
- Engine Misfire or Poor Performance: If you suspect a timing issue, use the diagram to visually inspect the timing marks. If the marks are misaligned, the timing chain may have jumped a tooth, indicating a worn chain or tensioner.
- Engine Noise: A rattling or whirring noise from the timing chain area could indicate a worn chain, tensioner, or guides. While you can't diagnose this solely with the diagram, it helps you understand where to look for potential problems.
- Verifying TDC: Ensure you're actually at TDC before aligning the timing marks. Use a piston stop tool or carefully observe the piston movement through the spark plug hole.
Troubleshooting Tip: If the colored links on your new timing chain don't *perfectly* align with the marks on the sprockets, double-check that you've counted the links correctly and that the engine is indeed at TDC. A slight misalignment can cause significant performance issues.
Safety Precautions
Working on the timing chain system involves potential hazards. Always disconnect the negative battery cable before starting any work. Here are specific risks to be aware of:
- Valve Train Components: Be extremely careful when rotating the engine with the timing chain removed. You could cause valve-to-piston contact, resulting in bent valves and further engine damage.
- Tensioner Release: Some tensioners are spring-loaded and can release with considerable force. Follow the manufacturer's instructions carefully when compressing or releasing the tensioner to avoid injury.
- Sharp Edges: The timing chain and sprockets can have sharp edges. Wear gloves to protect your hands.
- Cleanliness: Keep the work area clean to prevent debris from entering the engine. This is especially critical for the timing chain system, as dirt can accelerate wear.
- Torque Specifications: Always use a torque wrench and tighten bolts to the correct specifications. Over-tightening can damage the threads, while under-tightening can lead to component failure.
Also, It is critical to consult your specific vehicle's repair manual for torque specifications. Using incorrect torque values could lead to serious problems.
Remember, this guide is a general overview. The specific timing chain diagram and procedure will vary depending on the exact year and model of your Nissan 2.4 engine. The above example describes the generic Nissan 2.4. Always refer to your specific service manual for the most accurate information.
Now that you understand timing marks, you're better prepared to tackle timing chain issues on your Nissan 2.4 engine. You can now download a sample diagram. Good luck!