Diagram Of Cooling System For Engine
Understanding your engine's cooling system is crucial for its longevity and performance. This article will guide you through a detailed diagram, explaining its components, functions, and how to troubleshoot common issues. Whether you're planning a repair, modification, or simply want to deepen your automotive knowledge, this guide will provide you with the necessary information. And remember, we have the complete, high-resolution diagram file available for you to download – details at the end of this article.
Purpose: Why Understand the Cooling System Diagram?
A cooling system diagram is more than just a picture; it's a roadmap to maintaining and understanding one of the most vital systems in your vehicle. Having a solid grasp of this diagram allows you to:
- Diagnose problems accurately: Pinpoint the source of leaks, overheating issues, or cooling inefficiencies.
- Perform repairs effectively: Know which parts to replace and how they interconnect.
- Plan modifications: Understand the system's limitations before making performance upgrades.
- Perform routine maintenance: Identify areas that need regular inspection and attention.
- Avoid costly repairs: Address minor issues before they escalate into major problems.
Key Specs and Main Parts
Let's break down the core components you'll typically find in a cooling system diagram. Understanding these parts and their functions is essential for interpreting the diagram effectively.
Main Components:
- Engine Block: The heart of the engine; the cooling system's primary task is to prevent it from overheating. Coolant channels (water jackets) are cast directly into the block.
- Radiator: A heat exchanger that dissipates heat from the coolant to the atmosphere. It usually consists of a core with fins to increase surface area, and tanks at the top and bottom.
- Radiator Cap: Maintains pressure within the cooling system, raising the boiling point of the coolant. It also incorporates a pressure relief valve.
- Coolant Reservoir (Expansion Tank): Allows for coolant expansion and contraction due to temperature changes. It also provides a place to add coolant.
- Water Pump: Circulates coolant throughout the system. It's typically driven by the engine's crankshaft via a belt.
- Thermostat: Regulates coolant flow to maintain a consistent engine operating temperature. It opens and closes based on coolant temperature.
- Hoses: Connect all the components, allowing coolant to flow between them. They are designed to withstand high temperatures and pressures.
- Cooling Fan: Assists in cooling the radiator, especially at low speeds or when the engine is idling. It can be mechanically driven or electric.
- Temperature Sensor/Sending Unit: Monitors coolant temperature and sends a signal to the engine control unit (ECU) and/or temperature gauge.
- Heater Core: A small radiator located inside the vehicle's cabin, providing heat to the interior.
Key Specs: While specific numbers vary depending on the vehicle, some common specs to be aware of include:
- Coolant Type: Determines the proper coolant mixture (e.g., ethylene glycol, propylene glycol, or organic acid technology (OAT)).
- Coolant Capacity: The total volume of coolant the system holds.
- Thermostat Opening Temperature: The temperature at which the thermostat begins to open.
- Radiator Cap Pressure Rating: The maximum pressure the radiator cap can hold before releasing pressure.
Symbols: Understanding Lines, Colors, and Icons
Cooling system diagrams use standardized symbols to represent different components and their connections. Understanding these symbols is key to deciphering the diagram:
- Solid Lines: Typically represent hoses or pipes carrying coolant. The thickness might indicate the diameter of the hose.
- Dashed Lines: Often represent vacuum lines or control signals.
- Arrows: Indicate the direction of coolant flow.
- Colors: While not always standardized, colors can be used to differentiate between hot and cold coolant lines (e.g., red for hot, blue for cold).
- Component Icons: Specific icons represent each component (e.g., a wavy box for the radiator, a circle with blades for the water pump). These icons are usually labelled clearly.
Pay close attention to the legend or key that accompanies the diagram, as it will provide specific explanations for the symbols used.
How It Works: The Cooling System in Action
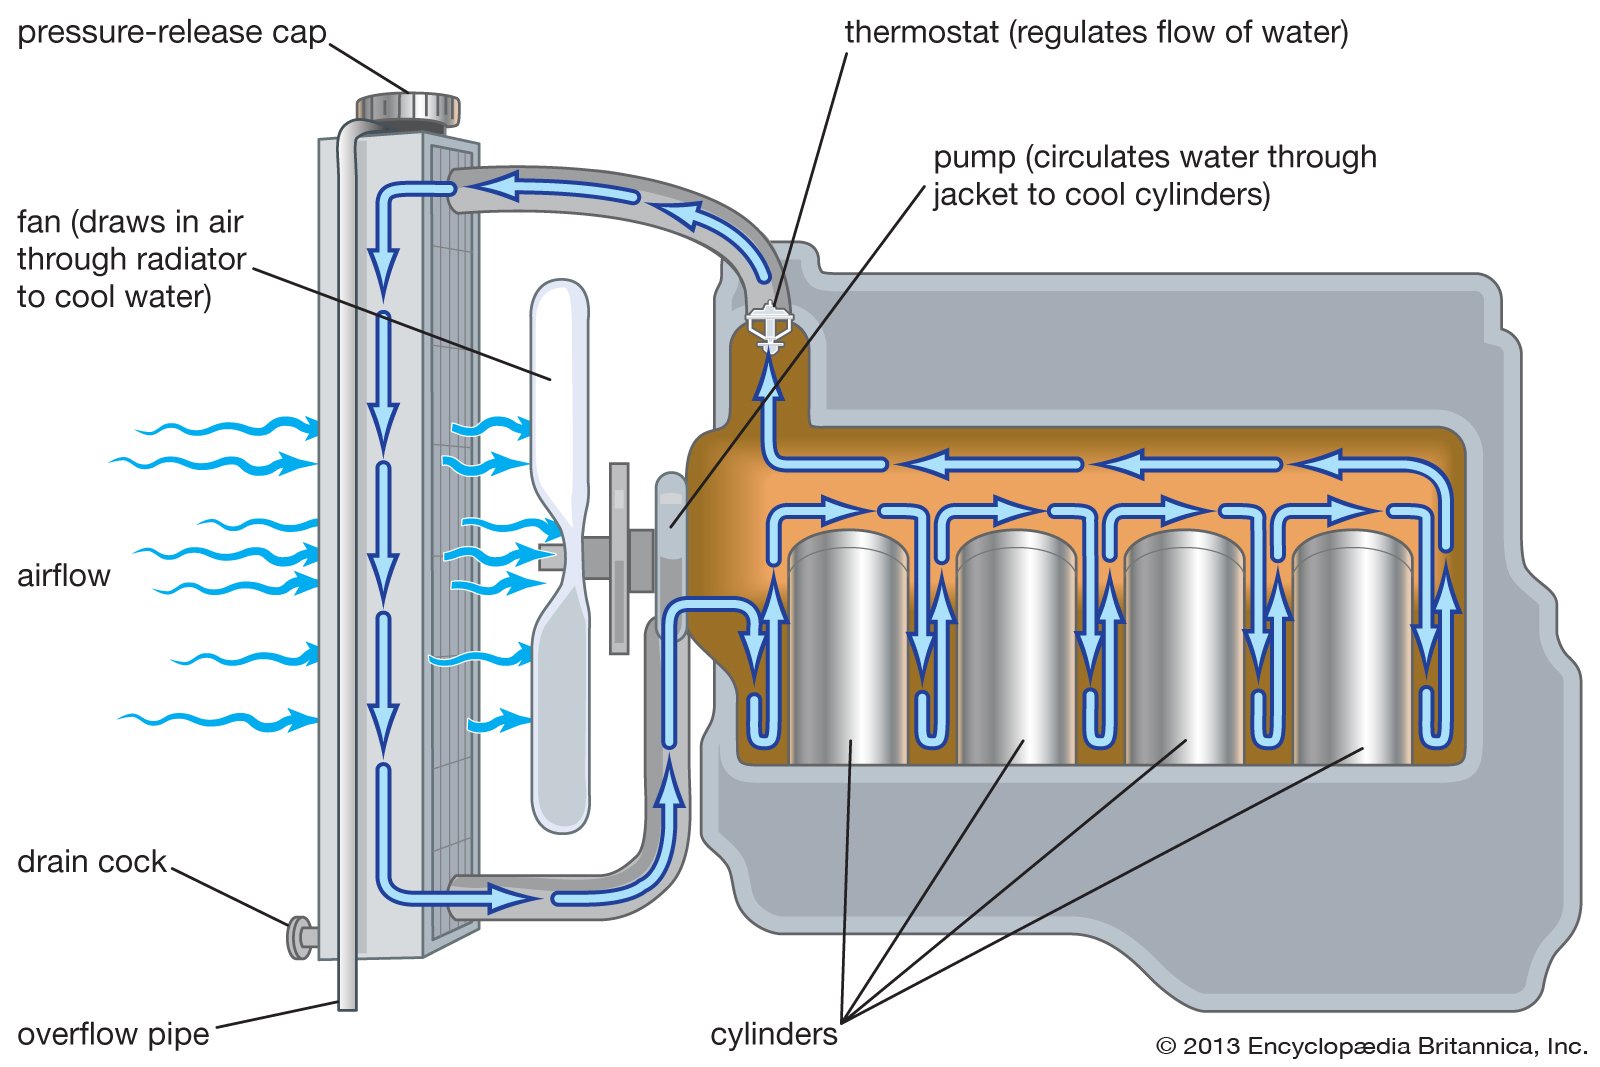
The cooling system operates on a closed-loop principle, constantly circulating coolant to remove heat from the engine. Here's a simplified overview:
- Coolant Circulation: The water pump circulates coolant from the radiator, through the engine block (where it absorbs heat), and back to the radiator.
- Thermostat Regulation: The thermostat controls the flow of coolant. When the engine is cold, the thermostat remains closed, allowing the coolant to bypass the radiator and circulate only within the engine, allowing it to warm up quickly. As the engine reaches its operating temperature, the thermostat opens, allowing coolant to flow to the radiator.
- Heat Dissipation: In the radiator, heat from the coolant is transferred to the air passing through the radiator fins. The cooling fan assists in this process, especially at low speeds.
- Pressure Regulation: The radiator cap maintains pressure within the system, raising the boiling point of the coolant and preventing it from boiling over. Excess pressure is released through the pressure relief valve into the coolant reservoir.
- Coolant Expansion/Contraction: The coolant reservoir allows for the expansion and contraction of coolant as its temperature changes.
- Heater Core Functionality: A portion of the hot coolant is routed to the heater core inside the cabin to provide heat. A blend door regulates the amount of air passing through the heater core, controlling the temperature of the air entering the cabin.
Real-World Use: Basic Troubleshooting Tips
Understanding the cooling system diagram can significantly aid in troubleshooting common issues. Here are a few examples:
- Overheating: Check the coolant level, radiator cap, thermostat, water pump, and cooling fan. The diagram helps you locate these components and understand their role in preventing overheating.
- Coolant Leaks: Inspect hoses, connections, and the radiator for leaks. The diagram shows the routing of coolant lines, making it easier to trace the source of a leak. Look for tell-tale signs of dried coolant (often a rusty or greenish residue).
- No Heat: Check the coolant level and the heater core. A blocked heater core or low coolant can prevent heat from reaching the cabin. The diagram will show the location of the heater core and the coolant lines that feed it.
- Erratic Temperature Gauge Readings: Check the temperature sensor/sending unit. A faulty sensor can provide inaccurate readings. The diagram will show the sensor's location.
Safety: Handle with Care
Working on the cooling system can be hazardous. Here are some crucial safety precautions:
- Never open the radiator cap when the engine is hot: The system is under pressure, and hot coolant can spray out, causing severe burns. Wait until the engine has cooled down completely.
- Be careful when working with coolant: It is toxic and should be handled with gloves and eye protection. Dispose of used coolant properly (check with your local auto parts store or recycling center).
- Disconnect the negative battery cable before working on any electrical components: This prevents accidental shocks or damage to the electrical system.
- Be aware of the rotating fan blades: Ensure the engine is off and the fan cannot start accidentally before working near it. If the vehicle has an electric fan, disconnect the fan's electrical connector.
Hot Components to Be Careful Of:
Exhaust Manifold/Headers: Stay clear of these extremely hot components when working near the engine.
Engine Block: The engine block retains heat for a long time after the engine is turned off.
Radiator Hoses: These hoses carry hot coolant and can cause burns if touched.
By understanding the cooling system diagram and following these safety precautions, you can effectively diagnose and repair cooling system issues, ensuring your engine stays cool and runs reliably.
Ready to dive deeper? Download the high-resolution cooling system diagram file here.