
Diagram Silverado Parking Brake Assembly
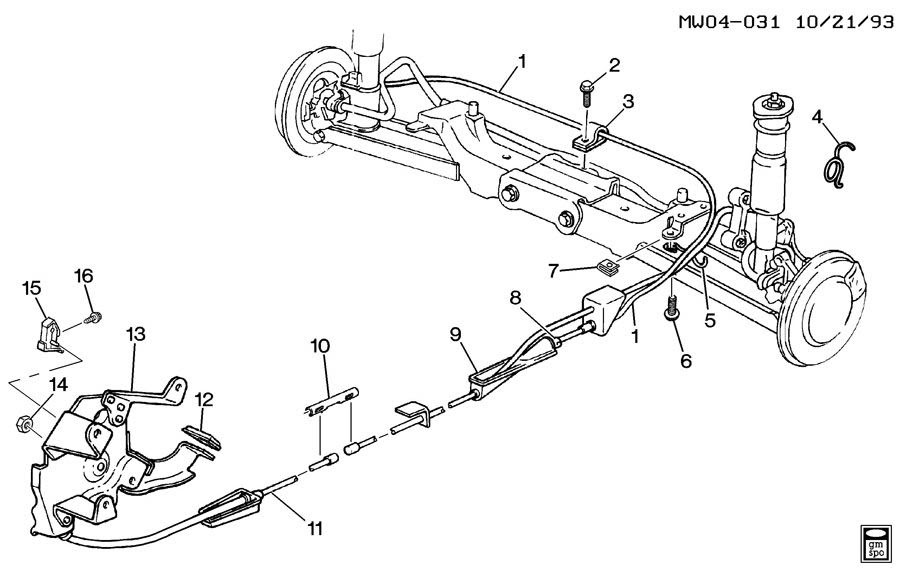
Let's dive into the diagram of a Silverado's parking brake assembly. Whether you're tackling a brake job, diagnosing a pesky parking brake issue, or just expanding your automotive knowledge, understanding this system is crucial. This isn't just about preventing your truck from rolling away; a malfunctioning parking brake can lead to dragging brakes, reduced fuel economy, and even safety hazards. Having a clear understanding of the assembly, aided by a detailed diagram, will empower you to diagnose, repair, and maintain this critical system with confidence.
Why This Diagram Matters
A good diagram of the Silverado's parking brake assembly is your roadmap to understanding and fixing this often-overlooked system. Here's why it's so valuable:
- Repair and Maintenance: The most obvious reason. If your parking brake isn't holding properly, or if you hear strange noises coming from the rear of your truck, the diagram helps you identify the faulty components that need replacement or adjustment.
- Diagnosis: Before you start wrenching, you need to know what's wrong. The diagram helps you trace the linkage, cables, and internal brake shoe mechanisms to pinpoint the source of the problem.
- Modifications: Planning to upgrade your braking system or install a new axle? Understanding the parking brake assembly ensures compatibility and prevents unexpected issues.
- Education: Even if you don't plan on doing the work yourself, understanding the diagram will allow you to better communicate with your mechanic and understand the repair process.
Key Specs and Main Parts
The Silverado's parking brake system is typically a mechanically actuated system, using cables to apply force to brake shoes inside the rear brake rotors (or drums, depending on the model year and configuration). Here's a breakdown of the major components:
- Parking Brake Pedal/Handle Assembly: This is where you initiate the parking brake. It includes the pedal or handle, the release mechanism, and often an adjustment mechanism.
- Equalizer Bar: This component ensures that the force applied to the left and right rear brakes is equal, preventing uneven braking. It's a critical part of maintaining a balanced and effective parking brake.
- Parking Brake Cables: These are the steel cables that transmit force from the pedal/handle to the rear brakes. They run along the underside of the truck and are subject to corrosion and wear.
- Rear Brake Shoe Assembly: Located inside the rear brake rotors (or drums), this assembly consists of brake shoes, springs, levers, and an adjuster. When the parking brake cable is pulled, the shoes are forced against the inside of the rotor (or drum), creating friction and holding the vehicle in place.
- Actuation Lever: A lever located at the brake backing plate; the cable attaches to the lever and, when pulled, forces the brake shoes outward.
- Return Springs: These springs retract the brake shoes when the parking brake is released.
- Adjuster Mechanism: Allows you to adjust the gap between the brake shoes and the rotor (or drum), ensuring proper parking brake engagement. Many are self-adjusting, but some require manual adjustment.
Typical specs to consider are cable length, brake shoe material, and the torque specifications for any bolts you may need to remove. Refer to your Silverado's service manual for the precise specifications for your year and model.
Diagram Symbols Explained
Understanding the symbols in a parking brake assembly diagram is crucial for accurate interpretation. Here's a basic guide:
- Solid Lines: Usually represent physical components like cables, rods, or levers. The thickness of the line might indicate the component's size or type.
- Dashed Lines: Often indicate hidden components or pathways, such as cables running inside the frame or through a protective sheath.
- Arrows: Show the direction of movement or force. For example, an arrow might indicate the direction the cable pulls when the parking brake is engaged.
- Circles/Squares with Letters/Numbers: These are callouts that refer to specific parts listed in the diagram's legend or parts list.
- Different Colors: While not always present, colors can be used to differentiate between different types of components or systems. For instance, the parking brake cable might be colored red to easily distinguish it from other cables.
- Icons: Standard icons represent specific components like springs, bolts, nuts, or retaining clips. A spring icon, for example, clearly indicates the location of a return spring.
Always refer to the diagram's legend or key to fully understand the meaning of each symbol. Different manufacturers may use slightly different conventions.
How It Works
The Silverado's parking brake system is a relatively simple, but effective, mechanical system:
- Engagement: When you engage the parking brake (by pressing the pedal or pulling the handle), a cable system is activated.
- Cable Tension: The cable(s) pull on the actuation lever(s) located at the rear brakes.
- Shoe Expansion: The actuation lever pushes the brake shoes outward, pressing them against the inside surface of the rear brake rotor (or drum).
- Friction and Holding: The friction between the brake shoes and the rotor (or drum) creates resistance, preventing the wheels from turning and holding the vehicle in place.
- Equalization: The equalizer bar ensures that equal force is applied to both rear brakes, preventing one wheel from locking up before the other.
- Release: When you release the parking brake, the tension on the cable is released. The return springs then pull the brake shoes away from the rotor (or drum), allowing the wheels to rotate freely.
Real-World Use – Basic Troubleshooting Tips
Here are a few troubleshooting tips based on common parking brake issues:
- Parking Brake Not Holding: Possible causes include stretched cables, worn brake shoes, or a misadjusted adjuster mechanism. Check the cable tension and adjust the brake shoes as needed. Look for rust or corrosion on the cable.
- Parking Brake Dragging: This could be due to a sticking cable, weak return springs, or excessive corrosion inside the brake drum or rotor. Inspect the cables for binding, replace the return springs if necessary, and clean the brake components.
- Loud Noises When Engaging/Releasing: Grinding or squealing noises can indicate worn brake shoes or a lack of lubrication. Inspect the brake shoes and lubricate the moving parts of the assembly.
- Uneven Parking Brake Engagement: This is usually caused by a faulty equalizer bar or a problem with one of the brake cables. Inspect the equalizer bar for damage and check the tension of both cables.
- Check Engine Light: Though rare, a fault in the parking brake system (especially if it's electronically assisted in newer models) can sometimes trigger a check engine light. Use an OBD-II scanner to read the diagnostic trouble codes (DTCs) and consult your service manual for troubleshooting procedures.
Before you replace any parts, always inspect the entire system to identify the root cause of the problem. A worn brake shoe might be a symptom of a larger issue, like a corroded cable.
Safety First
Working on the parking brake system involves working under the vehicle and dealing with potentially rusty and seized components. Always use jack stands to safely support the vehicle. Here are other key safety considerations:
- Eye Protection: Wear safety glasses to protect your eyes from debris and brake dust.
- Gloves: Wear gloves to protect your hands from dirt, grease, and sharp edges.
- Brake Dust: Brake dust can contain asbestos (especially in older vehicles). Avoid breathing brake dust and wash your hands thoroughly after working on the brakes.
- Springs: Brake shoe assemblies often contain strong springs. Use the correct tools to safely remove and install these springs. An errant spring can cause serious injury.
- Cable Tension: Be aware of the tension on the parking brake cables, especially when disconnecting them. The cables can snap back with considerable force.
- Wheel Chocks: Place wheel chocks behind the rear wheels when working on the front brakes, and vice versa.
- Disconnect Battery: Disconnecting the negative terminal of the battery is good practice before starting any automotive work.
Proper safety measures are essential to prevent injuries and ensure a successful repair.
Ready to get your hands dirty? We have a detailed Silverado parking brake assembly diagram available for download. This diagram includes specific component locations, cable routing, and adjustment points. With this resource in hand, you'll be well-equipped to tackle any parking brake-related issues on your Silverado.