Diagram Transmission Filter Location
So, you're diving into the intricate world of your car's automatic transmission, specifically the filter. Knowing the location of the transmission filter, and understanding the associated diagram, is crucial for preventative maintenance, troubleshooting, and even performance upgrades. This isn't just about changing oil; it's about understanding the lifeline of your transmission. We're not going to hand-hold you through every single step of a filter change – this is about demystifying the diagrams that guide that process.
Purpose of Transmission Filter Location Diagrams
These diagrams aren't just pretty pictures. They are essential tools for several reasons:
- Precise Location: They pinpoint the exact location of the transmission filter within the transmission assembly. This is critical because accessibility can vary significantly across different car models and transmission types. You don't want to be blindly poking around in a complex system like this.
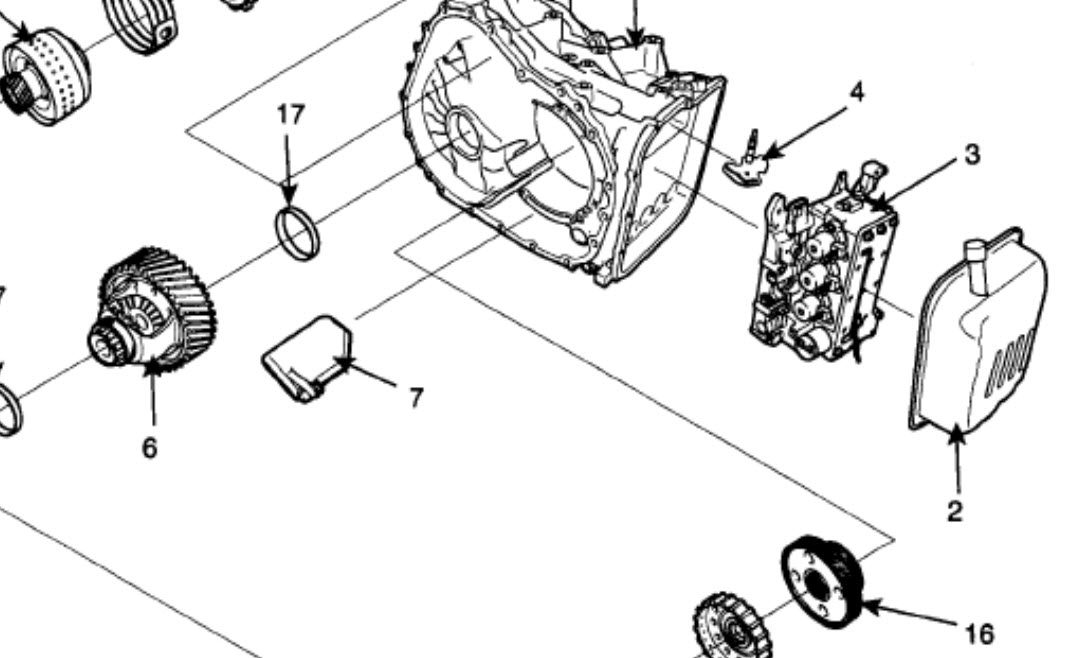
- Component Identification: Diagrams illustrate the surrounding components, such as the transmission pan, valve body, oil pump, and associated lines. This context is invaluable for understanding how everything fits together and avoiding accidental damage.
- Troubleshooting: When diagnosing transmission problems (slipping, rough shifting, etc.), the diagram can help you understand how a clogged or damaged filter might be contributing to the issue.
- Repair and Maintenance: Whether you're replacing the filter during a routine service or overhauling the entire transmission, the diagram provides a visual roadmap.
- Upgrades and Modifications: If you're considering upgrading to a high-performance filter or modifying the transmission for increased performance, understanding the stock filter location and related components is paramount.
In short, a good transmission filter location diagram provides a visual language for understanding your transmission's anatomy.
Key Specifications and Main Parts Depicted
A comprehensive transmission filter location diagram will usually include the following:
- Transmission Case: The external housing of the transmission. The diagram will show where the pan bolts to the case.
- Transmission Pan: The removable pan at the bottom of the transmission that holds the transmission fluid. Expect to see the drain plug location here.
- Transmission Filter: The filter itself, along with its mounting points (bolts, clips, or a simple push-in design). The diagram shows its orientation.
- Valve Body: A complex assembly of valves, solenoids, and passages that control the flow of transmission fluid. While not always directly related to filter location, the valve body is often located nearby and may need to be removed for access in some cases.
- Oil Pump: The pump that circulates transmission fluid throughout the system. Again, its proximity to the filter is useful information.
- Gaskets and Seals: The diagram may indicate the location of the transmission pan gasket or o-rings associated with the filter connection. Always replace these when servicing the filter.
- Fluid Lines: The input and output lines for transmission fluid, sometimes including cooler lines. This helps in understanding the fluid flow path.
- Bolts and Fasteners: The diagram will call out bolt sizes and torque specifications for the pan and the filter securing components. Using the correct torque is critical to avoid leaks or damage.
Key Specs: Torque values for bolts are critical. These are often listed alongside the diagram or in a separate service manual. Pay close attention to fluid capacity, especially when refilling after a filter change.
Diagram Symbols: Lines, Colors, and Icons
Understanding the symbols used in the diagram is crucial for interpreting the information correctly. Here's a breakdown of common symbols:
- Solid Lines: Represent physical components, such as the transmission case, pan, and filter body.
- Dashed Lines: May indicate hidden components or internal passages within the transmission. Sometimes, they denote the path of fluid flow.
- Arrows: Indicate the direction of fluid flow. Pay attention to arrows near the filter to understand how fluid enters and exits.
- Colors: Colors can indicate different types of materials or fluids. For example, blue might represent ATF, while red could indicate a high-temperature area. Check the diagram's legend for specific color coding.
- Icons: Small icons might represent specific fasteners (bolts, clips, screws), sensors, or electrical connectors. The legend should identify what these icons represent.
- Callouts: Numbered or lettered labels pointing to specific components, with corresponding descriptions in a table or key. These are essential for identifying each part.
Always refer to the diagram's legend or key to understand the specific meaning of each symbol. Don't assume anything. A misinterpretation could lead to mistakes.
How It Works: The Transmission Filter in the System
The transmission filter's job is simple in concept: to remove contaminants from the transmission fluid. But understanding *how* it does this, and its relation to the diagram, will make you more confident. The oil pump draws fluid from the transmission pan, passes it through the filter, and then circulates the clean fluid through the valve body, torque converter, and other critical components. The diagram shows you this flow (check for those arrows!).
A blocked or damaged filter restricts fluid flow, which can lead to:
- Reduced pressure: Insufficient fluid pressure can cause slipping gears and poor shifting performance.
- Overheating: Restricted flow can lead to increased friction and heat buildup within the transmission.
- Component wear: Contaminants circulating in the fluid can accelerate wear on gears, bearings, and other internal parts.
The diagram also shows the relationship of the filter to the pan – typically, the filter sits inside the pan, accessible by removing the pan. The pan acts as a reservoir for fluid and also collects debris. That's why cleaning the pan is a vital part of the filter replacement process.
Real-World Use: Basic Troubleshooting Tips
Let's put this diagram knowledge to work. Here are some basic troubleshooting scenarios where a transmission filter location diagram can be helpful:
- Transmission Slipping or Rough Shifting: If you're experiencing these symptoms, the filter could be clogged. The diagram will show you where to access it for inspection. After checking the fluid level and condition, this is the next place to check.
- Fluid Leak Near the Transmission Pan: The diagram will show the location of the pan gasket. If the gasket is damaged or improperly installed (over-tightened bolts), it can cause a leak.
- Difficulty Finding the Filter: This sounds obvious, but different transmissions have filters in vastly different locations. The diagram removes the guesswork.
- Identifying Replacement Parts: When ordering a new filter or pan gasket, the diagram provides the necessary part numbers or descriptions. Compare against your diagram to verify correct parts.
Important Note: Before tackling any transmission work, always check the fluid level and condition. Dark, burnt-smelling fluid is a sign of serious problems and may indicate more than just a clogged filter.
Safety Considerations
Working on a transmission involves several safety risks:
- Hot Fluid: Transmission fluid can be extremely hot. Allow the engine and transmission to cool completely before draining the fluid.
- Jacking Up the Vehicle: Always use jack stands to support the vehicle after lifting it with a jack. Never work under a vehicle supported only by a jack.
- Eye Protection: Wear safety glasses to protect your eyes from fluid splashes and debris.
- Potential for Burns: Exhaust components can remain hot for a long time. Be careful not to touch them.
- Electrical Hazards: If the diagram shows sensors or solenoids near the filter, disconnect the battery to avoid electrical shock.
- Environmental Concerns: Dispose of used transmission fluid properly at a recycling center. Do not pour it down the drain or onto the ground.
The valve body can be fragile and contain small parts. If the diagram indicates the valve body needs to be removed, proceed with caution and consult a service manual for detailed instructions.
Most importantly, if you're uncomfortable performing any of these procedures, seek the help of a qualified mechanic. Automatic transmissions are complex, and mistakes can be costly.
By understanding the layout and function of the transmission filter as represented by the diagram, you'll be able to work on your car with more confidence and expertise. Remember to always prioritize safety and consult a service manual for detailed instructions specific to your vehicle model.
We have the diagram file available for download. This will be a valuable resource for your maintenance and repair work. Happy wrenching!