Dodge Grand Caravan Serpentine Belt Diagram
The serpentine belt diagram for your Dodge Grand Caravan is an indispensable tool for any owner comfortable tackling basic auto repairs or preventative maintenance. It's more than just a pretty picture; it's a roadmap to understanding how the accessories attached to your engine function and interact. Without a clear understanding of this diagram, replacing a worn serpentine belt, troubleshooting accessory issues, or even just inspecting the system becomes a much more daunting task. We’ve got a handy downloadable diagram for your specific Grand Caravan model, but first, let's dive into what this diagram represents and how to use it effectively.
Purpose of the Serpentine Belt Diagram
The serpentine belt diagram serves several crucial purposes:
- Belt Replacement: This is the most common use. When your serpentine belt shows signs of wear (cracks, fraying, glazing), you'll need to replace it. The diagram shows the precise routing of the new belt, ensuring it's properly engaged with each pulley.
- Accessory Troubleshooting: If you’re experiencing issues with your power steering, air conditioning, alternator, or water pump, the diagram helps you isolate the problem. By understanding the belt's path, you can quickly determine if a slipping or broken belt is the culprit.
- Preventative Maintenance: Regular inspection of the serpentine belt and its components is key to preventing breakdowns. The diagram allows you to easily locate each pulley and check for signs of wear, misalignment, or damage.
- Understanding Engine Accessory Systems: For the DIY enthusiast who wants to deepen their knowledge of automotive systems, the diagram provides a clear visual representation of how the engine accessories are driven.
Key Specs and Main Parts
Before we delve into the diagram, let's identify the key components of the serpentine belt system in your Dodge Grand Caravan:
- Serpentine Belt: A single, long belt that snakes around multiple pulleys to power various engine accessories. It's typically made of a durable rubber compound with reinforcing cords.
- Crankshaft Pulley (or Harmonic Balancer): Driven directly by the engine's crankshaft, this pulley is the source of power for the entire system. It's located at the bottom of the engine and is usually the largest pulley in the system.
- Alternator Pulley: The alternator generates electricity to power the vehicle's electrical system and charge the battery. Its pulley is driven by the serpentine belt.
- Power Steering Pump Pulley: The power steering pump provides hydraulic assistance to make steering easier. Its pulley is also driven by the serpentine belt.
- Air Conditioning Compressor Pulley: The A/C compressor circulates refrigerant to cool the cabin. Its pulley is driven by the serpentine belt and engages only when the A/C is turned on.
- Water Pump Pulley: The water pump circulates coolant through the engine to prevent overheating. Its pulley is driven by the serpentine belt.
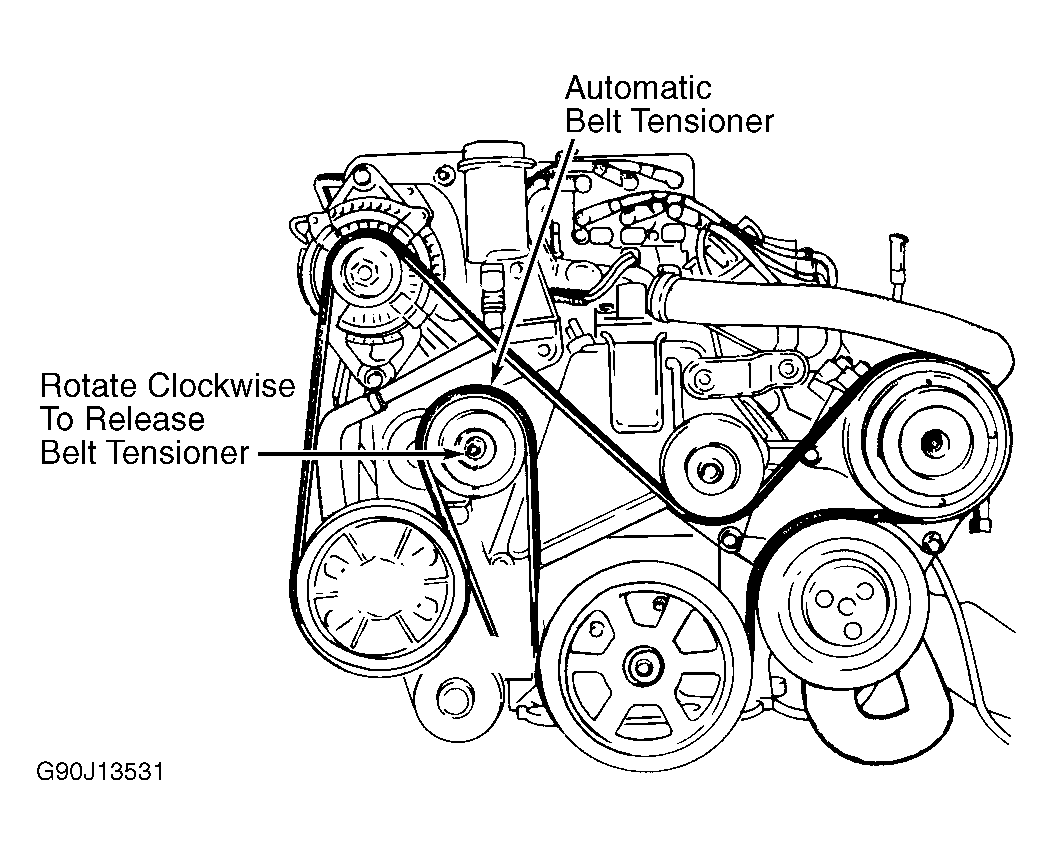
- Tensioner Pulley: This spring-loaded pulley maintains the correct tension on the serpentine belt, preventing slippage and prolonging belt life. It's crucial for proper system operation.
- Idler Pulley: Idler pulleys are smooth pulleys that guide the serpentine belt around the engine, ensuring proper routing and avoiding interference.
Understanding the Symbols in the Diagram
The serpentine belt diagram uses specific symbols to convey information efficiently. Here's a breakdown of the common elements:
- Solid Lines: These represent the serpentine belt itself, showing its path around the pulleys.
- Dashed Lines: Sometimes used to indicate the belt's path behind or underneath other components, providing a clearer understanding of its routing in three dimensions.
- Arrows: Indicate the direction of rotation for each pulley. This is crucial for proper belt installation.
- Labels: Each pulley is labeled with its corresponding component (e.g., ALT for alternator, P/S for power steering, A/C for air conditioning).
- Tensioner Markings: The tensioner pulley often has markings to indicate the proper range of belt tension. The diagram may highlight these markings.
- Component Outlines: The diagram may include simplified outlines of the engine and its accessories to provide a visual reference point.
Colors are rarely used in serpentine belt diagrams, but if present, they might differentiate between different belt routing options for various engine configurations or model years. Always consult the diagram specific to your Grand Caravan's engine and year.
How the Serpentine Belt System Works
The serpentine belt system operates on a relatively simple principle: the rotational force of the engine's crankshaft is transferred to the various accessories via the serpentine belt. The crankshaft pulley, connected directly to the crankshaft, spins continuously when the engine is running. The serpentine belt, wrapped around this pulley and the pulleys of the accessories, transmits this rotational force. As the crankshaft pulley spins, it drives the serpentine belt, which in turn drives the accessory pulleys, causing them to spin and perform their respective functions (generating electricity, pumping power steering fluid, compressing refrigerant, etc.). The tensioner pulley plays a critical role in maintaining the necessary tension on the belt to prevent slippage. Without adequate tension, the belt will slip, reducing the efficiency of the accessories and potentially causing damage.
Real-World Use: Basic Troubleshooting Tips
Here are some basic troubleshooting tips using the serpentine belt diagram:
- Squealing Noise: A common symptom of a worn or loose serpentine belt. Use the diagram to check the belt for cracks, fraying, or glazing. Also, inspect the tensioner pulley to ensure it's functioning properly and maintaining adequate tension.
- Accessory Malfunction: If you notice a specific accessory is not working (e.g., the A/C is not cooling, the power steering is not assisting), use the diagram to trace the belt's path to that accessory's pulley. A slipping or broken belt could be the cause.
- Belt Slippage: If you suspect the belt is slipping, visually inspect the pulleys for signs of wear or misalignment. A worn pulley can cause the belt to ride improperly and slip.
Remember to always consult your vehicle's repair manual for specific diagnostic procedures and torque specifications.
Safety Precautions
Working on the serpentine belt system can be hazardous. Here are some important safety precautions:
- Disconnect the Battery: Always disconnect the negative battery cable before working on any electrical components, including the alternator.
- Hot Engine: Never work on the serpentine belt system when the engine is hot. Allow the engine to cool completely before starting any repairs.
- Moving Parts: Keep your hands, clothing, and tools clear of the serpentine belt and pulleys when the engine is running. Serious injury can result from contact with moving parts.
- Proper Tools: Use the correct tools for the job. A serpentine belt tool is essential for releasing the tension on the tensioner pulley during belt removal and installation.
- Eye Protection: Wear safety glasses to protect your eyes from debris.
The area around the tensioner pulley can be especially risky, as the spring mechanism can release unexpectedly with considerable force. Handle the tensioner with care and always use the proper tools to control its movement.
With this detailed information and the correct diagram in hand, you are now equipped to tackle serpentine belt maintenance and repairs on your Dodge Grand Caravan with confidence. If you have any questions, consult a qualified mechanic.
To get the specific serpentine belt diagram for your Dodge Grand Caravan model and year, simply Download it here.