Dodge Ram 2500 Tail Light Wiring Diagram
The Dodge Ram 2500, a staple in the heavy-duty truck world, is known for its reliability. However, like any vehicle, its electrical systems can sometimes require attention. Understanding the tail light wiring diagram for your Ram 2500 is invaluable for performing repairs, customizing lighting, or even just gaining a better understanding of your truck's inner workings. This guide provides a detailed breakdown of the wiring diagram, helping you navigate the complexities of your Ram 2500's tail light system.
Purpose of Understanding the Tail Light Wiring Diagram
Why bother understanding this diagram? There are several key reasons:
- Troubleshooting Electrical Issues: Tail light malfunctions are common. The diagram helps you pinpoint the source of the problem, whether it's a faulty bulb, a broken wire, or a malfunctioning module.
- Installing Aftermarket Accessories: Adding trailer wiring, LED upgrades, or other lighting modifications requires a solid understanding of the existing wiring.
- Performing Repairs: If a wire is damaged or needs replacement, the diagram shows you where it connects and what its function is.
- General Vehicle Knowledge: Learning about your truck's electrical system empowers you to perform more of your own maintenance and repairs.
Key Specs and Main Parts
The tail light system in a Dodge Ram 2500 is more complex than just a few bulbs and wires. Here are the key components:
- Tail Light Assembly: This unit houses all the lights, including the brake lights, turn signals, reverse lights, and running lights (also called tail lights).
- Bulbs: Incandescent or LED bulbs provide the illumination. LEDs are increasingly common due to their longevity and efficiency.
- Wiring Harness: A bundle of wires that connect the tail light assembly to the truck's electrical system. This harness includes wires for each function of the tail light.
- Connectors: Plugs that allow for easy connection and disconnection of the tail light assembly. These connectors are crucial for quick bulb replacements or assembly removal.
- Grounding Points: Metal connection points where wires are grounded to the chassis. A good ground is essential for proper electrical function.
- Trailer Wiring Connector (if equipped): A connector that allows you to connect trailer lights to your truck's electrical system. It often integrates with the main tail light wiring.
- Body Control Module (BCM): The BCM is a computer that controls many of the truck's electrical functions, including the tail lights.
Common bulb types you might find are 3157 for brake/turn signal and 921 for reverse. Refer to your owner's manual for the exact bulb types for your model year.
Decoding the Symbols: Lines, Colors, and Icons
Wiring diagrams use standardized symbols to represent different components and wires. Understanding these symbols is crucial for interpreting the diagram. Here's a breakdown:
- Lines: Solid lines represent wires. The thickness of the line doesn't usually indicate wire gauge.
- Colors: Each wire is assigned a specific color (e.g., red, black, yellow). The diagram will have a color key that identifies each color and its corresponding function.
- Ground Symbol: A symbol resembling an upside-down tree indicates a ground connection.
- Connector Symbol: Often represented as a circle or square with lines pointing towards it, indicating a plug or connector.
- Splice Symbol: Shows where two or more wires are joined together.
- Fuse Symbol: A zigzag line inside a rectangle, representing a fuse.
- Relay Symbol: A box with connected lines depicting the relay's coil and switch contacts.
- Lamp/Bulb Symbol: A circle with an "X" inside, representing a light bulb.
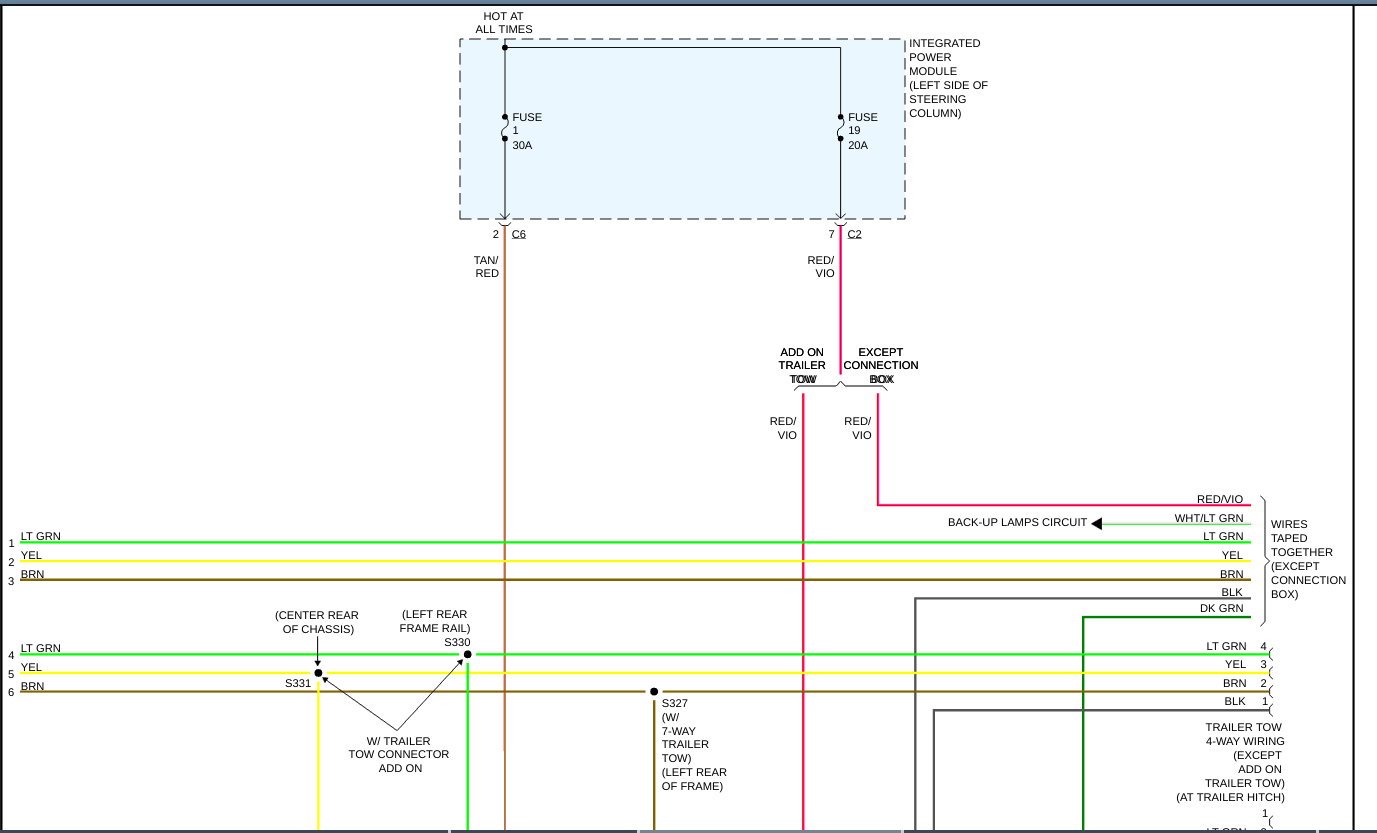
Important Color Codes: While they can vary slightly by year, some common color codes include:
- Brown: Tail lights/Running lights
- Yellow: Left turn signal/Brake light
- Green: Right turn signal/Brake light
- White: Ground
- Light Green: Reverse lights
How the Tail Light Wiring System Works
Here's a simplified overview of how the tail light system operates:
- Power Source: The system receives power from the truck's battery, which is routed through the BCM and fuse box.
- Switch Activation: When you turn on the headlights, a signal is sent to the BCM, which then activates the tail lights via a relay.
- Brake Light Activation: When you press the brake pedal, a switch sends a signal to the BCM, which activates the brake lights.
- Turn Signal Activation: When you activate the turn signal stalk, the BCM sends a pulsating signal to the appropriate turn signal light (left or right).
- Reverse Light Activation: When you shift into reverse, a switch on the transmission sends a signal to the BCM, which activates the reverse lights.
- Ground Path: Each light needs a complete circuit to function. The current flows through the bulb and then returns to the battery via a ground wire.
The BCM acts as a central control unit, monitoring and managing the various signals and outputs to the tail lights. This sophisticated system allows for features like trailer light integration and bulb-out detection.
Real-World Use: Basic Troubleshooting Tips
Here are some basic troubleshooting tips using the wiring diagram:
- No Tail Lights: Check the tail light fuse. If the fuse is blown, replace it. If it blows again, there's likely a short circuit. Use the wiring diagram to trace the power wire and look for damaged insulation or exposed wires. Also, check the ground connection.
- One Tail Light Out: First, replace the bulb. If that doesn't work, check the wiring and connector for that specific light. Use a multimeter to check for voltage at the connector.
- Turn Signal Not Working: Check the turn signal bulb. If the bulb is good, check the flasher relay or the BCM. Use the wiring diagram to identify the correct wires and connectors.
- Brake Lights Not Working: Check the brake light switch on the brake pedal. Use a multimeter to check for voltage at the switch and at the brake light connector. Also, many Ram 2500s use the same bulb filament for brake and turn signal, so a bad connection can affect both.
- Trailer Lights Not Working: Check the trailer wiring connector and the wiring leading to it. Inspect the connector for corrosion or damage. Verify that the truck is providing the correct signals to the connector.
Using a Multimeter: A multimeter is your best friend for electrical troubleshooting. Use it to check for voltage, continuity, and resistance. Continuity testing helps you identify broken wires or bad connections. Always disconnect the battery before performing any electrical testing.
Safety Considerations
Working with automotive electrical systems can be dangerous. Here are some safety precautions:
- Disconnect the Battery: Always disconnect the negative battery terminal before working on any electrical system. This prevents accidental shorts and electrical shocks.
- Work in a Well-Lit Area: Good lighting is essential for seeing what you're doing and avoiding mistakes.
- Use Proper Tools: Use insulated tools designed for automotive electrical work.
- Avoid Working in Wet Conditions: Water and electricity are a dangerous combination.
- Fuses: Never replace a fuse with one of a higher amperage rating. This can overload the circuit and cause a fire.
- Airbags: Be extremely careful when working near airbags. Accidental activation can cause serious injury. If you're unsure, consult a professional.
Warning: The BCM and other electronic control modules are sensitive to voltage fluctuations. Improper wiring or shorts can damage these components, leading to costly repairs. If you're not comfortable working with electrical systems, it's best to consult a qualified mechanic.
With a solid understanding of your Dodge Ram 2500's tail light wiring diagram, you can confidently tackle a variety of electrical repairs and modifications. Remember to always prioritize safety and double-check your work. We have the Dodge Ram 2500 Tail Light Wiring Diagram file available for download. This diagram will provide you with the necessary information to diagnose and repair any issues with your truck's tail light system.