Dodge Ram Ignition Switch Wiring Diagram
Understanding the Dodge Ram ignition switch wiring diagram is crucial for a variety of automotive tasks, ranging from basic troubleshooting to more complex modifications. Whether you're facing a starting issue, adding aftermarket accessories, or simply expanding your automotive knowledge, a solid grasp of this diagram will prove invaluable. We're going to break down the components, explain how everything works, and give you the practical knowledge you need to tackle electrical issues confidently. You can also download a copy of the Dodge Ram Ignition Switch Wiring Diagram from us, for your own reference.
Purpose of the Ignition Switch Wiring Diagram
Why bother with this diagram? Several reasons. First and foremost, it's essential for diagnosing starting problems. A faulty ignition switch or related wiring can prevent your Ram from starting, leaving you stranded. The diagram allows you to trace the circuit, identify potential breaks or shorts, and pinpoint the source of the problem. Second, it's vital for safe and proper modifications. Adding remote starters, alarms, or other electrical accessories requires tapping into the vehicle's wiring harness. Knowing the function of each wire in the ignition switch circuit ensures you make the correct connections without damaging other systems. Finally, studying the diagram enhances your overall understanding of automotive electrical systems, giving you a better handle on your vehicle's inner workings.
Key Specs and Main Parts of the Ignition Switch Circuit
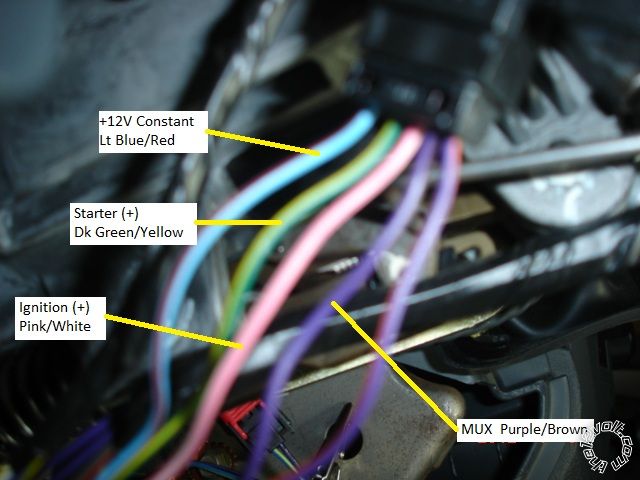
The ignition switch circuit is a relatively simple system, but it involves several key components that must function correctly for the engine to start. Here's a breakdown of the main parts:
- Battery: The heart of the electrical system, providing the necessary power. Expect a voltage of around 12.6V when fully charged.
- Ignition Switch: This multi-position switch (typically OFF, ACC, ON, START) controls the flow of power to various circuits.
- Starter Relay: A heavy-duty switch that delivers high current to the starter motor. This relay is often controlled by the ignition switch in the START position.
- Starter Motor: The electric motor that cranks the engine to initiate combustion.
- Solenoid: Often integrated with the starter motor, the solenoid engages the starter pinion gear with the flywheel and closes the high-current circuit to the starter motor.
- Fuses and Circuit Breakers: Protective devices that interrupt the circuit in case of an overcurrent or short circuit.
- Wiring Harness: The network of wires that connects all the components. These wires are typically color-coded for easy identification.
The ignition switch itself has several positions, each serving a specific purpose:
- OFF: No circuits are energized.
- ACC (Accessory): Powers accessory circuits like the radio and cigarette lighter, but not the engine.
- ON (Run): Powers the engine control unit (ECU), fuel pump, ignition system, and other essential components for running the engine.
- START: Activates the starter motor to crank the engine.
Decoding the Wiring Diagram: Symbols, Lines, and Colors
Understanding the symbols and conventions used in a wiring diagram is essential for accurate interpretation. Here's a quick guide:
- Lines: Represent wires. The thickness of the line generally doesn't indicate wire gauge, but rather clarity.
- Colors: Wires are color-coded for easy identification. Common colors include Red (power), Black (ground), Yellow, Green, Blue, White, etc. The diagram will have a legend indicating the meaning of each color abbreviation (e.g., RD = Red, BK = Black, YL = Yellow).
- Symbols: Represent components. Standard symbols exist for resistors, capacitors, diodes, relays, switches, fuses, grounds, etc. These symbols are generally universally understood, but referencing the diagram's legend is always a good idea.
- A circle with a line connecting to a chassis symbol typically indicates a ground point.
- A zigzag line often represents a resistor.
- A rectangle with a diagonal line through it generally indicates a fuse.
- Grounds: Represented by various symbols, often resembling a downward-pointing tree or stacked horizontal lines. A good ground connection is critical for proper circuit function.
- Connectors: Represented by circles, squares, or rectangles where wires connect to components or other wires.
Pay close attention to the wire gauge, which indicates the wire's current-carrying capacity. Using a wire that is too thin can lead to overheating and potentially a fire. The diagram *may* specify the gauge (e.g., 16 AWG), or it may be necessary to consult a separate wire gauge chart based on the circuit's amperage.
How the Ignition Switch Circuit Works
The ignition switch circuit works by selectively connecting different circuits based on the position of the ignition key. Let's trace the power flow in each key position:
- OFF: No power flows to any of the downstream circuits. The battery is connected only to essential systems like the clock and security system (if equipped).
- ACC: Power flows from the battery through a fuse to the accessory circuit. This allows you to use the radio, power windows, and other accessories without the engine running.
- ON: Power flows to the ECU, fuel pump, ignition system, and other engine-related components. This prepares the engine for starting. The ECU performs various checks and activates the fuel pump to pressurize the fuel system.
- START: In addition to the ON circuit, power is also sent to the starter relay. The starter relay then closes, sending a high-current surge to the starter motor, which cranks the engine. Once the engine starts, you release the key, and the switch returns to the ON position.
It is critical to understand that modern vehicles often incorporate a Park/Neutral Safety Switch. This switch prevents the starter from engaging unless the transmission is in Park or Neutral, adding another layer of safety to the starting circuit.
Real-World Use: Basic Troubleshooting Tips
Here are some common issues you might encounter and how the ignition switch wiring diagram can help:
- No Start: If the engine doesn't crank at all, check the battery voltage, starter relay, starter motor, and ignition switch. Use the diagram to trace the power flow and identify any breaks in the circuit. A multimeter is your best friend here.
- Engine Cranks but Doesn't Start: This could indicate a problem with the fuel pump, ignition system, or ECU. The diagram can help you verify that these components are receiving power when the ignition switch is in the ON position.
- Accessory Circuits Not Working: Check the fuse associated with the accessory circuit. The diagram will show you the location of the fuse and the wiring path.
- Battery Draining: A parasitic drain can occur if a circuit is constantly energized, even when the ignition switch is off. The diagram can help you identify which circuits are supposed to be off and isolate the source of the drain.
When troubleshooting, always start with the simplest and most obvious solutions, such as checking the battery connections and fuses. Use a multimeter to test for voltage and continuity. Continuity is a measure of how easily electricity flows through a circuit. A broken wire will have no continuity.
Safety Considerations
Working with automotive electrical systems can be dangerous. Here are some important safety precautions:
- Disconnect the Battery: Always disconnect the negative battery cable before working on any electrical circuits. This will prevent accidental shorts and shocks.
- Be Careful with the Airbag System: The airbag system is a high-voltage system that can be dangerous if mishandled. Consult the service manual for proper procedures before working near the airbag system. The ignition switch wiring often involves the airbag system.
- Use Proper Tools: Use insulated tools designed for automotive electrical work.
- Wear Safety Glasses: Protect your eyes from flying debris.
- Never Work Alone: Have someone nearby in case of an emergency.
The starter solenoid carries a very high current. Never touch the solenoid terminals with bare hands when the ignition switch is in the START position. This could result in severe burns or electric shock.
Disclaimer
The information provided here is for general guidance only. Always consult the vehicle's service manual for specific wiring diagrams and procedures. Automotive electrical systems can be complex, and improper repairs can damage your vehicle or cause injury. If you are not comfortable working on electrical systems, consult a qualified mechanic.
Remember, we have the Dodge Ram Ignition Switch Wiring Diagram file ready for you to download and use.