Dodge Ram Tail Light Wiring Color Code
Let's talk Dodge Ram tail light wiring. Whether you're tackling a repair after a fender-bender, planning a custom lighting upgrade, or simply trying to understand your truck's electrical system better, knowing the tail light wiring color code is absolutely essential. This guide will break down the complex world of automotive wiring into easily digestible information, empowering you to diagnose problems and perform modifications with confidence. We'll cover everything from the basic purpose and components to troubleshooting tips and safety precautions.
Why You Need This Knowledge
Understanding the Dodge Ram tail light wiring diagram opens doors to a variety of tasks:
- Repairing Damaged Wiring: Identifying the correct wire for each function is crucial for splicing, soldering, and reconnecting damaged wires.
- Installing Aftermarket Lights: Adding LED tail lights, auxiliary brake lights, or custom turn signals requires precise wiring to avoid electrical shorts or system malfunctions.
- Troubleshooting Electrical Issues: If your tail lights aren't functioning correctly, knowing the wiring color codes allows you to systematically test each circuit and pinpoint the problem.
- Understanding Vehicle Electrical Systems: Familiarizing yourself with the tail light wiring is a great way to grasp the basics of automotive electrical systems, which can benefit you in countless other repair and modification projects.
- Trailer Wiring: Often, the tail light circuit provides the electrical source for trailer lights, making it essential to correctly integrate trailer wiring.
Key Specs and Main Parts of the Dodge Ram Tail Light Circuit
The tail light circuit isn't just about bulbs and wires. Several key components work together to ensure proper function:
- Tail Light Assembly: This houses the various bulbs for brake lights, tail lights, turn signals, and sometimes reverse lights.
- Bulbs: Incandescent, halogen, or LED bulbs illuminate the various functions.
- Wiring Harness: A bundle of wires that connects the tail light assembly to the vehicle's electrical system.
- Connectors: These provide a secure and weather-resistant connection between the wiring harness and the tail light assembly, as well as other points in the circuit.
- Fuses: Critical for protecting the circuit from overloads and short circuits. A blown fuse is often the first sign of a problem.
- Relays: Some Ram models utilize relays to switch higher-current circuits for the tail lights.
- Body Control Module (BCM): The BCM is a computer that controls various electrical functions, including the tail lights, in many newer Ram models. This means the BCM, not just simple wiring, dictates how some lights function.
While the specific wiring color code can vary slightly depending on the year, model, and trim level of your Dodge Ram, some common color conventions apply. We have access to model-specific diagrams – more on that later! Generally, you'll find wires dedicated to these functions:
- Tail Lights (Running Lights): These illuminate when the headlights are on, providing visibility at night.
- Brake Lights: These illuminate when the brake pedal is pressed, signaling to other drivers that you are slowing down.
- Turn Signals: These flash to indicate the direction you intend to turn.
- Reverse Lights: These illuminate when the vehicle is in reverse.
- Ground: Provides a return path for the electrical current.
Understanding Wiring Diagram Symbols
A wiring diagram is a map of the electrical system, and like any map, it uses symbols to represent different components and connections. Here’s a breakdown of common symbols you'll encounter in a Dodge Ram tail light wiring diagram:
- Solid Lines: Represent wires. The thickness of the line may indicate the gauge (thickness) of the wire.
- Dashed Lines: May represent a shielded cable or a connection to ground (chassis ground).
- Circles: Can represent light bulbs, connectors, or other electrical components.
- Squares: Often represent relays or switches.
- Resistor Symbol (Zig-zag line): Indicates a resistor, which limits the flow of current.
- Ground Symbol (Downward-pointing arrow or series of decreasing lines): Represents the connection to the vehicle's chassis, providing a common ground for the electrical system.
- Color Codes: Wires are typically labeled with abbreviations indicating their color (e.g., BR for Brown, BK for Black, RD for Red). These are critical for identifying the correct wires.
- Connector Symbols: Show how wires connect to each other or to components.
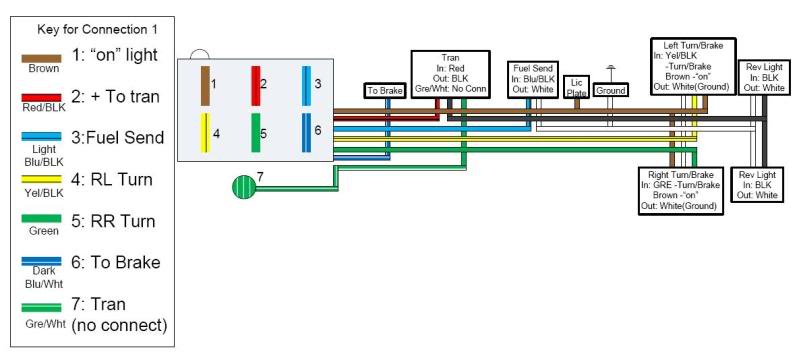
Color coding is crucial. Here are some frequently used Dodge Ram tail light wiring colors. Remember to always verify with your vehicle's specific diagram, as variations do exist:
- Black (BK): Ground.
- Brown (BR): Tail Lights (Running Lights).
- Dark Green (DG): Right Turn Signal/Brake Light.
- Yellow (YL): Left Turn Signal/Brake Light.
- White/Gray (WT/GY): Typically related to backup (reverse) lights.
How the Tail Light Circuit Works
The tail light circuit is a relatively simple electrical loop. Power from the battery flows through a fuse to protect the circuit. When you turn on the headlights, power is sent to the tail light relay (if equipped) or directly to the tail light bulbs, illuminating the running lights. When you press the brake pedal, a switch activates, sending power to the brake light filaments within the tail light bulbs. Similarly, when you activate the turn signal stalk, a flasher unit (or the BCM in newer models) sends pulsating power to the appropriate turn signal bulb, causing it to flash. Finally, when you shift into reverse, a switch activates the reverse lights.
In modern Dodge Rams, the BCM plays a more significant role. It monitors sensor inputs (e.g., brake pedal position, turn signal stalk position) and controls the tail lights accordingly. This allows for more sophisticated features like trailer sway control and bulb-out detection.
Real-World Use: Basic Troubleshooting Tips
Here's how you can use your knowledge of the wiring diagram to troubleshoot common tail light problems:
- No Tail Lights: Check the tail light fuse first. If it's blown, replace it with a fuse of the same amperage rating. If the fuse blows again immediately, there's likely a short circuit in the wiring. Use a multimeter to check for continuity between the tail light wire and ground.
- One Tail Light Not Working: Check the bulb first. If the bulb is good, check the connector for corrosion or damage. Use a multimeter to check for voltage at the connector when the headlights are on. If there's no voltage, trace the wiring back to the source, checking for breaks or loose connections.
- Turn Signal Not Working: Check the turn signal bulb first. If the bulb is good, check the flasher unit (or the BCM in newer models). Also, check the wiring and connectors for corrosion or damage.
- Brake Lights Not Working: Check the brake light fuse and the brake light switch, which is typically located near the brake pedal.
- Erratic Lighting Behavior: This could be a sign of a bad ground connection. Clean and tighten all ground connections associated with the tail light circuit. Another suspect is a faulty BCM, which needs professional diagnosis.
Safety First!
Working with automotive electrical systems can be dangerous. Here are some crucial safety precautions:
- Disconnect the Battery: Always disconnect the negative battery terminal before working on any electrical system to prevent accidental shorts and electrical shocks.
- Use Proper Tools: Use insulated tools designed for automotive electrical work.
- Work in a Well-Ventilated Area: If you're soldering, work in a well-ventilated area to avoid inhaling fumes.
- Protect Your Eyes: Wear safety glasses to protect your eyes from debris or sparks.
- Be Aware of Airbags: When working near airbags, take extra precautions to avoid accidentally triggering them. Disconnecting the battery is especially important in this scenario.
- High Current Circuits: The circuits powering the lighting system are relatively low current. The most risky component to interact with on a car is the battery itself. Disconnect it, isolate it, and respect its potential for both shock and for causing damage to electronic systems.
Finally, always double-check your work and consult a qualified mechanic if you're unsure about any aspect of the repair. An improper electrical connection can cause serious damage to your vehicle.
Accessing Your Model-Specific Diagram
While this guide provides a general overview, the wiring color code can vary depending on your specific Dodge Ram year, model, and trim level. Therefore, it's essential to consult a model-specific wiring diagram before starting any repair or modification. We have access to a comprehensive library of Dodge Ram wiring diagrams. Contact us to request the diagram for your specific vehicle.