Drive Belt Diagram For Murray Riding Mower
Hey folks, ever wrestled with a tangled mess of belts under your Murray riding mower? Knowing your drive belt system is crucial for keeping your lawn in tip-top shape. This article is your deep dive into understanding the drive belt diagram for your Murray riding mower. We'll break down the components, explain how it all works, and give you the knowledge to tackle basic maintenance and troubleshooting yourself. Consider this your masterclass in mower beltology!
Purpose of the Drive Belt Diagram
Why bother with a drive belt diagram? Simple: it's your roadmap for understanding and maintaining your mower's propulsion system. The drive belt diagram is not just a pretty picture; it's an essential tool for:
- Repairs: Identifying the correct belt size and routing after a breakage or replacement.
- Maintenance: Inspecting belt condition and tension for preventative maintenance.
- Learning: Understanding the relationship between the engine, transmission, and cutting deck.
- Troubleshooting: Diagnosing issues like slippage, noise, or failure to engage the blades.
- Parts Ordering: Accurately identifying and ordering replacement belts and pulleys.
Trying to replace a belt without the diagram is like trying to assemble IKEA furniture without the instructions – frustrating and likely to end in disaster! The diagram saves you time, money, and potential damage to your mower.
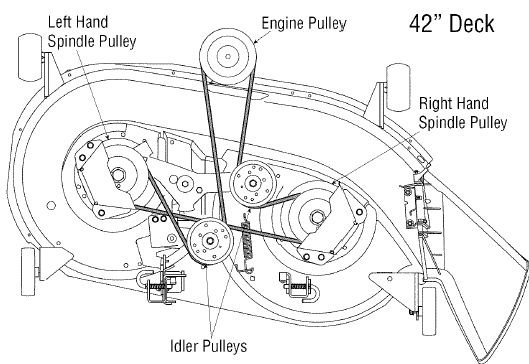
Key Specs and Main Parts
Before we dive into the diagram itself, let's familiarize ourselves with the main players in the drive system. The diagram will illustrate how these components interact:
- Engine Pulley: The driving force. This pulley is connected directly to the engine's crankshaft and provides the initial rotational power.
- Transmission Pulley: Receives power from the engine pulley and transfers it to the transmission, controlling the mower's speed.
- Deck Pulley(s): (If applicable) Delivers power from the engine to the cutting blades. Some mowers have multiple deck pulleys.
- Idler Pulley(s): These pulleys maintain proper belt tension and guide the belt around tight corners. They are often spring-loaded or adjustable.
- Drive Belt: The unsung hero. A reinforced rubber belt that transmits rotational force between pulleys. Murray mowers often use specific belt types (e.g., Kevlar reinforced) to handle the high stress.
- Tension Spring/Adjustment Mechanism: Provides the necessary tension on the idler pulley to ensure the belt doesn't slip. This is a critical element.
Key Specs: The most critical specification for any belt is its length and width. Using the wrong size belt will lead to slippage, premature wear, or even complete failure. The diagram may include belt part numbers or dimensions; if not, a parts catalog for your specific Murray model will be indispensable.
Understanding the Symbols
Drive belt diagrams aren't always works of art, but they are packed with information. Here's how to decode the common symbols:
- Solid Lines: Typically represent the drive belt itself. The line thickness might indicate the belt's relative width, but this isn't always consistent.
- Dashed Lines: Often indicate the belt's path on the underside of a pulley or component. Think of it like showing the belt 'passing behind' something in the drawing.
- Circles: Represent pulleys. Some diagrams might differentiate between engine, transmission, idler, and deck pulleys using subtle differences in size or shading.
- Arrows: Show the direction of belt rotation. This is crucial for understanding how the system works.
- Spring Symbols: Indicate the location of tension springs associated with idler pulleys.
- Numbers/Letters: These often correspond to part numbers in a parts list or service manual.
- Color Coding: Some diagrams use color to differentiate between different belt systems (e.g., drive belt vs. deck belt). However, don't rely solely on color, as it can vary between diagrams.
Important Note: Diagram styles can vary between Murray models and even revisions. Always consult the diagram specific to your mower's model and serial number.
How It Works: The Flow of Power
The drive belt system is a simple yet elegant way to transfer power from the engine to the wheels (and the cutting blades if a deck belt is present). Here's the basic flow:
- The engine spins the engine pulley.
- The drive belt, wrapped around the engine pulley, is driven by its rotation.
- The drive belt then transmits this rotational force to the transmission pulley.
- The transmission pulley, connected to the transmission, controls the mower's speed and direction.
- The idler pulley, kept under tension by a spring or adjustment mechanism, ensures the belt maintains proper grip and doesn't slip.
- (If applicable) A separate belt, the deck belt, driven by the engine or intermediate pulley, powers the cutting blades.
The tension on the drive belt is critical. Too little tension, and the belt will slip, resulting in loss of power. Too much tension, and the belt will wear prematurely, and the bearings on the pulleys will be stressed.
Real-World Use: Basic Troubleshooting
Armed with your diagram and newfound knowledge, you can tackle some common drive belt issues:
- Slipping Belt: Check belt tension. The idler pulley might need adjustment, or the tension spring might be weak or broken. Also, inspect the belt for wear (cracks, fraying) or contamination (oil, grease).
- Belt Noise (Squealing): Often caused by a slipping belt. Address tension as above. Check for worn pulley bearings.
- Belt Breaking: Indicates excessive wear, improper tension, or a misaligned pulley. Make sure all pulleys are properly aligned and free of damage. Replacing a broken belt without addressing the underlying cause will only lead to another failure.
- Mower Won't Move: If the engine runs but the mower doesn't move, the drive belt may have broken or slipped off the pulleys. Refer to the diagram to re-route the belt.
Pro Tip: When replacing a drive belt, take pictures of the existing belt routing *before* removing the old belt. This will serve as a valuable reference, even if you have the diagram.
Safety First!
Working on a riding mower can be dangerous. Always follow these safety precautions:
- Disconnect the spark plug wire before working on any part of the mower. This prevents accidental starting.
- Wear safety glasses to protect your eyes from debris.
- Use jack stands if you need to lift the mower for access. Never rely solely on a jack.
- Be aware of rotating parts. Keep your hands, clothing, and tools clear of the pulleys and belts when the engine is running.
- Refer to your mower's owner's manual for specific safety instructions.
The areas around the engine pulley and deck pulleys are particularly risky when the engine is running. Exercise extreme caution in these areas.
By understanding your Murray riding mower's drive belt diagram, you're empowering yourself to maintain your machine and keep your lawn looking its best. Happy mowing!
We have a comprehensive collection of Murray riding mower drive belt diagrams available. Contact us, and we'll help you find the right diagram for your specific model. You can download the diagram as needed.