Driver Side Power Window Switch Wiring Diagram
So, you're staring at a driver's side power window switch that's decided to take an early retirement? Or maybe you're diving into a custom wiring project and need to understand how those little buttons control a hefty pane of glass. Either way, understanding the wiring diagram for your driver's side power window switch is crucial. This isn't just some academic exercise; it's the key to diagnosing problems, making repairs, and even upgrading your system. Let's break it down.
Purpose of Understanding the Wiring Diagram
Why bother with a wiring diagram? Here's the gist:
- Troubleshooting Electrical Issues: When your window refuses to budge, a wiring diagram pinpoints the exact wires and components to test. No more guessing!
- Repairing Faulty Switches: Identify damaged wires, corroded connectors, or a failing switch contact.
- Custom Wiring Projects: Adding new features, like automatic window roll-up or remote control, requires a solid understanding of the existing wiring.
- Learning Automotive Electrical Systems: The power window circuit is a great introduction to basic automotive electrical concepts like relays, switches, and motors.
Think of it as a map for your car's electrical system. Without it, you're wandering in the dark.
Key Specs and Main Parts
Let's get familiar with the players in this electrical drama:
- Battery: The heart of the system, providing the 12V (or 24V in some heavy-duty vehicles) DC (Direct Current) power.
- Fuse: A safety device that protects the circuit from overloads. If too much current flows, the fuse blows, preventing damage to other components. Always check the fuse first when troubleshooting!
- Main Power Window Switch (Driver's Side): This is the master control, allowing you to operate all windows from the driver's seat.
- Individual Window Switches (Passenger and Rear): These allow passengers to control their own windows.
- Power Window Motor: A small DC motor that drives the window regulator, which raises and lowers the window.
- Window Regulator: The mechanical linkage that translates the motor's rotation into the up-and-down movement of the window.
- Wiring Harness: A bundle of wires that connects all the components. These are often color-coded for easy identification.
- Relays: Electrically operated switches that allow a small current to control a larger current. Often used to protect the main switches from the high current drawn by the window motors.
Symbols - Deciphering the Electrical Alphabet
Wiring diagrams use standardized symbols to represent components. Here's a cheat sheet:
- Straight Lines: Represent wires. Thicker lines may indicate larger gauge wires (capable of carrying more current).
- Dotted Lines: Often indicate a connection between components on different pages of the diagram, or ground connections.
- Color Codes: Wires are typically color-coded. Common abbreviations include:
- BK: Black (usually ground)
- RD: Red (usually power)
- BL: Blue
- GR: Green
- WH: White
- YL: Yellow
A wire labeled "BL/WH" would be a blue wire with a white stripe.
- Switch Symbols: Represent switches in their normal (unactuated) state. Different switch symbols exist for single-pole single-throw (SPST), single-pole double-throw (SPDT), and multi-pole switches. The power window switch is typically a double-pole double-throw (DPDT) switch, allowing it to reverse the polarity of the current to the motor for up and down movement.
- Motor Symbol: A circle with an "M" inside.
- Ground Symbol: Looks like an upside-down triangle, often connected to the chassis of the car.
- Fuse Symbol: A wavy line inside a rectangle.
- Relay Symbol: Shows the coil and the switch contacts. The coil, when energized, closes (or opens, depending on the relay type) the contacts.
Understanding these symbols is crucial for "reading" the diagram.
How It Works: The Flow of Electricity
Let's trace the path of electricity in a typical driver's side power window circuit:
- Power Source: The battery provides the initial power.
- Fuse Protection: The power travels through a fuse, protecting the circuit from overloads.
- Main Switch Input: The power reaches the main power window switch on the driver's side. This switch acts as the central control point.
- Individual Switch Control: The main switch often controls power to the individual window switches. In some designs, the individual switches are always powered.
- Switch Activation: When you press the "up" or "down" button on the switch, you complete a circuit that allows current to flow to the window motor. The DPDT switch reverses the polarity of the current to the motor, causing it to rotate in the desired direction.
- Motor Operation: The window motor turns, driving the window regulator.
- Window Movement: The regulator raises or lowers the window.
- Ground Path: The current returns to the battery through a ground connection.
The key is understanding how the switch redirects the flow of current to the motor. The DPDT switch configuration is what allows for the motor to run in both directions.
Real-World Use: Basic Troubleshooting Tips
Okay, the window's stuck. What now? Here's a basic troubleshooting process:
- Check the Fuse: This is the easiest and most common cause. Use a multimeter to test for continuity across the fuse.
- Listen for Motor Noise: When you press the switch, do you hear a click or a whirring sound from the motor?
- No Noise: Indicates a problem with the power supply to the motor (fuse, wiring, switch).
- Clicking Noise: Could indicate a stuck motor or a problem with the relay.
- Whirring Noise: Indicates the motor is running, but the regulator may be broken or disconnected.
- Test the Switch: Use a multimeter to check for continuity across the switch contacts when the button is pressed.
- Check the Wiring: Look for damaged or corroded wires, especially near the door hinges where wires can be flexed repeatedly.
- Test the Motor: Apply direct power to the motor (bypassing the switch) to see if it runs. Be careful!
Refer to the wiring diagram to identify the specific wires and terminals to test. This will save you a ton of time and prevent accidental damage.
Safety - Respect the Electricity!
Working with automotive electrical systems can be dangerous. Keep these safety precautions in mind:
- Disconnect the Battery: Before working on any electrical component, disconnect the negative terminal of the battery. This prevents accidental shorts and shocks.
- Use Proper Tools: Use insulated tools designed for automotive electrical work.
- Be Aware of Airbags: Some wiring harnesses run near airbag sensors. Be extremely careful not to damage these wires, as this could cause the airbags to deploy unexpectedly.
- Avoid Water: Never work on electrical systems in wet conditions.
- Double-Check Your Work: Before reconnecting the battery, double-check all your connections and ensure that no wires are exposed.
The power window motor itself isn't particularly dangerous, but the wires feeding it are. Always prioritize safety!
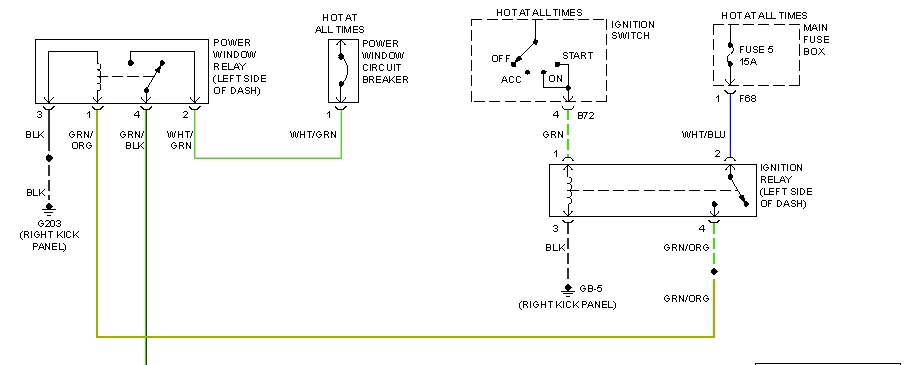
We have a detailed wiring diagram available for download. It provides a comprehensive view of the driver's side power window switch wiring. Analyzing this diagram will significantly enhance your troubleshooting capabilities and provide a solid foundation for any custom wiring projects.