Ecotec Engine 2.4 Ecotec Timing Chain Diagram
Alright folks, let's dive deep into the 2.4L Ecotec timing chain system. This guide isn't just about memorizing a diagram; it's about understanding the heart of your engine. Whether you're tackling a timing chain replacement, diagnosing a P0016 code, or simply expanding your automotive knowledge, a solid grasp of the timing chain diagram is crucial.
Purpose of the 2.4L Ecotec Timing Chain Diagram
The timing chain diagram serves as a visual roadmap for understanding the intricate relationship between the crankshaft, camshafts, and other critical engine components. It’s your go-to resource when performing any work related to the timing system, ensuring accurate reassembly and preventing catastrophic engine damage. Think of it as the engine's DNA blueprint. It's essential for:
- Repairs: Accurate timing is paramount. This diagram prevents misalignments during timing chain replacement or head work.
- Diagnosis: Symptoms like rough idling, misfires, or trouble codes (like P0016 - Crankshaft Position - Camshaft Position Correlation) often point to timing issues. The diagram aids in pinpointing the problem.
- Learning: Understanding the 2.4L Ecotec's design allows for better preventative maintenance and informed modifications.
Key Specs and Main Parts
Before we jump into the diagram, let's define the key players in the 2.4L Ecotec timing chain system. Knowing these parts will make the diagram far more meaningful. The diagram is a representation of where all the parts should be at one time:
- Crankshaft: The engine's backbone, converting reciprocating motion into rotational power. The crankshaft drives the timing chain via a sprocket.
- Camshaft(s): In the 2.4L Ecotec, you'll find dual overhead camshafts (DOHC). These control the opening and closing of the intake and exhaust valves.
- Timing Chain: The strong, silent link that synchronizes the crankshaft and camshaft(s).
- Timing Chain Tensioner: Crucial for maintaining proper chain tension, preventing slack and ensuring accurate timing. These are often hydraulically operated, using engine oil pressure.
- Timing Chain Guides/Rails: These plastic or metal guides ensure the timing chain follows the correct path and minimize vibration.
- Camshaft Sprockets: Gears mounted on the camshafts that are driven by the timing chain.
- Crankshaft Sprocket: The gear mounted on the crankshaft that drives the timing chain.
- Variable Valve Timing (VVT) Actuators (if equipped): Some 2.4L Ecotec engines feature VVT, allowing the engine control unit (ECU) to adjust camshaft timing for optimized performance and fuel efficiency. These are often found on the camshaft sprockets.
- Oil Pump Drive Chain (separate but often depicted): Some diagrams also show the smaller chain that drives the oil pump, which runs off the crankshaft.
Common Specs to keep in mind:
- Torque Specifications: Crucial for securing sprockets, tensioners, and guides. Always consult a service manual for accurate values. Using the wrong torque can result in component failure or worse.
- Timing Marks Alignment: There are specific timing marks on the crankshaft and camshaft sprockets that must align correctly during installation. These are indicated in the diagram.
- Chain Wear Limits: Timing chains stretch over time. The service manual will specify acceptable wear limits.
Understanding Timing Chain Diagram Symbols
A timing chain diagram isn't just a pretty picture. It communicates vital information through various symbols and conventions. Decoding these symbols is key to using the diagram effectively.
- Solid Lines: Typically represent the timing chain itself, or solid components such as the block or head.
- Dotted Lines: Often indicate oil passages, vacuum lines, or other secondary systems.
- Arrows: Show the direction of rotation for the crankshaft and camshafts. Note that these are often counter-rotating.
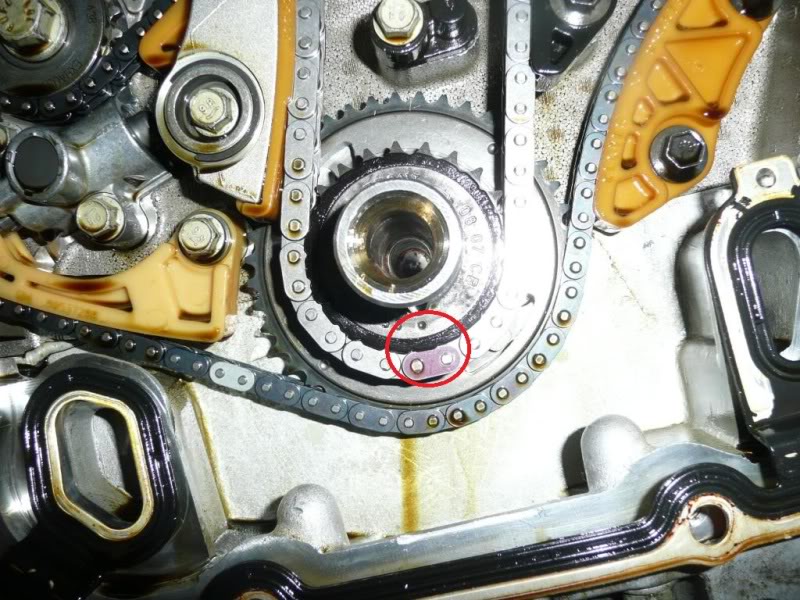
- Circles/Dots: Represent timing marks. These can be small indentations, painted marks, or raised bumps on the sprockets. Proper alignment of these marks is critical for correct engine timing.
- Colors: Some diagrams use colors to differentiate between components or highlight specific features. For example, the oil pump chain might be a different color from the timing chain.
- Icons/Abbreviations: Common abbreviations include "CRK" for crankshaft, "CAM" for camshaft, "VVT" for variable valve timing, and "TDC" for top dead center. Icons are used to indicate sensors or other components.
How the 2.4L Ecotec Timing Chain System Works
The 2.4L Ecotec timing chain system operates on a straightforward principle: synchronizing the crankshaft and camshafts. The crankshaft's rotation, driven by the pistons' up-and-down motion, is transferred to the camshafts via the timing chain. The camshafts then control the opening and closing of the intake and exhaust valves, allowing air and fuel to enter the cylinders and exhaust gases to exit.
The timing chain tensioner plays a crucial role in maintaining the correct chain tension. Without it, the chain would be prone to slack, leading to timing inaccuracies and potential engine damage. The chain guides prevent excessive chain vibration and ensure smooth operation.
In VVT-equipped engines, the ECU can adjust the camshaft timing dynamically. This is achieved through VVT actuators, which are controlled by oil pressure. By advancing or retarding the camshaft timing, the ECU can optimize engine performance, fuel economy, and emissions based on driving conditions.
The oil pump drive chain is a separate but related system. Driven directly by the crankshaft, it powers the oil pump, ensuring that the engine receives adequate lubrication.
Real-World Use and Basic Troubleshooting
Now, let's apply this knowledge to real-world scenarios. Here are some basic troubleshooting tips related to the 2.4L Ecotec timing chain system:
- P0016 Code (Crankshaft/Camshaft Position Correlation): This is a common code indicating a timing misalignment. Check the timing chain for wear or stretch. Inspect the timing chain tensioner for proper function. Verify that the timing marks are correctly aligned.
- Rough Idling or Misfires: These symptoms can be caused by incorrect valve timing. Check the timing chain for slack or wear. Inspect the VVT system (if equipped) for proper function.
- Rattling Noise from the Engine: A rattling noise, especially during cold starts, can indicate a worn timing chain tensioner or damaged chain guides.
- Oil Leaks: Leaks near the timing chain cover can be caused by a damaged seal or gasket. When replacing the timing chain, it’s good preventative maintenance to replace any seals in the area.
Quick Checks:
- Visual Inspection: Look for obvious signs of wear or damage on the timing chain, sprockets, and guides.
- Listen Carefully: Pay attention to any unusual noises coming from the engine, particularly around the timing chain area.
- Scan for Codes: Use an OBD-II scanner to check for any diagnostic trouble codes (DTCs) related to the timing system.
Always consult a repair manual for specific diagnostic procedures and torque specifications.
Safety Precautions
Working on the timing chain system can be risky, especially if you're not familiar with the procedure. Here are some critical safety precautions:
- Disconnect the Battery: Always disconnect the negative battery terminal before working on any electrical components.
- Secure the Vehicle: Ensure the vehicle is properly supported on jack stands. Never work under a vehicle supported only by a jack.
- Handle Components Carefully: Be careful when handling sharp or heavy components, such as the timing chain, sprockets, and cylinder head.
- Avoid Contamination: Keep the timing chain and related components clean. Foreign debris can damage the engine.
- Use the Right Tools: Use the correct tools for the job. This will prevent damage to the engine and reduce the risk of injury.
- Be Aware of High-Pressure Oil: The timing chain tensioner is often hydraulically operated, meaning it uses engine oil pressure. Be cautious when removing the tensioner, as residual oil pressure can cause it to spring out.
Warning! Improper timing can lead to catastrophic engine damage. If you're not comfortable working on the timing chain system, it's best to consult a qualified mechanic.
This information provides a solid foundation for understanding the 2.4L Ecotec timing chain system. Remember to always consult a repair manual for specific procedures and torque specifications. Understanding the diagram, the parts, and how they interact is crucial for successful diagnostics and repairs.
We have a detailed timing chain diagram available for download to assist you with your work. This diagram includes detailed views of the timing marks, component locations, and other critical information. Please reach out to us to access the file.