
Electric Pressure Washer Wiring Diagram
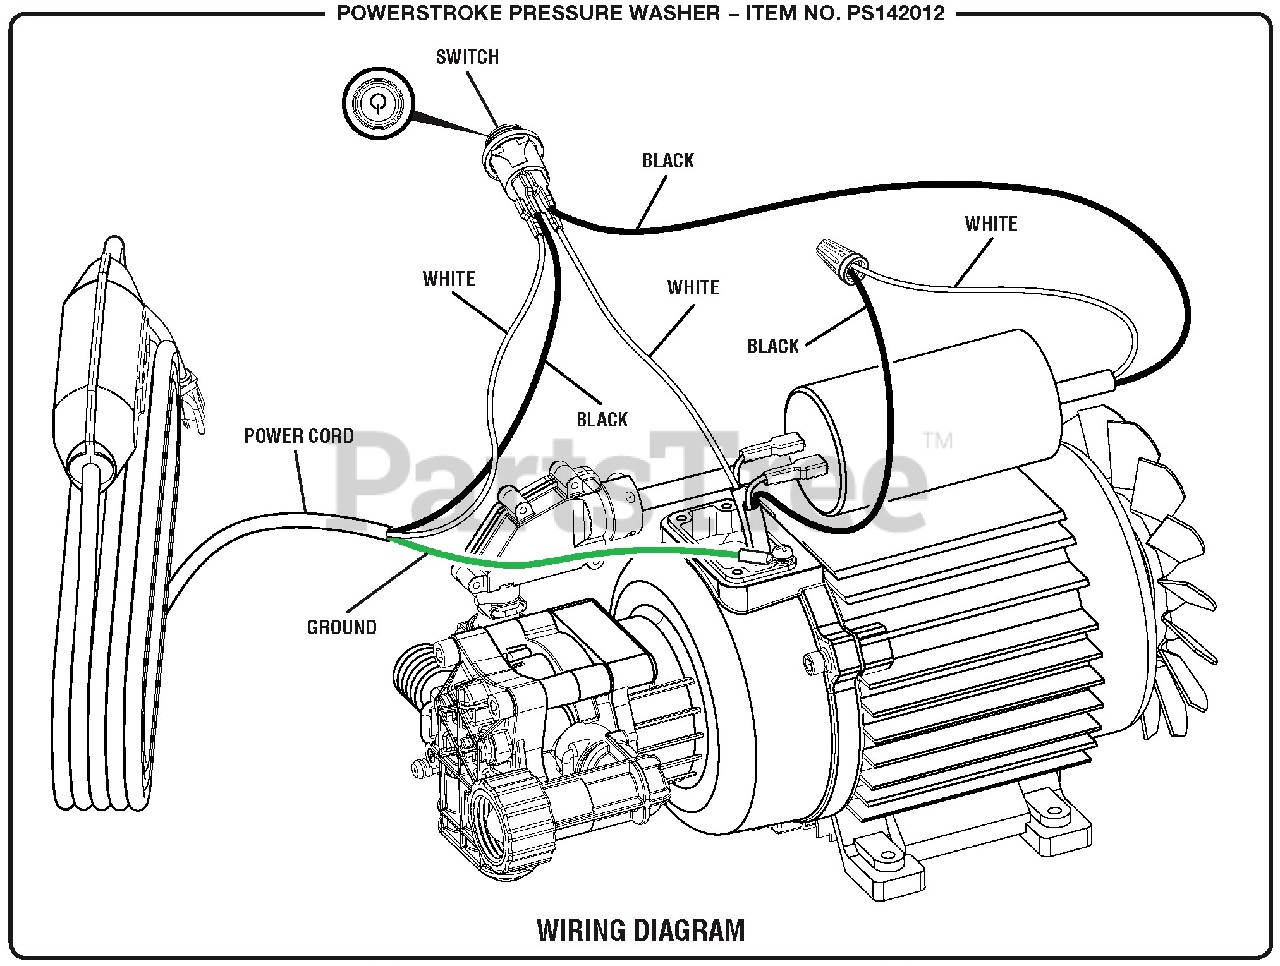
Let's dive into the world of electric pressure washer wiring diagrams. You might be thinking, "Why do I need to understand this?" Well, whether you're tackling a repair, modifying your unit for specific tasks, or simply want to gain a deeper understanding of how your equipment functions, a solid grasp of the wiring diagram is invaluable. This isn't just abstract theory; it's practical knowledge that can save you time, money, and potentially prevent serious accidents.
Purpose of the Wiring Diagram
The primary purpose of an electric pressure washer wiring diagram is to provide a visual representation of all the electrical components within the machine and how they are interconnected. It's essentially a roadmap for the electrical system. This roadmap is critical for several reasons:
- Troubleshooting: When your pressure washer malfunctions, the wiring diagram helps you trace the electrical flow, identify potential points of failure (like a short circuit or open circuit), and pinpoint the faulty component.
- Repair: Replacing a damaged motor, switch, or capacitor becomes much easier with a clear understanding of the wiring layout. You can ensure you're connecting everything correctly, avoiding further damage.
- Modification: If you're feeling ambitious and want to add a feature, such as an upgraded pressure switch or a different type of motor, the diagram shows you where to safely tap into the existing circuitry. Always proceed with extreme caution and consult a qualified electrician for complex modifications.
- Learning: Even if you don't plan on performing repairs yourself, studying the wiring diagram offers valuable insights into the inner workings of your pressure washer and electrical systems in general.
Key Specs and Main Parts
Before we delve into the diagram itself, let's identify the core components typically found in an electric pressure washer:
- Power Cord: This connects the pressure washer to the mains electricity supply (usually 120V or 240V AC).
- On/Off Switch: A simple switch to turn the pressure washer on and off. Often a single-pole single-throw (SPST) switch.
- Motor: The heart of the machine, responsible for driving the pump and generating water pressure. Electric pressure washers typically use universal motors or induction motors.
- Pump: The mechanical component that pressurizes the water. Driven directly by the motor.
- Capacitor: Often used in conjunction with the motor, especially induction motors, to improve starting torque and power factor. A start capacitor provides a burst of energy for starting, while a run capacitor helps maintain efficient operation.
- Thermal Overload Protection: A safety device that automatically cuts off power to the motor if it overheats, preventing damage. This can be a resettable fuse or a thermal cutout.
- Pressure Switch: Senses the water pressure and automatically starts or stops the motor to maintain the desired pressure level.
- Wiring Harness: A bundle of wires that connect all the components together.
Key Specs to look for on the diagram or components:
- Voltage (V): Indicates the electrical potential required for the device to operate. Common voltages are 120V and 240V.
- Current (Amps - A): Represents the amount of electrical current the device draws. Important for selecting appropriate fuses and wiring.
- Power (Watts - W): The rate at which the device consumes energy (Volts x Amps = Watts).
- Capacitance (Farads - F or µF): The electrical storage capacity of a capacitor.
Understanding the Symbols
Wiring diagrams use standardized symbols to represent electrical components and connections. Here's a breakdown of some common symbols you'll encounter:
- Lines: Solid lines represent wires. Dashed lines may indicate mechanical linkages or connections that are not electrical.
- Circles: Can represent various components, depending on what's inside them. Could be motors, lamps, or other devices.
- Rectangles: Commonly used to represent switches, relays, or control modules.
- Resistors: Represented by a zig-zag line.
- Capacitors: Two parallel lines, often with one curved.
- Ground: Typically shown as a series of horizontal lines decreasing in length, connected to a vertical line. This indicates a connection to earth ground.
Color Coding: Color coding is used to distinguish wires. While standards can vary slightly, common colors include:
- Black: Often used for the hot (live) wire in AC circuits.
- White: Typically used for the neutral wire.
- Green or Green/Yellow: Used for the ground wire.
- Other Colors: Other colors like red, blue, and yellow may be used for control circuits or specific functions.
The wiring diagram should also contain annotations and labels that further clarify the purpose of each wire and component.
How It Works: Electrical Flow
Let's trace the typical electrical flow within an electric pressure washer:
- Power Input: Electricity enters the pressure washer through the power cord (Line, Neutral, and Ground).
- On/Off Switch: The power goes through the on/off switch. When the switch is closed (ON position), it allows current to flow.
- Motor Circuit: From the switch, the electricity flows to the motor circuit. This circuit may include a capacitor (for starting and running) and a thermal overload protector.
- Pressure Switch Control: A pressure switch is often wired in series with the motor circuit. When the pressure in the system drops (e.g., when you squeeze the trigger on the spray gun), the pressure switch closes, completing the circuit and allowing the motor to run. When the pressure reaches the setpoint, the switch opens, stopping the motor.
- Motor Operation: The motor converts electrical energy into mechanical energy, which drives the pump.
- Pump Operation: The pump pressurizes the water, which is then delivered through the hose to the spray gun.
- Grounding: The ground wire provides a safe path for electricity to flow in the event of a fault, preventing electric shock.
Real-World Use: Basic Troubleshooting Tips
Here are a few common troubleshooting scenarios where understanding the wiring diagram can be helpful:
- Pressure Washer Won't Turn On:
- Check the power cord for damage. Use a multimeter to verify continuity.
- Test the on/off switch. Is it making a connection when turned on?
- Inspect the thermal overload protector. If tripped, reset it (if it's a resettable type).
- Check for voltage at the motor terminals. If no voltage, trace back through the wiring diagram to identify the break.
- Motor Hums but Doesn't Start:
- The capacitor might be faulty. Test the capacitor with a capacitance meter. A bulging or leaking capacitor is a sure sign of failure.
- The motor windings might be shorted or open. Test the motor windings with an ohmmeter.
- Pressure Washer Turns On and Off Rapidly:
- The pressure switch may be malfunctioning. Check its adjustment or replace it.
- There may be air in the pump system. Bleed the air from the system.
- The unloader valve might be sticking or malfunctioning.
Important: Always disconnect the power cord from the outlet before performing any electrical troubleshooting or repairs.
Safety Considerations
Working with electricity can be dangerous. Be aware of the following:
- High Voltage: Electric pressure washers operate on mains voltage, which can be lethal.
- Capacitors: Capacitors can store a charge even after the power is disconnected. Discharge capacitors before handling them using a resistor of appropriate value.
- Water and Electricity: Never work on an electric pressure washer while it is wet or damp. Ensure the area is dry and well-ventilated.
- Proper Grounding: Ensure the pressure washer is properly grounded to prevent electric shock.
- Use Insulated Tools: Always use insulated tools when working on electrical components.
- When in doubt, consult a qualified electrician. If you're not comfortable working with electricity, seek professional help.
Remember, safety should always be your top priority. Proceed with caution and take all necessary precautions to avoid electric shock.
We have a detailed wiring diagram file available for download. This diagram provides a comprehensive visual representation of the electrical system, complete with labels and annotations. This will be a helpful guide when troubleshooting or repairing your electric pressure washer. Contact us, and we will be happy to provide the link for you to download!