Electric Water Heater Thermostat Wiring Diagram
Let's dive into the world of electric water heater thermostat wiring diagrams. If you're an experienced DIYer, home improvement enthusiast, or even just someone who likes to understand how things work around the house, this is a topic that can be incredibly valuable. Knowing how your water heater's thermostat is wired can save you money on repairs, allow you to perform basic troubleshooting, and even give you the confidence to upgrade or replace components yourself.
Purpose of Understanding the Wiring Diagram
Why bother with a wiring diagram? There are several compelling reasons:
- DIY Repairs: Minor issues like a faulty thermostat can often be resolved without calling a professional. A wiring diagram helps you diagnose the problem and ensure you're connecting the new part correctly.
- Troubleshooting: Is your water heater not heating, overheating, or tripping the breaker? A wiring diagram is essential for tracing the electrical path and identifying potential faults.
- Learning and Understanding: Gaining a deeper understanding of how your appliances work empowers you to make informed decisions about maintenance, repairs, and upgrades.
- Modifications (with caution): While generally discouraged due to safety concerns, understanding the wiring is crucial if you're attempting any modifications, such as installing a timer or smart thermostat (always consult with a qualified electrician for these types of projects).
Key Specs and Main Parts
Before we delve into the diagram itself, let's familiarize ourselves with the essential components of an electric water heater's electrical system:
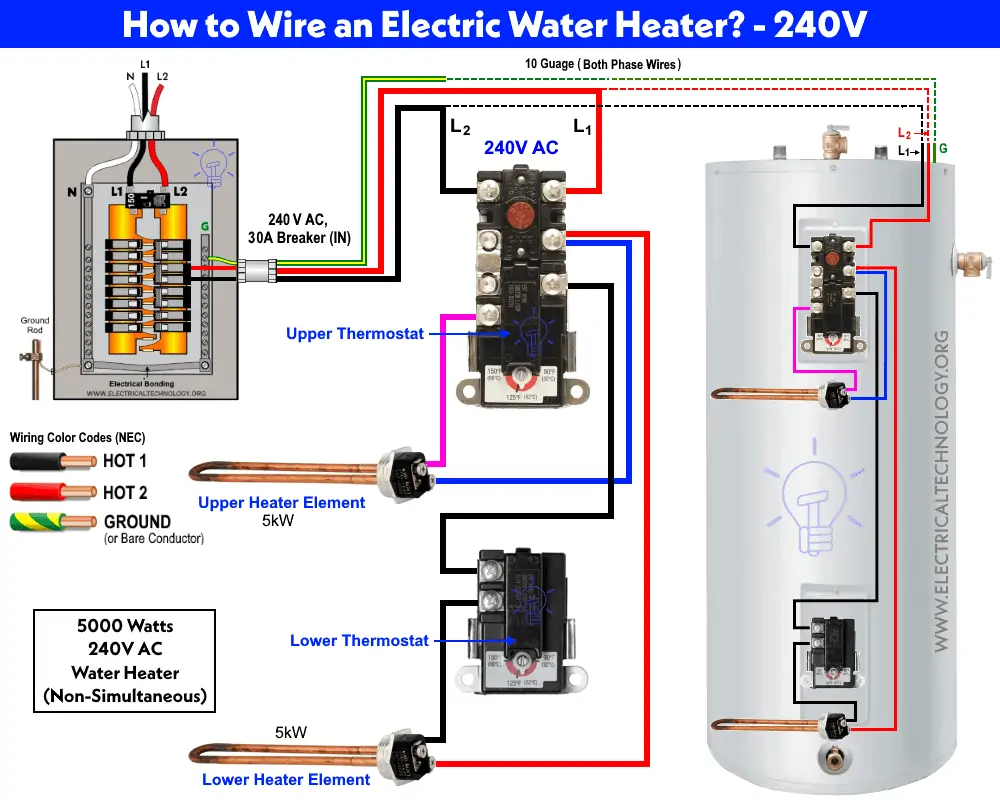
- Thermostat(s): Typically, electric water heaters have two thermostats – an upper thermostat and a lower thermostat. The upper thermostat prioritizes heating the top half of the tank, then switches power to the lower thermostat once the top half reaches the set temperature.
- Heating Elements: These are the resistive heating elements that immerse directly in the water. Typically, there is one upper element and one lower element, each controlled by its respective thermostat. They usually range from 3000 to 5500 watts.
- Over-Temperature Cutoff (ECO): A safety device that automatically cuts power to the heating elements if the water temperature exceeds a safe limit (usually around 190°F). This prevents scalding and potential damage to the tank. It's often a red button on the upper thermostat that needs to be manually reset.
- Terminal Blocks: These provide a secure connection point for the wiring between the power supply, thermostats, and heating elements.
- Power Supply: Electric water heaters typically require a 240V AC power supply, although some smaller models might use 120V.
Symbols in the Wiring Diagram
Understanding the symbols used in a wiring diagram is crucial for interpreting it correctly. Here's a breakdown of common symbols:
- Lines: Represent wires. The thickness of the line usually doesn't indicate wire gauge in a basic schematic.
- Solid Black Line: Indicates a live (hot) wire carrying electrical current.
- White Line: Usually represents the neutral wire.
- Green or Bare Copper Line: Represents the ground wire.
- Circles: Can represent various components, often with a symbol inside to specify the component (e.g., a resistor symbol for a heating element).
- Rectangles: Often represent devices like thermostats or control modules.
- Switches: Show the state of a switch (open or closed). A thermostat acts as a switch.
- Circles with 'T' inside: Thermostat symbol.
Color Coding: While not always present on the actual wiring within the water heater, the wiring diagram will often use color coding to denote the function of the wires. Common colors include black (hot), white (neutral), green or bare (ground), and sometimes red (another hot wire in a 240V system). Always verify the wiring with a multimeter to confirm the actual voltage and function, regardless of the wire color.
How It Works – The Electrical Flow
Here's a simplified explanation of how the electrical circuit works in a typical electric water heater with two thermostats and heating elements:
- Power Input: 240V power enters the water heater through two hot wires (L1 and L2) and a neutral wire. A ground wire provides a path for fault current in case of a short circuit.
- Upper Thermostat Control: L1 (one of the hot wires) feeds into the upper thermostat. If the upper thermostat senses that the water temperature is below its set point, it closes a switch, allowing power to flow to the upper heating element.
- Upper Element Activation: The upper heating element heats the top portion of the tank.
- Switch to Lower Thermostat: Once the upper thermostat reaches its set point, it opens the circuit to the upper element and simultaneously closes a switch that allows L1 to flow to the lower thermostat.
- Lower Thermostat Control: The lower thermostat then controls the lower heating element in a similar fashion. If the lower thermostat senses that the water temperature is below its set point, it closes the switch allowing power to flow to the lower heating element.
- Lower Element Activation: The lower heating element heats the bottom portion of the tank.
- Neutral Return: Both heating elements connect back to the neutral wire, completing the circuit.
Important Note: Some water heaters may use a slightly different configuration. The key is to understand the flow of electricity through the components.
Real-World Use – Basic Troubleshooting
Let's say your water heater isn't heating. Here's how a wiring diagram can help:
- No Hot Water: Check the breaker first! Then, using the wiring diagram, trace the electrical path from the breaker to the thermostats and heating elements. Use a multimeter to test for voltage at each point. If you find voltage at the thermostat but not at the heating element, the thermostat is likely faulty.
- Water Too Hot: The thermostat may be malfunctioning and not turning off the heating element. The ECO (over-temperature cutoff) might be tripped. The diagram helps you locate these components.
- Tripping the Breaker: This could indicate a short circuit. Inspect the wiring for damaged insulation. A heating element could also be shorted. You can use the wiring diagram to isolate the suspect component and test its resistance with a multimeter. A shorted element will typically show very low resistance.
Warning: Troubleshooting electrical problems can be dangerous. Always disconnect the power to the water heater at the breaker before working on it. If you are uncomfortable working with electricity, consult a qualified electrician.
Safety – Respecting the Risk
Electric water heaters operate on 240V AC, which is lethal. Here are some crucial safety precautions:
- Always disconnect the power at the breaker before working on the water heater. Double-check with a voltage tester to ensure the power is off.
- Never work on a water heater with wet hands or while standing in water.
- If you are unsure about any aspect of the repair, consult a qualified electrician.
- Be aware of the potential for scalding water. Always allow the water to cool before draining or working on the tank.
- The heating elements get extremely hot. Allow them to cool completely before handling them.
- Properly ground the water heater. Ensure the ground wire is securely connected to the grounding terminal.
The ECO is a critical safety device. Never bypass or disable it. If it trips frequently, there is an underlying problem that needs to be addressed.
By understanding the wiring diagram and taking the proper safety precautions, you can confidently tackle basic repairs and maintenance on your electric water heater. Always remember that safety is paramount. When in doubt, consult a qualified professional.
Note: We have access to a standard electric water heater thermostat wiring diagram file in PDF format that you can use as a reference. This file provides a visual guide to help you understand the connections and components discussed in this article.