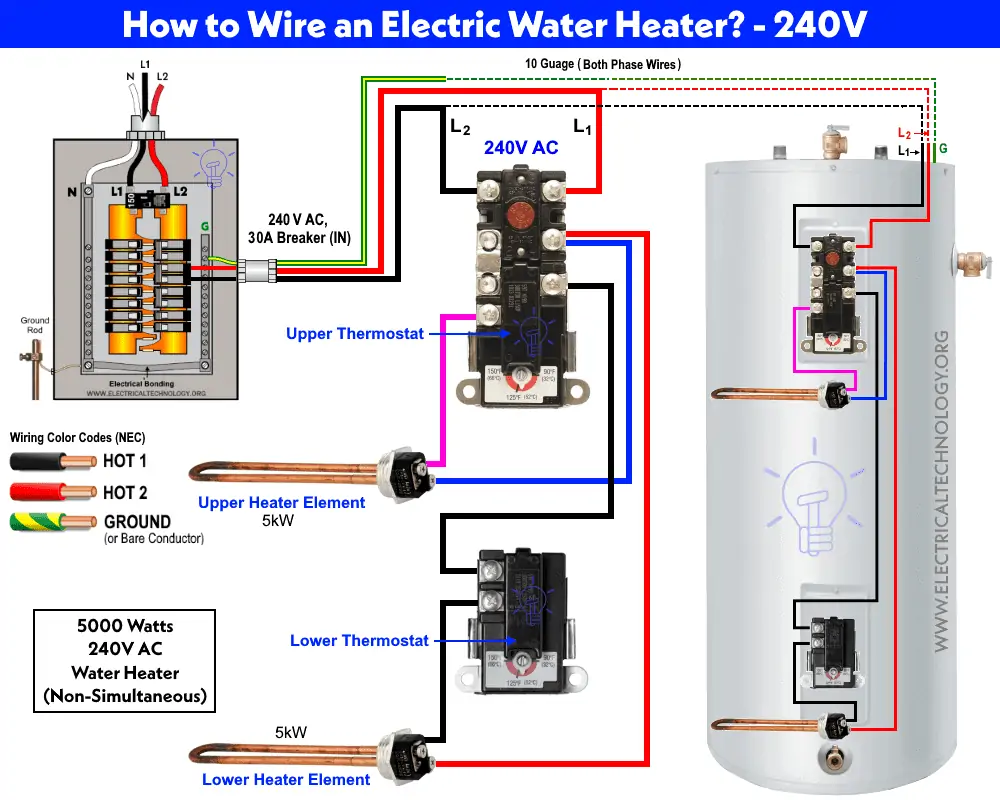
Electric Water Heater Wiring Diagram
Alright, let's dive into the wiring of electric water heaters. Think of this as understanding the circulatory system of your hot water supply. This isn't just theoretical; grasping the electric water heater wiring diagram empowers you to diagnose problems, perform basic repairs (safely, of course!), and even upgrade components down the line. We're not talking about completely rebuilding the thing, but knowing your way around the electrical connections can save you a bundle on service calls and give you a serious sense of accomplishment.
Why Bother with the Wiring Diagram?
The wiring diagram is essentially a roadmap of the electrical system within your water heater. It's more than just a pretty picture; it's critical for several reasons:
- Troubleshooting: When your water heater isn't heating, or the thermostat is acting up, the diagram helps you trace the circuit to identify faulty components like heating elements, thermostats, or wiring issues.
- Repairing: Replacing a heating element or thermostat requires understanding how the new component integrates into the existing electrical system. The diagram ensures correct wiring, preventing shorts, fires, and further damage.
- Understanding Operation: Even if everything is working perfectly, the diagram provides insight into how the water heater functions. This knowledge is invaluable for preventive maintenance and spotting potential problems before they escalate.
- Modifications (Proceed with Caution!): While we generally advise against radical modifications, understanding the wiring diagram can allow for safe, minimal adjustments, such as adding a timer or integrating with a smart home system. However, proceed with extreme caution and always consult a qualified electrician for anything beyond basic troubleshooting.
Key Specs and Main Parts
Before we jump into the diagram, let's establish the key specifications and components you'll encounter in most electric water heaters:
- Voltage: Typically 240V AC (in North America), but always confirm the voltage rating on your specific unit's nameplate. Using the wrong voltage can cause serious damage and pose a significant fire hazard.
- Wattage: The combined wattage of the heating elements determines how quickly the water heats. Common wattages range from 3000W to 5500W per element.
- Heating Elements: These are the resistive coils that heat the water. Most water heaters have two: an upper and a lower element, each independently controlled by a thermostat.
- Thermostats: These control the heating elements, switching them on and off to maintain the desired water temperature. There's usually an upper and lower thermostat, each associated with its respective heating element.
- High-Temperature Limit Switch (ECO): A safety device that automatically shuts off power to the heating elements if the water temperature exceeds a pre-set limit. This prevents overheating and potential explosions. It’s often a red button that needs manual reset.
- Wiring: Copper or aluminum conductors that carry electricity to the various components. Wire gauge (thickness) is crucial; it must be sufficient to handle the current draw.
- Junction Box: Where the house wiring connects to the water heater's wiring.
- Ground Wire: Essential for safety. Provides a path for fault current to flow back to the source, tripping the circuit breaker.
- Tank: The insulated container holding the water. While not electrical, its condition directly affects the system's efficiency and lifespan.
Decoding the Wiring Diagram: Symbols and Colors
The wiring diagram uses a standardized set of symbols and color codes. Here's a breakdown of the most common ones:
- Lines: Lines represent wires. A solid line indicates a direct connection, while a dashed line might represent a connection within a component or a physical separation.
- Circles with a "T" inside: Thermostat symbol.
- Squiggly lines: Represent the heating elements (resistive load).
- Rectangle with a diagonal line: Overload protection devices like the high-temperature limit switch (ECO).
- Ground Symbol (three horizontal lines getting shorter): Indicates a connection to ground.
- Color Codes: These are crucial for identifying wires. Common color codes in North America include:
- Black (Hot): Carries the live voltage.
- White (Neutral): The return path for the current. Note: In 240V circuits, white wires can be used as hot wires *if* they are properly marked with black tape or paint near the connections. This is a common source of confusion, so pay close attention!
- Green (Ground): Connects to the grounding system, providing a safety path.
- Red (Hot): Often used for a second hot wire in 240V circuits.
A typical diagram will show the power coming in through the junction box, then branching off to the upper thermostat. The upper thermostat controls power to the upper element and, when satisfied, sends power to the lower thermostat. The lower thermostat then controls the lower element. The ECO (high-temperature limit switch) is typically in series with the power supply to one or both thermostats, acting as a safety cutoff.
How It Works: The Electrical Flow
Understanding how the electricity flows is key to understanding the diagram. Here's a simplified explanation:
- Power from the circuit breaker enters the water heater through the junction box. Typically, there are two hot wires (240V) and a ground wire.
- The hot wires connect to the upper thermostat. The upper thermostat has a sensing element that monitors the temperature of the water in the upper part of the tank.
- If the water is below the setpoint, the upper thermostat sends power to the upper heating element.
- Once the upper part of the tank reaches the desired temperature, the upper thermostat stops sending power to the upper element. It then sends power to the lower thermostat.
- The lower thermostat operates similarly, controlling the lower heating element based on the water temperature in the lower part of the tank.
- The ECO switch monitors the water temperature and cuts off power to the thermostats if it gets too high.
- The ground wire provides a safe path for fault current to return to the source, tripping the circuit breaker and preventing electric shock.
Real-World Use: Basic Troubleshooting
Okay, let's get practical. Here are some common water heater problems and how the wiring diagram can help diagnose them:
- No Hot Water:
- Check the breaker: Is it tripped? Reset it. If it trips again immediately, there's a short circuit. Consult the diagram to trace the wiring.
- Test the heating elements: Use a multimeter to check for continuity across the terminals of each element. If there's no continuity (infinite resistance), the element is likely burned out. The diagram shows you which wires to disconnect for testing.
- Test the thermostats: Use a multimeter to check for continuity through the thermostat. If there's no continuity, the thermostat is faulty. The diagram shows where the thermostat is located in the circuit.
- Check the ECO switch: If the ECO has tripped (red button popped out), reset it. If it trips again quickly, there's likely a problem with a thermostat or heating element.
- Water Not Hot Enough:
- Check thermostat settings: Are they set correctly?
- Test the thermostats: They might be malfunctioning and not calling for enough heat.
- One heating element is bad: Only the top of the water will be hot.
- Circuit Breaker Keeps Tripping:
- Short circuit: Inspect the wiring for any signs of damage or loose connections. The diagram helps you trace the circuit to find the short.
- Faulty heating element: A failing element can draw excessive current, tripping the breaker.
Safety First! Highlighting Risky Components
Working with electricity is dangerous. Always remember these safety precautions:
- Turn off the power: Always turn off the circuit breaker that supplies power to the water heater before working on it. Double-check with a voltage tester to ensure the power is off.
- Use insulated tools: Protect yourself from electric shock.
- Never work on a wet floor: Water conducts electricity.
- Grounding is crucial: Ensure the water heater is properly grounded. Never bypass or remove the ground wire.
- Know your limits: If you're uncomfortable working with electricity, call a qualified electrician. This is especially true for complex repairs or modifications.
- The Heating Elements: Can become extremely hot during operation, so wait for them to cool down before touching them.
- The ECO Switch: Is a crucial safety device; never bypass or disable it.
Water and electricity don't mix. Take your time, be careful, and when in doubt, call a professional.
We've covered a lot here, from understanding the purpose of a wiring diagram to basic troubleshooting. With this knowledge and the diagram itself, you'll be better equipped to tackle common water heater issues. Remember safety first, and don't hesitate to consult a professional when needed.
A downloadable PDF of a generic electric water heater wiring diagram is available. This resource can be a valuable tool for your troubleshooting and repair endeavors. Please remember that this is a generic diagram, and your specific water heater model may have slight variations. Always refer to the manufacturer's diagram for your unit for the most accurate information.