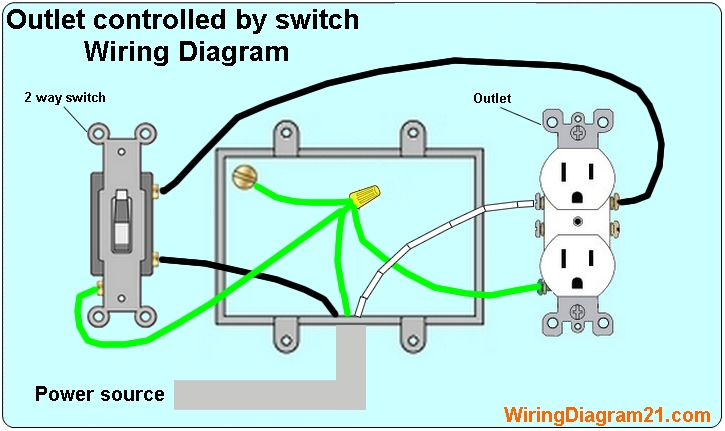
Electrical Wiring Diagrams Light Switch Outlet
Electrical wiring diagrams for light switches and outlets are indispensable tools for anyone tackling electrical work around their home. Whether you're replacing a faulty outlet, adding a new light fixture, or simply trying to understand how your home's electrical system works, these diagrams provide a visual roadmap. We're going to delve into the intricacies of these diagrams, providing you with the knowledge and confidence to handle basic electrical tasks safely and effectively. And to make things even easier, we've got a downloadable diagram that you can use as a reference – you'll find information on how to get it at the end of this article.
Why This Diagram Matters
Understanding electrical wiring diagrams transcends simply following instructions; it empowers you to diagnose issues, perform repairs, and even customize your electrical system (within safe and code-compliant limits, of course!). Consider these scenarios:
- Troubleshooting: A light switch stops working. A diagram helps you trace the circuit, identify potential fault points (like loose connections), and pinpoint the problem component.
- Adding New Fixtures: Want to install a new ceiling fan or add an outlet? A diagram shows you how to properly wire the new fixture into the existing circuit.
- Understanding Your Home's Electrical System: Gain a deeper understanding of how electricity flows through your home, enhancing your overall safety and DIY capabilities.
- Code Compliance: Ensuring your work meets local electrical codes is crucial. Understanding diagrams helps you maintain safe and compliant installations.
Key Specs and Main Parts
A typical light switch and outlet wiring diagram will depict the following key components:
- Power Source (Service Panel/Breaker Box): This is where the electricity enters the circuit. The diagram shows which circuit breaker controls the circuit you're working on. Important: Always turn off the breaker before working on any electrical wiring!
- Wiring: These are the conductors that carry electricity. The three main types are:
- Hot (Live): Carries the electrical current from the power source. Usually black or red.
- Neutral: Returns the current to the power source. Usually white.
- Ground: Provides a safe path for electricity in case of a fault. Usually green or bare copper.
- Light Switch: Controls the flow of electricity to the light fixture.
- Outlet (Receptacle): Provides a point of connection for electrical devices. Outlets typically have two or three slots:
- Hot Slot (Narrow): Where the hot wire is connected.
- Neutral Slot (Wide): Where the neutral wire is connected.
- Ground Slot (Round): Where the ground wire is connected.
- Light Fixture: The lamp or other device that emits light.
- Junction Boxes: Enclosures where wires are connected and protected. These are not always explicitly shown in the diagram but are implied.
Symbols - Deciphering the Diagram
Wiring diagrams use a standardized set of symbols to represent electrical components and connections. Here's a breakdown of some common symbols:
- Lines: Represent wires. Solid lines indicate wires that are connected, while dotted lines may represent wires that pass through but are not connected at a particular point.
- Colors: Wires are often color-coded to indicate their function:
- Black (or Red): Hot (Live)
- White: Neutral
- Green (or Bare Copper): Ground
- Switch Symbols: Various symbols are used to represent different types of switches (single-pole, double-pole, three-way, etc.). A simple toggle switch is often represented by a line with a break and a curved connector that shows how the circuit is closed or opened.
- Outlet Symbols: A circle with two parallel lines (for a two-prong outlet) or a circle with two parallel lines and a half-moon shape below (for a three-prong outlet).
- Light Fixture Symbol: Usually a circle with a cross inside or a stylized light bulb.
- Ground Symbol: Typically three horizontal lines, decreasing in length, connected to a vertical line.
How It Works – The Flow of Electricity
Understanding how the circuit works is crucial for troubleshooting and making safe modifications. Here's a simplified explanation:
- Electricity flows from the service panel through the hot wire to the light switch.
- When the switch is in the "on" position, it completes the circuit, allowing electricity to flow through the switch and to the light fixture.
- The electricity powers the light fixture.
- The electricity then flows from the light fixture back to the service panel through the neutral wire.
- The ground wire provides a safety path for electricity in case of a short circuit or fault. It's connected to the metal casing of the outlet and the light fixture (if they are metal) and to the grounding system of your home.
Real-World Use – Basic Troubleshooting
Here are a few common troubleshooting scenarios and how a wiring diagram can help:
- Light Switch Doesn't Work: Use the diagram to check the wiring connections at the switch and the light fixture. A loose connection is a common cause. Use a multimeter to check for voltage at the switch to confirm power is reaching it.
- Outlet Doesn't Work: Check the wiring connections at the outlet. Ensure the hot, neutral, and ground wires are properly connected to the correct terminals. Test the outlet with a circuit tester to confirm power. Also, check the circuit breaker.
- Light Bulb Burns Out Quickly: While not directly related to the wiring itself, a diagram helps you ensure the correct type and wattage of bulb is being used. Over-wattage bulbs can overload the circuit.
Safety – Respect the Electricity
Electricity can be dangerous, so safety is paramount. Always remember these key precautions:
- Turn off the Breaker: Always, always, always turn off the circuit breaker that controls the circuit you're working on before you touch any wires. Use a non-contact voltage tester to confirm the power is off.
- Use Insulated Tools: Use tools with insulated handles to protect yourself from electric shock.
- Work in Dry Conditions: Never work with electricity in wet or damp conditions.
- Identify Wires Correctly: Double-check the wire colors and connections to ensure you're wiring everything correctly.
- Risky Components: The service panel itself is extremely dangerous. Never attempt to work inside the service panel unless you are a qualified electrician. Even with the main breaker off, there are still live components inside.
- When in Doubt, Call a Professional: If you're unsure about any aspect of the wiring or feel uncomfortable, call a licensed electrician. It's better to be safe than sorry.
By understanding electrical wiring diagrams and following safety precautions, you can confidently tackle basic electrical tasks around your home. Remember to always prioritize safety and seek professional help when needed.