Electrical Wiring For Trailer Lights
So, you’re ready to tackle trailer wiring – good on you! This guide dives deep into understanding and troubleshooting trailer light wiring. Whether you’re repairing a faulty connection, upgrading your setup, or just want to understand how it all works, this information is crucial. Many folks get intimidated by wiring, but with a systematic approach, it's a very manageable DIY project.
Why This Diagram Matters
Having a good understanding of a trailer wiring diagram is vital for several reasons:
- Troubleshooting: Quickly identify and fix issues with your trailer lights, saving time and money on professional repairs.
- Customization: Modify or upgrade your trailer's lighting system to suit your specific needs, such as adding auxiliary lights or brake controllers.
- Safety: Ensure that your trailer lights function correctly, preventing accidents and avoiding legal penalties.
- Understanding: Gain a deeper understanding of your vehicle's electrical system and how it interacts with your trailer.
Think of it like this: a wiring diagram is the roadmap for your trailer's electrical system. Without it, you're driving blind. By understanding the diagram, you can navigate the electrical landscape with confidence.
Key Specs and Main Parts
Before we delve into the wiring diagram itself, let's cover the essential components of a standard trailer lighting system. These parts work in concert to provide the necessary signals for safe towing.
- Trailer Connector: This is the interface between your tow vehicle and the trailer. Common types include 4-way flat, 5-way flat, 6-way round, and 7-way round connectors. The 7-way round is the most common and versatile, offering connections for taillights, turn signals, brake lights, running lights, and often a 12V auxiliary power wire, and a brake controller wire.
- Wiring Harness: The bundle of wires that transmits electrical signals from the connector to the various lights. The gauge (thickness) of the wires is important; thicker wires can handle more current. Typically, 16-gauge wire is sufficient for most trailer light circuits, but 14-gauge or even 12-gauge might be needed for longer trailers or circuits with higher amperage draw.
- Lights: These include:
- Taillights: Provide visibility from the rear.
- Brake Lights: Indicate when the tow vehicle is braking.
- Turn Signals: Signal intentions to turn.
- Running Lights (Clearance Lights): Enhance visibility at night. Required on trailers over 80 inches wide.
- License Plate Light: Illuminates the license plate.
- Ground Wire: Provides a return path for the electrical current. A solid, reliable ground connection is *absolutely crucial* for proper operation.
Understanding the Wiring Diagram Symbols
A wiring diagram uses specific symbols to represent components and connections. Let's break down the common ones:
- Solid Lines: Represent wires. Thicker lines might indicate wires with a higher current-carrying capacity.
- Dotted Lines: Can indicate optional connections or wires that are part of a sub-circuit.
- Color Codes: Each wire is typically assigned a color (e.g., brown, yellow, green, white). These colors correspond to specific functions, which we'll cover shortly.
- Ground Symbol (often three horizontal lines decreasing in size): Indicates a connection to the vehicle's frame, providing a return path for the current.
- Connectors (circles or squares): Indicate where wires connect to each other.
- Fuses (zigzag line within a rectangle): Protect the circuit from overcurrent.
- Relays (a coil symbol with switch contacts): Allow a low-current circuit to control a high-current circuit.
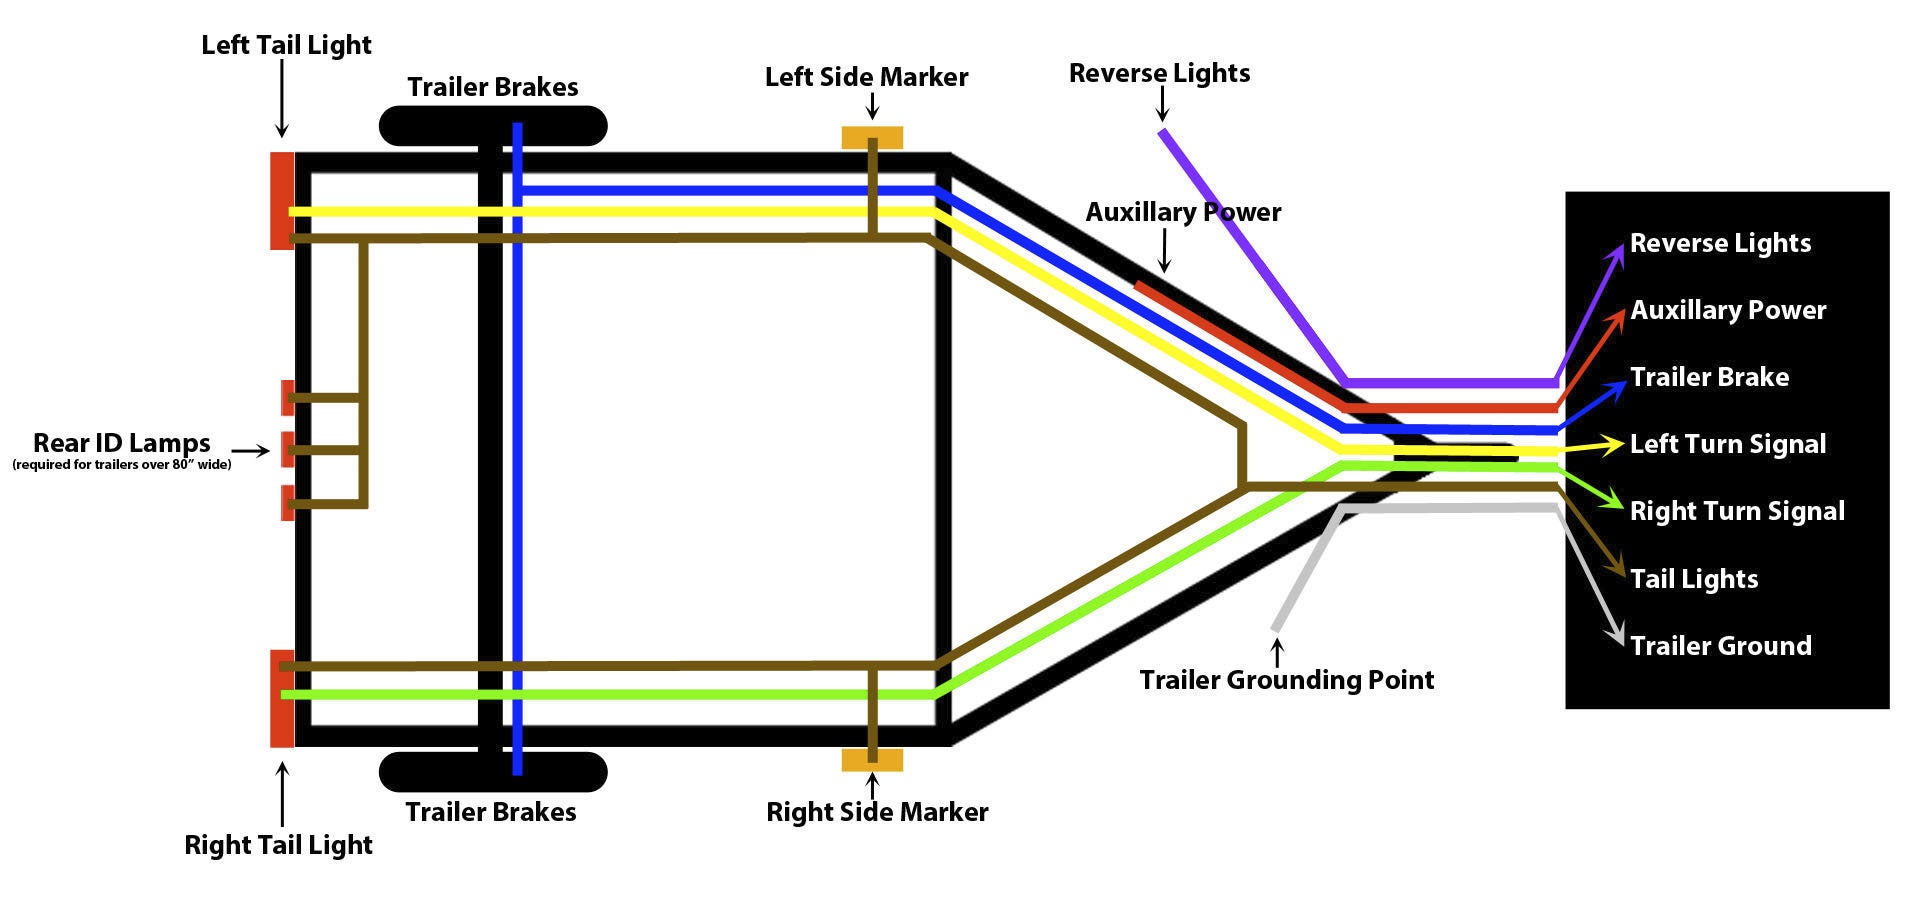
Let's look at common color codes for a 7-way round connector (though always double-check your specific wiring):
- White: Ground
- Brown: Taillights/Running Lights
- Yellow: Left Turn Signal/Brake Light
- Green: Right Turn Signal/Brake Light
- Red: Stop Lamp (brake light)
- Blue: Electric Brakes
- Black: 12V Auxiliary Power
How It Works: Following the Electrical Path
The basic principle is simple: when you activate a light in your tow vehicle (e.g., turn signal), it sends an electrical signal through the trailer connector and wiring harness to the corresponding light on the trailer. The electrical current then returns to the tow vehicle through the ground wire, completing the circuit. Let’s explain what happens when you activate a turn signal.
- You engage the turn signal lever in your tow vehicle.
- This sends a signal to the vehicle's turn signal circuit.
- The tow vehicle's wiring harness routes this signal to the appropriate pin in the trailer connector.
- The signal travels through the corresponding wire in the trailer's wiring harness.
- The signal reaches the turn signal light on the trailer, causing it to illuminate.
- The electrical current returns to the tow vehicle through the ground wire, completing the circuit.
The same process occurs for brake lights, taillights, and other functions. The key is that each function has its own dedicated wire and circuit.
Real-World Use: Basic Troubleshooting Tips
Trailer light problems are frustrating, but often easily fixed. Here are a few common issues and solutions:
- No Lights:
- Check the trailer connector for corrosion or loose connections. Clean the contacts and ensure they are making good contact.
- Inspect the ground connection. A poor ground is the most common cause of trailer light problems. Clean and tighten the ground connection.
- Check the fuses in your tow vehicle's fuse box. A blown fuse can prevent power from reaching the trailer connector.
- One Light Not Working:
- Inspect the bulb. Replace it if it's burned out.
- Check the wiring connection at the light fixture. Ensure the wires are securely connected.
- Inspect the wiring for damage. Look for cuts, frayed wires, or corrosion.
- Lights Flickering:
- Loose connections. Tighten all connections in the circuit, including the trailer connector, ground connection, and light fixture connections.
- Corrosion. Clean all connections in the circuit.
Tools you will need: Multimeter, wire stripper, crimping tool, electrical tape, wire connectors (butt connectors, etc.), dielectric grease (to prevent corrosion).
Using a multimeter is essential for diagnosing electrical problems. You can use it to check for voltage, continuity (whether a circuit is complete), and resistance. It will save you a lot of time and guesswork.
Safety: Handle With Care
Working with electrical systems always carries some risk. Here are key safety precautions:
- Disconnect the Battery: Before working on any electrical wiring, disconnect the negative terminal of your tow vehicle's battery. This will prevent accidental short circuits and electric shocks.
- Use Proper Tools: Use insulated tools designed for electrical work.
- Wear Safety Glasses: Protect your eyes from debris and sparks.
- Work in a Well-Ventilated Area: When using solvents or cleaners, work in a well-ventilated area.
- Avoid Water: Never work on electrical wiring in wet conditions.
- Double-Check Your Work: Before reconnecting the battery, carefully inspect your wiring to ensure that all connections are secure and properly insulated.
Warning: The brake controller circuit, if present, can carry significant current. Always follow the manufacturer's instructions and exercise caution when working with this circuit. Short circuits in the brake controller circuit can damage your tow vehicle's electrical system.
Working on your trailer lights is straightforward if you take your time and follow the wiring diagram. Have fun with it and be safe!