Engine Fuse 2013 Vw Passat Fuse Box Diagram Under Hood
Navigating the electrical system of your 2013 VW Passat can be daunting, but with a good understanding of the under-hood fuse box diagram, you can diagnose and repair a wide range of electrical issues. This guide will serve as your comprehensive resource, explaining the purpose, key components, and how to use the diagram effectively. We'll focus specifically on the under-hood fuse box, crucial for many of the Passat's essential systems.
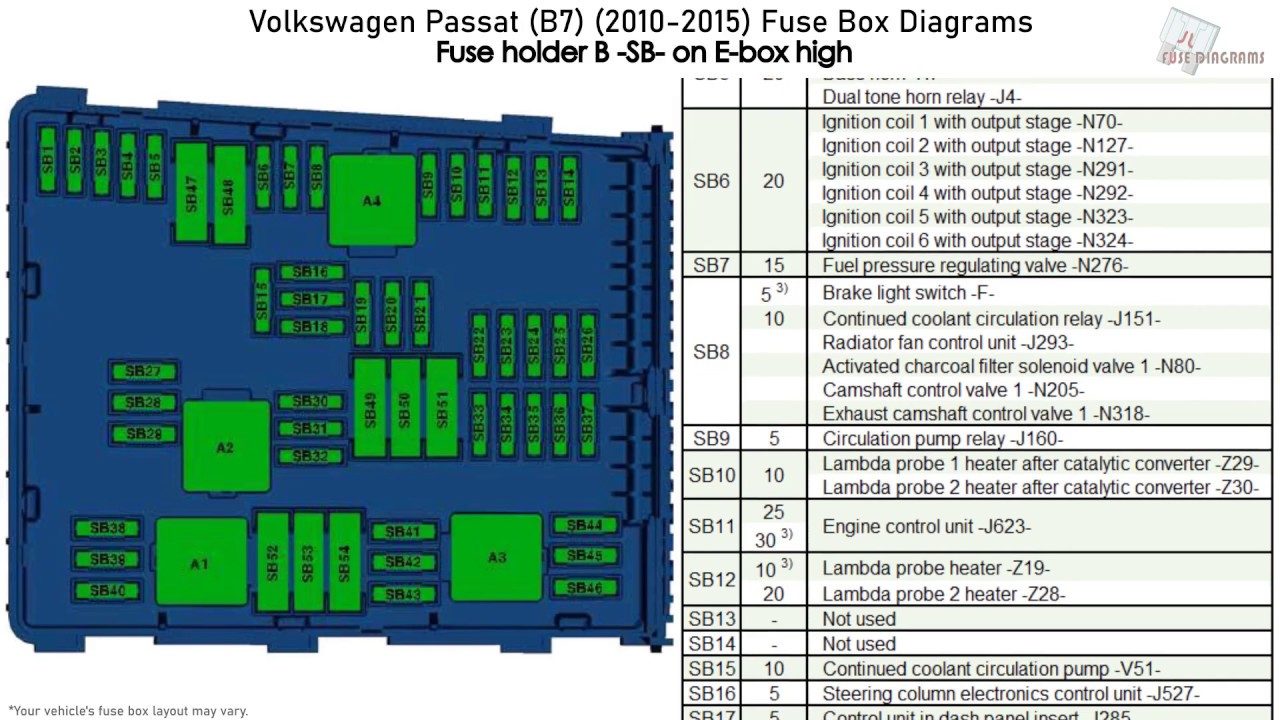
Purpose of the Under-Hood Fuse Box Diagram
The fuse box diagram is more than just a pretty picture; it's a vital tool for several reasons:
- Troubleshooting Electrical Problems: When an electrical component fails (e.g., headlights, windshield wipers, fuel pump), the first step is often to check the corresponding fuse. The diagram identifies which fuse protects each circuit.
- DIY Repairs: If you're comfortable performing minor electrical repairs, the diagram helps you pinpoint the exact location of fuses and relays.
- Adding Aftermarket Accessories: Modifying your car's electrical system, such as adding a new sound system or auxiliary lighting, requires careful fuse selection. The diagram helps you determine appropriate fuse ratings and circuit locations.
- Understanding Your Car's Electrical System: Even if you don't plan on doing any repairs, studying the diagram provides valuable insight into how your Passat's electrical system is organized and protected.
Key Specs and Main Parts of the 2013 VW Passat Under-Hood Fuse Box
The 2013 VW Passat under-hood fuse box is typically located in the engine compartment, near the battery. It houses a collection of fuses and relays, each designed to protect specific circuits. Here's a breakdown of the key components:
- Fuses: These are sacrificial devices designed to break (open the circuit) when the current exceeds a safe level, preventing damage to other components. They are rated in Amperes (A), indicating the maximum current they can handle. Common fuse types include blade fuses (ATO/ATC) and mini blade fuses.
- Relays: These are electromechanical switches that use a small current to control a larger current circuit. They are used to switch on and off high-power components like the starter motor, fuel pump, and headlights. Relays consist of a coil and a set of contacts. When the coil is energized, the contacts close (or open, depending on the relay type), completing the circuit.
- Fuse Box Housing: This enclosure protects the fuses and relays from the elements and provides a mounting point for them.
- Fuse Puller: A small plastic tool used to safely remove fuses without damaging them.
- Diagram Label: Usually affixed to the inside of the fuse box cover, this diagram is your map to understanding the fuse layout.
Decoding the Fuse Box Diagram: Symbols, Lines, Colors, and Icons
Understanding the symbols and notations on the fuse box diagram is crucial for accurate troubleshooting. Here's a breakdown of common elements:
- Fuse Symbols: Fuses are usually represented by a rectangle with a wavy line inside. The number next to the symbol indicates the fuse's amperage rating (e.g., "10A" means a 10-amp fuse).
- Relay Symbols: Relays are typically represented by a square or rectangle with internal lines indicating the coil and contacts.
- Lines: Solid lines connect the fuse or relay to the circuit it protects. These lines may be color-coded in some diagrams to indicate wire color within the vehicle's wiring harness.
- Colors: While not always present, color coding on the diagram can represent the wire colors within the vehicle's wiring harness. For example, a red line might indicate a wire that is red, or has a red tracer stripe. Always double-check the wiring with a multimeter for accurate identification.
- Icons: Small icons often represent the component protected by a particular fuse. These icons can depict headlights, windshield wipers, fuel pumps, cigarette lighters, and other electrical devices.
Furthermore, be aware that some diagrams may use abbreviations. Common ones include:
- ECU: Engine Control Unit
- BCM: Body Control Module
- ABS: Anti-lock Braking System
- SRS: Supplemental Restraint System (Airbags)
How It Works: The Fuse Protection Mechanism
Fuses protect electrical circuits from overcurrent. When a short circuit or overload occurs, the current flowing through the circuit increases dramatically. This excessive current causes the fuse's internal element to heat up rapidly and melt, breaking the circuit. This prevents further damage to the wiring and components connected to that circuit. The fuse "blows," acting as a safety valve.
Relays, on the other hand, use a small electrical signal to control a much larger electrical load. For example, the starter relay allows the relatively small current from the ignition switch to control the high current needed to power the starter motor. Without a relay, the ignition switch would need to handle a much higher current, potentially damaging it.
Real-World Use: Basic Troubleshooting Tips
Here's how to use the fuse box diagram for basic troubleshooting:
- Identify the Problem: Determine which electrical component is malfunctioning. For example, the headlights are not working.
- Consult the Diagram: Locate the fuse diagram (usually on the inside of the fuse box cover). Identify the fuse associated with the headlights.
- Inspect the Fuse: Visually inspect the fuse. If the thin wire inside the fuse is broken, the fuse is blown.
- Replace the Fuse: Replace the blown fuse with a fuse of the same amperage rating. Never use a fuse with a higher rating, as this could damage the circuit.
- Test the Circuit: After replacing the fuse, test the circuit to see if the problem is resolved. If the fuse blows again immediately, there is a short circuit in the system that needs further diagnosis. Do not continue replacing fuses without addressing the underlying issue.
If you're unsure about any aspect of the troubleshooting process, consult a qualified mechanic.
Safety Precautions
Working with automotive electrical systems involves potential hazards. Here are some crucial safety precautions:
- Disconnect the Battery: Before working on any electrical components, disconnect the negative (-) battery terminal to prevent accidental short circuits.
- Avoid Water: Never work on electrical systems in wet or damp conditions.
- Use Proper Tools: Use insulated tools designed for automotive electrical work.
- Be Careful with Airbags: The SRS (airbag) system is a high-voltage system and can be dangerous. If you need to work near airbag components, consult a professional. Disconnecting and reconnecting the battery can sometimes trigger fault codes in the SRS system, requiring professional clearing.
- Fuel System: Be extremely careful when working around fuel system components (fuel pump relay, fuel injectors). Fuel is highly flammable. Ensure adequate ventilation and avoid sparks or open flames.
High-Risk Components: Pay extra attention when working near the following components:
- Fuel Pump Relay: Accidental activation of the fuel pump can lead to fuel spillage.
- ECU (Engine Control Unit): Mishandling the ECU can damage it, requiring expensive replacement.
- ABS Module: The ABS module controls the anti-lock braking system. Damage to this module can compromise braking performance.
To further assist you with your troubleshooting, we have the complete 2013 VW Passat under-hood fuse box diagram available for download. Please use this resource responsibly and consult with a professional if you are unsure about any aspect of the repair process.