Engine Mercedes Benz Serpentine Belt Diagram
If you're a seasoned DIYer or a modder with a Mercedes-Benz, understanding the serpentine belt system is crucial for maintenance, repairs, and even performance upgrades. The serpentine belt diagram, often found under the hood or in your owner's manual, is your roadmap to this vital engine component. Let's dive into the details.
Purpose: Why You Need That Serpentine Belt Diagram
The serpentine belt diagram is more than just a picture; it's an essential tool. Its primary purposes are:
- Repair and Replacement: Accurately routing a new serpentine belt is impossible without knowing the correct path. A misplaced belt can lead to component failure and even engine damage.
- Troubleshooting: The diagram helps you visually inspect the belt's alignment and identify potential issues like misaligned pulleys or damaged components.
- Understanding Engine Layout: It provides a clear overview of how various engine accessories (alternator, power steering pump, A/C compressor, etc.) are driven.
- Preventative Maintenance: Regularly referencing the diagram during inspections allows you to catch wear and tear before a catastrophic failure occurs.
- Performance Modifications: When adding aftermarket accessories that interface with the belt system, the diagram helps plan and execute the modification safely and correctly.
Key Specs and Main Parts of a Mercedes-Benz Serpentine Belt System
Mercedes-Benz uses serpentine belt systems across many of its engines, but the specific layout and component types can vary significantly depending on the engine model and year. Here are the main components you'll typically find:
- Serpentine Belt: A long, continuous belt made of reinforced rubber that transmits power from the crankshaft pulley to various engine accessories. The belt's composition and length are critical and engine-specific. Using the wrong belt can cause issues.
- Crankshaft Pulley (Harmonic Balancer): Connected directly to the engine's crankshaft, this pulley is the driving force behind the serpentine belt. It also dampens torsional vibrations from the engine.
- Alternator Pulley: Driven by the serpentine belt, the alternator generates electrical power to recharge the battery and power electrical systems.
- Power Steering Pump Pulley: In hydraulic power steering systems, this pulley drives the pump that provides hydraulic assist to the steering system.
- Air Conditioning (A/C) Compressor Pulley: Driven by the serpentine belt, the A/C compressor circulates refrigerant to cool the cabin.
- Idler Pulley(s): Smooth pulleys used to guide the belt and maintain proper tension. They don't drive any specific component.
- Tensioner Pulley: A spring-loaded pulley that automatically adjusts belt tension. This is a critical component for ensuring the belt doesn't slip or over-stress other components. A failing tensioner is a common cause of serpentine belt issues.
- Water Pump Pulley: On some engines, the water pump is driven by the serpentine belt. Its primary function is to circulate coolant to regulate engine temperature.
Key Specs to note:
- Belt Length: Measured in millimeters or inches, this specification is absolutely critical for proper belt function. The correct length is usually printed on the old belt or available in your vehicle's service manual.
- Belt Width: Another critical measurement, ensuring proper engagement with the pulley grooves.
- Number of Ribs: The number of longitudinal ribs on the belt must match the pulley grooves for proper grip and power transfer.
- Torque Specifications: When replacing pulleys or the tensioner, always adhere to the manufacturer's specified torque values for the mounting bolts. Over-tightening can damage components; under-tightening can lead to loosening and failure.
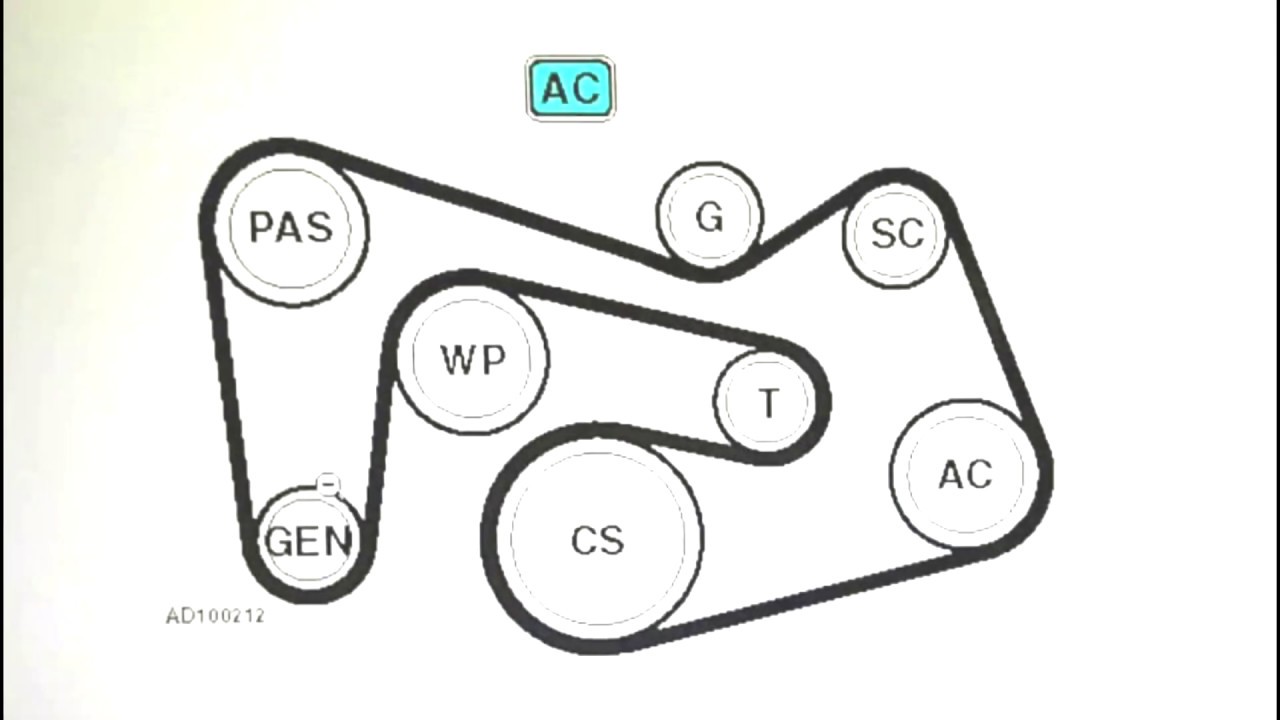
Understanding Serpentine Belt Diagram Symbols
Mercedes-Benz serpentine belt diagrams use various symbols to represent different components and the belt's routing path. Here's a breakdown:
- Solid Lines: These typically represent the serpentine belt itself. The thicker the line, the more prominent the belt segment is in the diagram.
- Dashed Lines: Often used to indicate the back side (smooth side) of the belt contacting a pulley. This helps differentiate between grooved and smooth pulley engagement.
- Arrows: Indicate the direction of belt rotation. Following the arrows is crucial for understanding how each component is driven.
- Component Icons: Each component (alternator, power steering pump, etc.) is represented by a stylized icon. The specific icon will vary, but it's usually a simplified representation of the component's shape. Look for legends or keys to help decipher the exact meaning.
- Tensioner Symbol: The tensioner is usually depicted as a pulley with a spring or arrow indicating the direction of tension application.
Color Coding: Some diagrams use color coding, although this is less common on basic diagrams. If present, a legend will explain what each color represents (e.g., coolant lines, vacuum lines, etc.). For example, you might see a blue line indicating the path of the coolant system in relation to a water pump driven by the belt.
How It Works: The Mechanics of the Serpentine Belt System
The serpentine belt system's operation is relatively straightforward. The crankshaft pulley, powered by the engine's combustion process, rotates. This rotation is transferred to the serpentine belt, which in turn drives all the accessories connected to it. The tensioner maintains optimal belt tension, preventing slippage and ensuring efficient power transfer.
Think of it as a carefully choreographed dance of pulleys and a belt. The crankshaft leads the dance, and the belt transmits that lead to the other partners (accessories). Proper tension is critical to ensure everyone stays in step. If the belt is too loose, it will slip, causing reduced performance of the driven components (dim headlights, weak power steering, poor A/C performance). If the belt is too tight, it can over-stress the bearings in the accessories and lead to premature failure.
Real-World Use: Basic Troubleshooting Tips
Here are some common serpentine belt issues and how to troubleshoot them using the diagram:
- Squealing Noise: Often indicates a slipping belt. Check the belt tensioner for proper operation. Refer to the diagram to visually inspect the belt's routing and ensure it's correctly aligned on all pulleys. A worn belt can also cause squealing.
- Cracked or Frayed Belt: A visual inspection using the diagram to locate the entire belt is crucial. Replace the belt immediately if you see cracks, fraying, or missing chunks. These are signs of imminent failure.
- Accessory Malfunction (e.g., A/C not cooling): If a specific accessory isn't working, use the diagram to confirm the belt is properly routed to its pulley. A slipped belt can cause intermittent or complete failure of that accessory.
- Belt Jumping Off Pulleys: Indicates a serious problem, such as a misaligned pulley, a failing tensioner, or a damaged belt. Use the diagram to carefully inspect the alignment of all pulleys.
- Visual Check with Diagram: Before any replacement, use the diagram. Compare the actual path of the belt with the diagram. Are there any discrepancies? If so, correct them before proceeding.
Safety: Risky Components and Precautions
Working around a running engine and rotating machinery is inherently dangerous. Here are some critical safety precautions:
- Never work on the serpentine belt system with the engine running. The rotating belt and pulleys can cause serious injury.
- Disconnect the negative battery cable before working on any electrical components, including the alternator.
- Be aware of hot engine components. Allow the engine to cool down completely before working on the belt system to avoid burns.
- Keep your hands, hair, and clothing clear of the rotating belt and pulleys.
- Wear safety glasses to protect your eyes from debris.
- If you're unsure about any aspect of the repair, consult a qualified mechanic. The serpentine belt system is critical to engine operation, and mistakes can be costly.
Working on your Mercedes-Benz can be rewarding. Having access to the right information makes all the difference.
We have a comprehensive Mercedes-Benz serpentine belt diagram file ready for you. This detailed resource will provide you with the visual aid you need for accurate repairs and maintenance.
Click here to download your diagram: [Insert Download Link Here - Placeholder] (Remember to replace this placeholder with a working link).