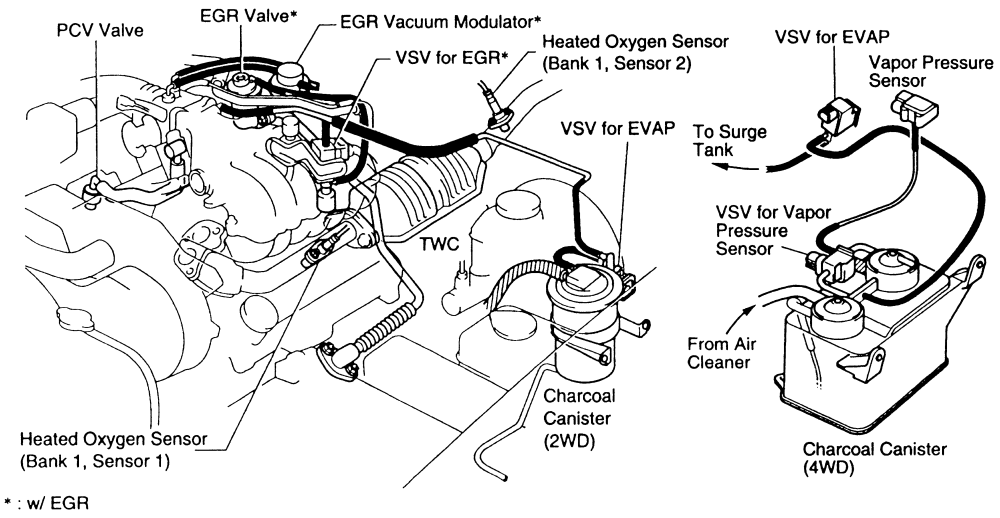
Engine Vacuum Hose Diagram Rav4 2008
Alright, let's dive into the engine vacuum hose diagram for your 2008 Toyota RAV4. Whether you're tackling a repair, trying to understand your engine's operation, or even considering some performance modifications, understanding this system is crucial. It might seem daunting at first, but we'll break it down into manageable pieces.
Purpose of the Vacuum Hose Diagram
The vacuum hose diagram is essentially a roadmap of your engine's vacuum system. It shows the routing of various hoses that use manifold vacuum – a pressure lower than atmospheric pressure created inside the intake manifold – to operate different components. Why is this important? Because the vacuum system controls a multitude of functions, including:
- Emission Control: Vacuum lines are vital for systems like the Positive Crankcase Ventilation (PCV) system and the Evaporative Emission Control (EVAP) system, which reduce harmful emissions.
- Engine Performance: They control components like the EGR valve (Exhaust Gas Recirculation), which helps reduce combustion temperatures and NOx emissions, and the brake booster, which provides power assist for braking.
- Heating and Air Conditioning (HVAC): Vacuum actuators control the flow of air in the HVAC system, directing it to the vents you select.
- Idle Speed Control: Vacuum leaks can directly impact idle speed and overall engine smoothness.
Therefore, a malfunctioning or disconnected vacuum hose can lead to a range of problems, from poor fuel economy and rough idling to failed emissions tests and compromised safety (e.g., reduced braking power). The diagram is your guide to properly diagnosing and repairing these issues. You can use the diagram for:
- Troubleshooting Vacuum Leaks: Locating and repairing leaks is the most common use.
- Replacing Damaged Hoses: Ensuring correct routing when replacing aged or cracked hoses.
- Understanding Engine Operation: Learning how various components interact within the engine bay.
- Performing Modifications: Understanding the impact of any modifications on the vacuum system.
Key Specs and Main Parts (2008 RAV4)
While the specific layout may vary slightly depending on your engine (2.4L 2AZ-FE or 3.5L 2GR-FE), the fundamental principles remain the same. Here are some key components you'll find on the diagram and in your engine bay:
- Intake Manifold: The source of the manifold vacuum.
- Vacuum Reservoir: A container that stores vacuum, ensuring a consistent supply for various actuators.
- PCV Valve (Positive Crankcase Ventilation): Recirculates crankcase gases back into the intake manifold.
- EVAP System Components: Including the canister purge valve, which controls the flow of fuel vapors from the charcoal canister into the engine.
- EGR Valve (Exhaust Gas Recirculation): Routes a portion of exhaust gas back into the intake manifold to lower combustion temperatures.
- Brake Booster: Provides vacuum-assisted power for the brakes.
- Vacuum Switching Valves (VSVs): Electrically controlled valves that switch vacuum between different circuits.
- Vacuum Hoses: The various rubber or plastic hoses that connect all the components. These hoses will be of different inside diameters to fit the components.
- Check Valves: One-way valves that allow vacuum to flow in only one direction, preventing backflow.
Symbols and Conventions
Understanding the symbols and conventions used in the vacuum hose diagram is critical for accurate interpretation. The diagrams commonly use different line types and colors to represent different hoses and connections. Here's a general guide:
- Solid Lines: Typically represent vacuum hoses.
- Dashed Lines: May represent electrical wiring or control lines.
- Different Colors: Often used to differentiate between various vacuum circuits. For example, one color might be used for the PCV system, another for the EVAP system, and so on. Refer to the diagram's legend for specific color coding.
- Arrows: Indicate the direction of airflow or vacuum.
- Component Symbols: Standardized symbols are used to represent components like valves, reservoirs, and actuators. These symbols may vary slightly, but are generally intuitive.
Pay close attention to the diagram's legend, which explains the specific symbols and color codes used. Also, note any text labels that identify components and hose connections. Some diagrams may use abbreviations for components, so be sure to understand what they mean (e.g., "VSV" for Vacuum Switching Valve). Knowing these symbols helps you accurately trace the vacuum lines to their source and destination.
How It Works (Simplified)
The basic principle is simple: the engine's intake manifold creates a vacuum, which is then used to operate various components. Think of it like a central vacuum cleaner system – the intake manifold is the vacuum cleaner, and the hoses are the pipes connecting to different outlets (actuators, valves, etc.).
The vacuum is typically regulated and distributed through a network of hoses and valves. For example, the PCV valve uses manifold vacuum to draw crankcase gases into the intake manifold, where they are burned. The EVAP system uses vacuum to purge fuel vapors from the charcoal canister into the engine. The brake booster uses vacuum to amplify the force applied to the brake pedal.
Vacuum Switching Valves (VSVs) play a crucial role in controlling vacuum flow based on engine operating conditions. These valves are electrically controlled by the engine control unit (ECU) and can switch vacuum between different circuits as needed. For example, the EVAP canister purge valve is typically controlled by a VSV, allowing the ECU to regulate the flow of fuel vapors into the engine based on engine temperature, load, and other factors.
Real-World Use – Basic Troubleshooting
Vacuum leaks are a common problem that can cause a variety of symptoms. Here's a basic troubleshooting approach:
- Visual Inspection: Start by visually inspecting all vacuum hoses for cracks, breaks, or loose connections. Pay close attention to areas where hoses are exposed to heat or friction.
- Listen for Hissing: A hissing sound can indicate a vacuum leak. Try to pinpoint the source of the noise.
- Use a Vacuum Gauge: Connect a vacuum gauge to a manifold vacuum source (e.g., a spare vacuum port on the intake manifold). A low or fluctuating vacuum reading can indicate a leak. A healthy reading should be around 17-22 inHg at idle.
- Spray with Carb Cleaner or Starting Fluid: Carefully spray small amounts of carb cleaner or starting fluid around vacuum hoses and connections. If the engine speed changes, you've likely found a leak in that area. Be extremely cautious when using these flammable substances.
- Smoke Test: For more elusive leaks, consider using a smoke machine. This involves injecting smoke into the vacuum system and looking for smoke escaping from leaks.
- Consult the Diagram: Refer to the vacuum hose diagram to identify the specific hoses and components in the area where you suspect a leak. This will help you isolate the problem.
Remember to replace any damaged hoses with new ones of the correct size and type. Use the diagram to ensure proper routing. Clear any diagnostic trouble codes (DTCs) after completing the repair.
Safety Considerations
Working on the vacuum system is generally safe, but there are a few precautions to keep in mind:
- Hot Components: Be careful when working around hot engine components, such as the exhaust manifold. Let the engine cool down before starting work.
- Flammable Substances: As mentioned earlier, use carb cleaner or starting fluid with extreme caution. Avoid spraying near open flames or sources of ignition.
- Eye Protection: Wear safety glasses to protect your eyes from debris.
- Battery Disconnect: Consider disconnecting the negative battery terminal before working on any electrical components, such as VSVs.
Specifically, pay extra attention to the fuel vapor lines for the EVAP system. Mishandling these lines can lead to fuel leaks and fire hazards. Double-check all connections after working on the EVAP system.
With a bit of patience and the right tools, you can successfully diagnose and repair vacuum system problems on your 2008 RAV4. Remember to consult the vacuum hose diagram and follow safe working practices. Good luck!
We have the 2008 RAV4 Vacuum Hose Diagram available for download. It will provide specific schematics related to your vehicle's engine configuration and emission standards. Knowing the specific layout will make working on your car much easier.