Equinox Diagram 2.4 Ecotec Timing Chain Marks
Alright, let's dive into the intricacies of the Equinox/Terrain 2.4L Ecotec timing chain and, more specifically, the timing chain marks found in diagram 2.4. This isn't just about lining up some colored links; it's about ensuring your engine functions as designed, preventing catastrophic failure, and saving yourself a boatload of cash. Knowing this diagram inside and out is crucial for anyone tackling timing chain replacement, head gasket repairs, or even just wanting a deeper understanding of their engine's internal workings.
Purpose of Understanding Timing Chain Marks
Why bother with all this detail? The timing chain's primary job is to synchronize the rotation of the crankshaft and camshaft(s). The crankshaft, connected to the pistons, dictates when they move up and down. The camshaft(s) control the opening and closing of the intake and exhaust valves. Precise timing between these events is critical for optimal engine performance, fuel efficiency, and emissions control. If the timing is off – even by a tiny amount – you could experience anything from poor performance and a check engine light to bent valves and a completely destroyed engine. Using the timing chain marks helps you make sure that your engine is in the correct synchronization with camshaft and crankshaft positions to deliver the power you want.
Diagram 2.4, along with other supporting documentation, provides the visual guide necessary to align the timing chain correctly during reassembly. Without it, you're essentially working blind, relying on guesswork – a gamble no experienced mechanic would take.
Key Specs and Main Parts of the Timing Chain System
Before we delve into the diagram itself, let's review the key components:
- Crankshaft Sprocket: The gear attached to the crankshaft, driving the timing chain.
- Camshaft Sprockets: The gears attached to the camshaft(s), driven by the timing chain, controlling valve timing.
- Timing Chain: The chain itself, connecting the crankshaft and camshaft sprockets. Often features colored links for alignment.
- Chain Guides and Tensioner: These components maintain chain tension and prevent excessive slack, ensuring smooth and reliable operation. The tensioner is usually spring-loaded and hydraulically assisted, using engine oil pressure to maintain proper tension.
- Variable Valve Timing (VVT) Actuators (if equipped): Some 2.4L Ecotec engines have VVT, allowing the camshaft timing to be adjusted dynamically. These actuators are typically located on the camshaft sprockets.
The key spec that is associated with this article is the precise location of the timing marks on the crankshaft and camshaft sprockets, along with the corresponding colored links on the timing chain. These positions are dictated by the engine's design and are *essential* for correct timing. Deviating from these specifications could lead to engine damage.
Understanding the Symbols in Diagram 2.4
Diagram 2.4 isn't just a pretty picture; it's a technical drawing with specific symbols conveying important information. Here's a breakdown of common elements:
- Solid Lines: Typically represent physical components, such as the timing chain, sprockets, and engine block.
- Dotted Lines: Often indicate hidden or obscured features, such as the alignment marks on the back of a sprocket.
- Arrows: Show the direction of rotation of the crankshaft and camshaft(s).
- Colored Links (on the Chain): These are the *most important* symbols for timing chain alignment. They are designed to correspond directly with the timing marks on the crankshaft and camshaft sprockets. Typical colors include gold, silver, or copper.
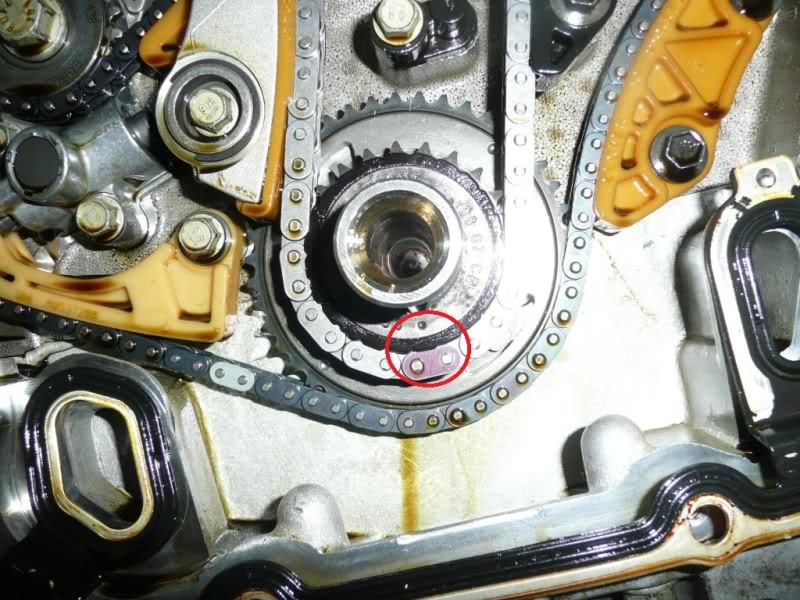
- Alignment Marks (on Sprockets): Usually small dots, notches, or triangles etched into the sprocket surface. They are the targets for the colored links.
- Reference Points (on Engine Block): Some diagrams include reference points on the engine block to aid in locating the timing marks accurately.
The diagram may also include callouts with notes and dimensions, further clarifying the location of specific features. Pay close attention to these callouts! They often contain critical information that is not immediately apparent from the main drawing.
How the Timing Chain System Works
The crankshaft's rotation drives the crankshaft sprocket, which in turn drives the timing chain. The timing chain then transfers this rotational force to the camshaft sprocket(s), causing the camshaft(s) to rotate. As the camshaft(s) rotate, the lobes on the camshaft push on the valve lifters (or followers), opening and closing the intake and exhaust valves at precisely the correct times.
The tensioner plays a vital role in maintaining constant tension on the chain, preventing it from slapping around and causing noise or damage. Chain guides further help to keep the chain aligned and prevent it from derailing.
In engines with VVT, the VVT actuators adjust the position of the camshaft(s) relative to the crankshaft, allowing the engine to optimize valve timing for different driving conditions. This can improve fuel economy, performance, and emissions.
Real-World Use and Basic Troubleshooting
Let's say you're replacing the timing chain on your 2.4L Ecotec. Here's how you'd use diagram 2.4:
- Preparation: Remove the necessary components to access the timing chain (e.g., valve cover, timing chain cover).
- Alignment Before Removal: Before removing the old chain, rotate the engine until the timing marks on the crankshaft and camshaft sprockets align with the colored links on the old chain. This is *crucial* for confirming that the engine was properly timed before disassembly.
- Installation: Install the new timing chain, aligning the colored links with the corresponding timing marks on the crankshaft and camshaft sprockets. Refer to diagram 2.4 for the *exact* locations of these marks.
- Tensioner Activation: Ensure that the timing chain tensioner is properly activated to provide the correct chain tension.
- Verification: After installation, rotate the engine *manually* (using a wrench on the crankshaft pulley) several times and recheck the alignment of the timing marks. This ensures that the chain is properly seated and that the timing has not shifted.
Troubleshooting Tips:
- Engine Won't Start: If the engine cranks but doesn't start after a timing chain replacement, double-check the timing mark alignment. A single tooth off can be enough to prevent the engine from starting.
- Check Engine Light (P0016, P0017, etc.): These codes often indicate a timing misalignment between the crankshaft and camshaft. Again, verify the timing mark alignment.
- Rattling Noise: A rattling noise coming from the timing chain area could indicate a worn timing chain, a faulty tensioner, or damaged chain guides.
Safety Considerations
Working on the timing chain system can be risky. Here are some crucial safety precautions:
- Disconnect the Battery: Always disconnect the negative battery cable before working on the engine to prevent accidental electrical shorts.
- Proper Tools: Use the correct tools for the job. Don't try to improvise with makeshift tools, as this could damage the engine or cause injury.
- Torque Specifications: Always tighten bolts to the manufacturer's specified torque values. Over-tightening can damage threads, while under-tightening can lead to leaks or component failure. Refer to a repair manual for the correct torque specs.
- Crankshaft and Camshaft Positioning: Never force the crankshaft or camshafts to rotate if you encounter resistance. This could indicate that the pistons are contacting the valves, which can cause serious damage.
- Hydraulic Tensioner: Be cautious when handling the hydraulic tensioner. It is under spring pressure and can release suddenly, causing injury. Depressurize and compress it properly before installation.
The timing chain itself stores considerable energy when under tension. Be extremely careful when removing or installing the chain to avoid injury if it were to suddenly snap or release. Also be careful of the VVT Actuators. They are precisely engineered, and easily damaged. Always store the actuator in a clean and safe area. Handle them carefully.
This article provides a comprehensive overview of the Equinox/Terrain 2.4L Ecotec timing chain marks and their importance. However, it's crucial to supplement this information with a reputable repair manual specific to your vehicle. Remember, proper timing is essential for engine health and performance. Taking the time to understand the timing chain system and follow the correct procedures will save you headaches – and potentially a very expensive repair bill – down the road.
And remember, we have access to the full resolution diagram 2.4 if you need it! Just reach out to us and we can get it to you.