
Evaporative Emission Evap System Diagram
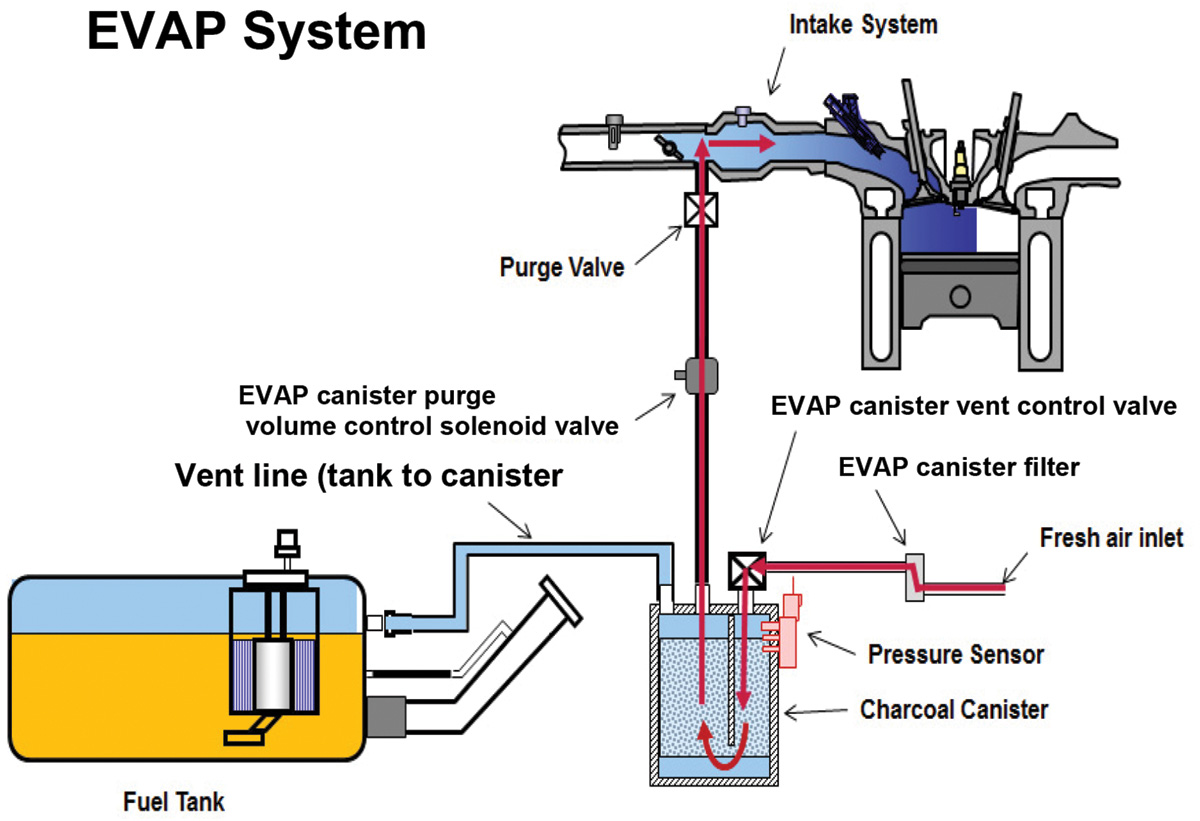
So, you're diving into the world of Evaporative Emission (EVAP) systems, eh? Good on you! Understanding your car's EVAP system is crucial for diagnosing those pesky check engine lights, improving fuel economy, and, most importantly, keeping our air clean. This article is your guide to interpreting EVAP system diagrams, empowering you to troubleshoot issues like a seasoned mechanic. We'll break down the components, symbols, and function of the EVAP system, giving you the knowledge to tackle repairs and modifications with confidence.
Why Understanding the EVAP System Diagram Matters
An EVAP system diagram is essentially a roadmap of your car's emission control apparatus. It's not just some abstract drawing; it's a vital tool for:
- Troubleshooting Check Engine Lights: Many Diagnostic Trouble Codes (DTCs) relate to the EVAP system. A diagram helps you pinpoint the exact component triggering the error.
- Performing Repairs: Whether you're replacing a faulty purge valve or tracing a vacuum leak, the diagram shows you where everything is located and how it connects.
- Understanding System Operation: Gaining a deep understanding of how the EVAP system functions allows you to better diagnose problems and prevent future issues. It will also allow you to modify the system correctly if that is your intention.
- Ensuring Emission Compliance: Keeping your EVAP system functioning correctly ensures your car meets emissions standards, which is vital for both the environment and legal compliance.
Key Specs and Main Parts of the EVAP System
The EVAP system prevents fuel vapor from escaping into the atmosphere. It's a sealed system that captures these vapors and eventually burns them in the engine. Here are the key components you'll find on most EVAP system diagrams:
- Fuel Tank: Where the fuel is stored and the source of fuel vapors. Not usually shown directly on the EVAP diagram, but is the start of it all.
- Fuel Cap: A seemingly simple component, but critical for maintaining the system's seal. A loose or damaged fuel cap is a common cause of EVAP system errors.
- Canister: Typically filled with activated charcoal, the canister absorbs and stores fuel vapors from the fuel tank. Think of it as a sponge for fumes.
- Canister Vent Valve (CVV): Controls airflow into the canister. When closed, it seals the system for leak tests. When open, it allows fresh air to enter the canister during the purge cycle.
- Purge Valve (or Canister Purge Valve - CPV): A vacuum-operated or electronically controlled valve that allows the engine to draw stored fuel vapors from the canister into the intake manifold to be burned. The Engine Control Unit (ECU) controls the purge valve opening.
- Fuel Tank Pressure Sensor (FTPS): Monitors the pressure inside the fuel tank. This sensor is crucial for detecting leaks within the system.
- Vapor Lines/Hoses: Connect all the components of the EVAP system. They are typically made of rubber or plastic and are susceptible to cracking and leaks over time.
- Liquid/Vapor Separator: Prevents liquid fuel from entering the charcoal canister, which would damage it.
- Restrictor Orifice: A small passage to limit flow, part of the leak detection function.
Understanding EVAP System Diagram Symbols
Diagrams use specific symbols to represent different components and connections. Here's a breakdown of common symbols you'll encounter:
- Lines: Represent hoses and vapor lines. Different line types may indicate different materials or functions (e.g., solid lines for rubber hoses, dashed lines for plastic tubing). Pay attention to line thickness; it might indicate hose diameter.
- Arrows: Indicate the direction of vapor flow.
- Boxes or Rectangles: Usually represent electronic components, such as the purge valve solenoid or the fuel tank pressure sensor.
- Circles: Often used for mechanical components like valves or connectors.
- Color Coding: Some diagrams use color coding to differentiate between different types of lines or components (e.g., blue for vacuum lines, green for vent lines). However, color coding is not standardized and can vary between manufacturers. Refer to the diagram's legend.
- Vacuum Lines: May be indicated with a 'V' or a dotted line.
- Electrical Connections: Shown as standard wiring symbols, with a solid line and terminal.
- Ground Connection: Symbolized with the familiar ground symbol (a series of horizontal lines).
Pay close attention to the diagram's legend! It's the key to understanding the specific symbols used in that particular diagram.
How the EVAP System Works
The EVAP system operates in two main phases:
- Vapor Storage: Fuel vapors generated in the fuel tank are vented to the charcoal canister. The charcoal absorbs and stores these vapors, preventing them from escaping into the atmosphere. The Canister Vent Valve (CVV) is typically open during this phase, allowing the canister to vent excess pressure.
- Purge Cycle: When the engine is running and specific conditions are met (e.g., engine temperature, load), the ECU activates the purge valve. This valve opens, allowing engine vacuum to draw fresh air through the canister vent valve (CVV) and into the canister. The fresh air mixes with the fuel vapors stored in the charcoal, and the mixture is then drawn into the intake manifold and burned in the engine. The ECU precisely controls the purge valve opening to prevent the engine from running too rich.
The Fuel Tank Pressure Sensor (FTPS) is constantly monitoring the pressure inside the fuel tank. The ECU uses this information to detect leaks in the system. If a leak is detected, the ECU will trigger a check engine light.
Real-World Use: Basic Troubleshooting Tips
Here are some basic troubleshooting tips you can use with your EVAP system diagram:
- Check the Fuel Cap: As mentioned earlier, a loose or damaged fuel cap is a common cause of EVAP system errors. Ensure the cap is properly tightened and that the seal is in good condition.
- Inspect Vapor Lines/Hoses: Carefully examine all vapor lines and hoses for cracks, leaks, or damage. Pay particular attention to areas near connectors and fittings. Use the diagram to help identify where each line goes.
- Test the Purge Valve: You can often test the purge valve by disconnecting it and applying vacuum. The valve should hold vacuum when closed and release it when energized (if it's an electronically controlled valve). Use your multimeter to test the solenoid's resistance if electrically operated.
- Check the Canister Vent Valve: Similar to the purge valve, the canister vent valve can be tested by applying vacuum. It should open and close as commanded.
- Smoke Test: A smoke test is an effective way to locate leaks in the EVAP system. Introduce smoke into the system and look for where it escapes. Use the diagram to trace the affected area.
When troubleshooting, always refer to your vehicle's specific service manual for detailed procedures and specifications.
Safety Considerations
Working with the EVAP system involves handling fuel vapors, which are flammable. Here are some safety precautions to keep in mind:
- Work in a well-ventilated area: Avoid working in enclosed spaces where fuel vapors can accumulate.
- Avoid sparks and open flames: Fuel vapors can ignite easily. Do not smoke or use any tools that could create sparks near the fuel system.
- Disconnect the battery: Before working on any electrical components of the EVAP system, disconnect the negative battery terminal to prevent accidental shorts.
- Handle fuel carefully: If you need to disconnect fuel lines, have a container ready to catch any spilled fuel. Dispose of fuel properly.
The charcoal canister itself is not particularly dangerous, but avoid puncturing or damaging it. The activated charcoal can be an irritant.
The EVAP system is integral to the car, and you can troubleshoot the issues yourself; however, we want to make sure that you have the file. It contains even more helpful info and is there as a resource to help you get started. With the information provided in this article and the EVAP system diagram, you'll be well-equipped to diagnose and repair common EVAP system problems, keeping your car running smoothly and efficiently.