Explorer Diagram Ford 3.5 Timing Marks
Okay, let's dive into the timing marks on a Ford 3.5L engine, specifically focusing on the Explorer. Understanding these marks is absolutely crucial for a range of procedures, from routine maintenance to more complex engine work. This article will arm you with the knowledge to interpret the timing marks effectively. We'll break down the diagram, explain the key components, and give you some practical tips for using this information in the real world.
Purpose of Understanding the Timing Marks
Why bother with these intricate markings? The primary reason is to ensure proper engine timing. Engine timing refers to the precisely coordinated relationship between the crankshaft, camshaft(s), and valves. Getting this wrong can lead to a host of problems, including:
- Poor engine performance
- Reduced fuel economy
- Engine misfires
- Difficult or impossible starting
- Severe engine damage (e.g., bent valves, piston damage)
Therefore, whether you're replacing a timing chain, checking for wear, or simply diagnosing an engine issue, knowing how to read and interpret the timing marks is essential. It's the cornerstone of many engine-related tasks. Understanding the marks helps you accurately set the timing after a repair, verify its correctness after someone else has worked on it, or even diagnose potential timing issues before they lead to catastrophic failure.
Key Specs and Main Parts of the Ford 3.5L Timing System
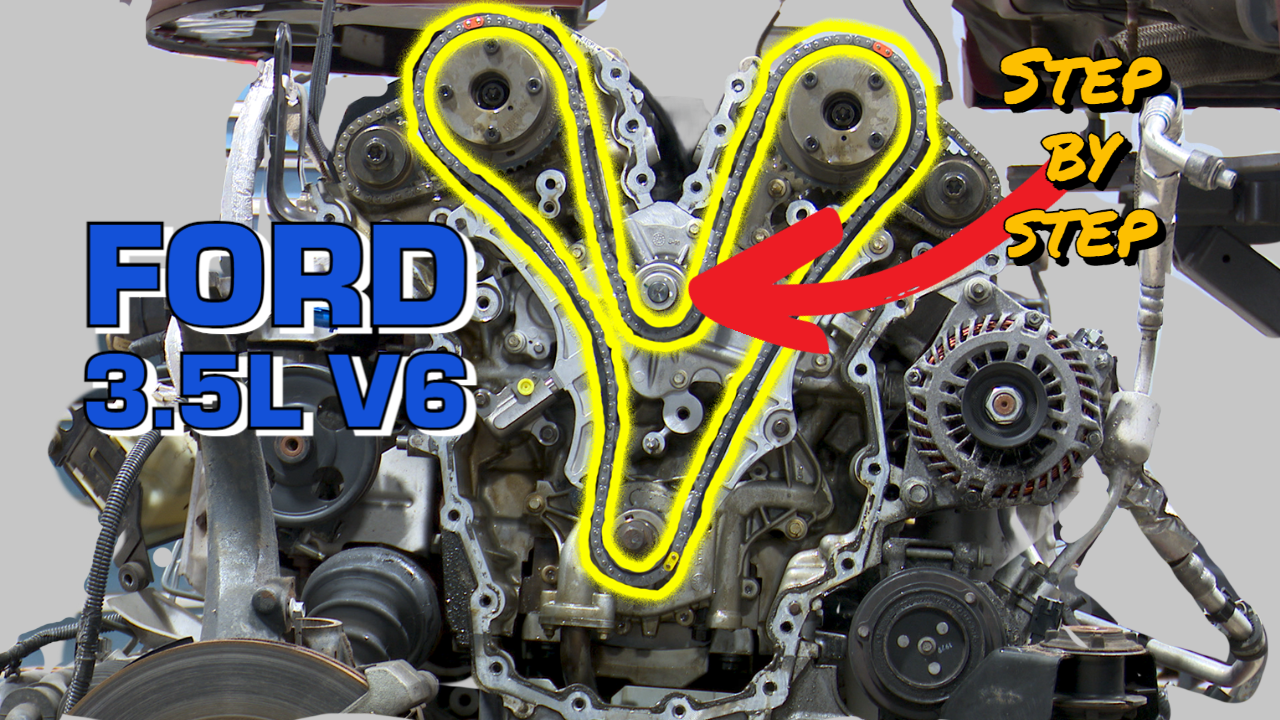
The Ford 3.5L engine, particularly in the Explorer, typically uses a timing chain system. The timing chain connects the crankshaft to the camshafts (usually dual overhead camshafts - DOHC). The main parts we'll be looking at on the diagram include:
- Crankshaft Pulley/Damper: This is the pulley at the bottom of the engine, connected to the crankshaft. It usually has a mark for Top Dead Center (TDC).
- Camshaft Sprockets: These are the gears on the ends of the camshafts. They have marks that need to align with corresponding marks on the engine block or timing cover.
- Timing Chain: The chain itself, sometimes marked with colored links to aid in installation.
- Timing Chain Guides/Tensioners: These components ensure the chain runs smoothly and maintains proper tension. They don't have timing marks themselves, but their condition is vital for correct timing.
- Engine Block/Timing Cover: These often have reference marks that the camshaft and crankshaft marks align with.
Key Specs to consider when working on the timing system (consult your specific vehicle's repair manual for exact values):
- Torque specifications: For camshaft bolts, crankshaft bolts, tensioner bolts, etc.
- Timing chain slack/deflection: Checking for excessive wear.
Symbols and Interpretation of the Timing Diagram
A typical Ford 3.5L Explorer timing diagram will use various symbols to represent different components and their alignment:
- Solid Lines: Indicate the physical path of the timing chain.
- Dotted Lines: Often represent alignment marks or imaginary lines for visual reference.
- Arrows: Show the direction of rotation for the crankshaft and camshafts.
- Circles or Dots: Indicate the location of timing marks on the crankshaft and camshaft sprockets. These circles might be filled in (black) or open (white) to differentiate between different marks.
- Squares or Rectangles: May represent the alignment points on the engine block or timing cover.
- Color Coding: Some diagrams use colors to highlight specific components or marks. For example, the timing chain links that align with specific sprocket marks might be colored differently.
Understanding the diagram requires you to locate the corresponding physical marks on the engine. The diagram usually provides zoomed-in views of each timing mark with labels identifying them, such as "Crankshaft TDC Mark" or "Left Bank Camshaft Alignment Mark." Pay close attention to the orientation of these marks, as they can be subtle and easily overlooked.
How the Timing System Works
In a four-stroke engine, the crankshaft completes two rotations for every one rotation of the camshaft(s). The timing chain ensures this precise relationship is maintained. When the timing marks are properly aligned:
- The crankshaft is at a specific position (usually Top Dead Center - TDC - for cylinder #1).
- The camshafts are positioned such that the valves for cylinder #1 are closed or in the correct position for the start of the combustion cycle.
The timing chain transmits the rotational force from the crankshaft to the camshafts. The camshaft lobes then actuate the valves, opening and closing them at precisely timed intervals. This synchronization is absolutely critical for proper engine operation.
Real-World Use and Basic Troubleshooting
Here's how you might use this information in a real-world scenario:
- Timing Chain Replacement: Before removing the old timing chain, carefully observe and document the position of the timing marks. Then, use the diagram to correctly align the new chain and sprockets during installation.
- Verifying Timing After Repair: If someone else has worked on the engine, you can use the diagram to independently verify that the timing is correct. This is a good safety measure.
- Diagnosing Timing Issues: If you suspect a timing problem (e.g., engine misfires, poor performance), you can use a timing light (or advanced diagnostic tools) to check the actual timing against the factory specifications. Misalignment could indicate a stretched timing chain, a worn tensioner, or a slipped sprocket.
Basic Troubleshooting Tips:
- Difficulty starting: Check for gross misalignment of the timing marks.
- Engine misfires: Could be caused by slight timing misalignment.
- Rattling noises: Often indicates a worn timing chain tensioner, which can eventually lead to timing issues.
Safety Considerations
Working on the timing system involves several potential hazards:
- High Torque Components: The crankshaft bolt and camshaft bolts are typically torqued to very high specifications. Use a properly calibrated torque wrench and appropriate sockets to avoid injury or damage.
- Engine Rotation: Be extremely careful when rotating the engine manually. Ensure the spark plugs are removed to reduce compression and make rotation easier. Never force the engine to turn.
- Sharp Edges: Be mindful of sharp edges on the engine block and timing cover. Wear gloves to protect your hands.
- Fuel System: Disconnect the fuel pump relay or disable the fuel injectors before working on the engine to prevent fuel from flooding the cylinders.
- Never work under a vehicle supported only by a jack. Always use jack stands.
The timing chain and sprockets are critical components. A broken or improperly installed timing chain can lead to catastrophic engine damage, including bent valves and damaged pistons. Double-check your work and consult the factory repair manual for any specific instructions or warnings.
Remember, if you're not comfortable working on the timing system, it's best to consult a qualified mechanic. The cost of a professional repair is often far less than the cost of repairing a damaged engine.
We have the file containing a detailed Explorer Diagram Ford 3.5 Timing Marks, ready for you to download and review at your convenience.