Extra Battery For Car Audio System Diagram
So, you're thinking about adding an extra battery for your car audio system? Smart move. Overloading your vehicle's electrical system with high-powered amps can lead to dimming headlights, reduced engine performance, and ultimately, a dead battery. This article will walk you through understanding an extra battery setup using a simplified diagram, focusing on the practical aspects an experienced DIYer like yourself needs to know.
Why Bother with a Diagram?
Think of this diagram as your roadmap. It serves multiple purposes:
- Planning: Before you even buy a single wire, the diagram helps you visualize the entire system and ensures you have all the necessary components.
- Installation: During the installation process, the diagram acts as a reference to ensure correct wiring and prevent costly mistakes.
- Troubleshooting: When things go wrong (and they often do!), the diagram becomes invaluable for identifying faulty connections or components.
- Understanding: Even if you're not doing the install yourself, understanding the diagram gives you a solid grasp of how the system functions, allowing you to communicate effectively with installers and maintain the system properly.
Key Specs and Main Parts
Let's break down the essential components you'll see in a typical extra battery diagram for a car audio system:
- Primary Battery: This is your vehicle's original battery, responsible for starting the engine and powering the standard electrical components.
- Secondary (Auxiliary) Battery: The dedicated power source for your audio system. Ideally, this should be a deep-cycle battery designed for sustained discharge and recharge cycles. Look for an Amp-Hour (Ah) rating that suits the power demands of your amplifiers.
- Battery Isolator (or Battery Management System - BMS): This is the brain of the operation. It prevents the auxiliary battery from draining the primary battery when the engine is off. There are two main types:
- Relay-Based Isolators: These are simpler and typically cheaper. They physically disconnect the two batteries when the engine is off. They use a voltage-sensing relay that closes when the alternator is charging, connecting the batteries for charging.
- Solid-State Isolators (BMS): These are more sophisticated and often include features like voltage monitoring, over-current protection, and temperature compensation. They generally offer better performance and longevity but come at a higher cost. A BMS is technically *not* an isolator in the strictest sense, as it manages power flow rather than simply disconnecting the batteries. They can even allow a small current *from* the auxiliary to the primary if the primary is dangerously low.
- Fuses/Circuit Breakers: Critical for protecting your electrical system from overloads and short circuits. Place them as close as possible to the batteries and other power sources. Amperage ratings are determined by the maximum current draw of the components they protect. Use appropriately sized fuses, erring on the slightly lower side to ensure protection.
- Grounding Cables: Provide a low-resistance path for current to return to the battery. Use heavy-gauge cables (the same gauge as your power cables) and ensure they are securely connected to bare metal on the vehicle chassis. Poor grounding is a common source of problems.
- Power Cables: These heavy-gauge cables connect the batteries, isolator, and amplifiers. The gauge (thickness) of the cable is crucial. Too thin, and you'll experience voltage drop, reducing amplifier power and potentially damaging components. Use a voltage drop calculator to determine the appropriate gauge for your specific setup, considering the distance, current draw, and desired voltage drop.
- Distribution Block (Optional): A convenient way to split a single power cable into multiple cables for powering multiple amplifiers. Ensure the distribution block is adequately rated for the current it will be carrying.
- Amplifiers: These boost the audio signal to drive your speakers. Their power consumption is a significant factor in determining the size of your auxiliary battery and wiring.
Understanding the Symbols
Diagrams use symbols to represent components and connections. Here's a breakdown:
- Solid Lines: Typically represent power cables carrying positive (+) voltage. Thicker lines indicate larger gauge wires.
- Dashed Lines: Usually indicate control wires, such as the remote turn-on wire from the head unit to the amplifier, or smaller signal wires.
- Ground Symbols: Represent a connection to the vehicle chassis, providing a return path for the current. This symbol often looks like a series of descending lines.
- Battery Symbols: Depict the battery, with the longer line indicating the positive terminal and the shorter line the negative terminal.
- Fuse Symbols: Represent a fuse or circuit breaker. They often look like a zigzag line inside a rectangle or circle.
- Component Boxes: Represent various electrical components like amplifiers, isolators, and distribution blocks. These boxes will often have labels indicating what the component is.
- Color Coding: While not always consistent, red generally indicates positive (+) voltage, and black indicates ground (-). Other colors may be used for control wires or specific signals.
How It Works: A Simplified Explanation
The basic principle is to isolate the auxiliary battery from the primary battery so that your audio system doesn't drain your starting battery. Here's how the system functions:
- When the engine is running, the alternator charges both the primary and auxiliary batteries through the battery isolator (or BMS). The isolator senses the voltage increase from the alternator and connects the two batteries.
- When the engine is off, the battery isolator disconnects the auxiliary battery from the primary battery. This ensures that the audio system draws power only from the auxiliary battery, leaving the primary battery with enough charge to start the engine.
- The auxiliary battery powers your audio amplifiers and other accessories.
- Fuses or circuit breakers protect the wiring and components from overloads and short circuits.
Real-World Use and Basic Troubleshooting
Even with a well-planned diagram, problems can arise. Here are some common issues and troubleshooting tips:
- Audio system drains both batteries: This usually indicates a problem with the battery isolator. It may be faulty and not disconnecting the batteries when the engine is off. Check the isolator's operation with a multimeter. Also, verify that the remote turn-on wire from your head unit is properly wired and turning off the amplifier when the car is off.
- Amplifier shuts off or sounds weak: This could be due to insufficient power. Check the voltage at the amplifier with a multimeter. If the voltage is significantly lower than the battery voltage (typically around 12-14 volts), there may be a voltage drop issue. Inspect your power and ground cables for corrosion or loose connections. Also, ensure that the cable gauge is adequate for the current draw.
- Fuses keep blowing: This indicates an overload or short circuit. Check the wiring for any damaged insulation or wires touching the chassis. Make sure the fuse amperage is correct for the component it's protecting. If the problem persists, there may be a fault within the amplifier or other component.
- Auxiliary battery not charging: Verify the battery isolator is functioning correctly and allowing current to flow to the auxiliary battery when the engine is running. Check the voltage at the auxiliary battery while the engine is running. It should be higher than the battery's resting voltage (around 13.5-14.5 volts). If not, the isolator may be faulty, or there may be a problem with the alternator.
Safety First!
Working with car electrical systems can be dangerous. Here are some crucial safety precautions:
- Disconnect the negative terminal of the primary battery before starting any work. This prevents accidental short circuits.
- Wear safety glasses to protect your eyes from sparks or debris.
- Use insulated tools to avoid electrical shock.
- Never work on the electrical system while the engine is running.
- Double-check all wiring connections before reconnecting the battery. Incorrect wiring can damage components or even start a fire.
- The alternator and the starter carry very high currents. Avoid accidentally shorting these components while working. They can generate a significant amount of heat and cause burns.
- When routing wires, avoid sharp edges or moving parts. Use wire loom or other protective sleeving to prevent damage.
This guide provides a foundational understanding of extra battery setups for car audio systems. Always consult your vehicle's service manual and the documentation for your audio components for specific recommendations. With careful planning, proper installation, and a solid understanding of the underlying principles, you can enjoy a powerful and reliable car audio system without compromising your vehicle's electrical system.
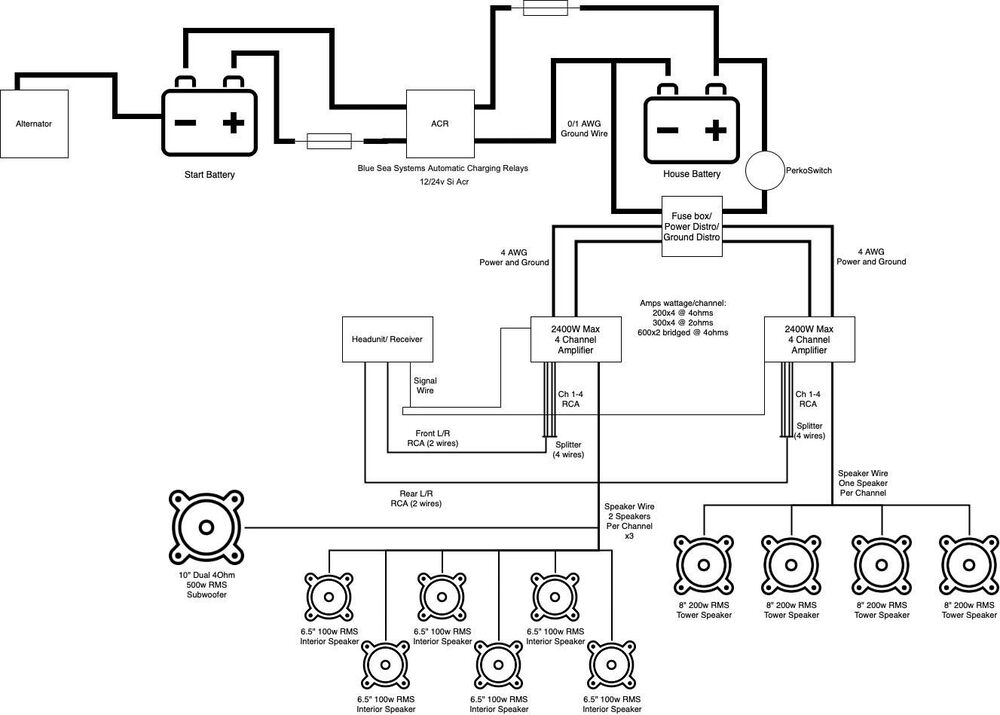
We have a sample extra battery diagram available for download. This diagram is a general representation and may need to be adjusted to fit your specific vehicle and audio system. It is intended as a starting point for your project and should be used in conjunction with other resources and your own research.