Factory Wiring Harness Ford Radio Wiring Harness Color Codes
Understanding the factory wiring harness for your Ford radio is crucial for various tasks, from simple radio replacement to more complex modifications and repairs. This article will delve into the intricacies of Ford radio wiring harness color codes, providing you with the knowledge to confidently tackle your automotive electrical projects. Having access to the correct wiring diagram is paramount, and we have one available for you to download at the end of this article. This knowledge will empower you whether you're upgrading your sound system, troubleshooting a blown fuse, or simply trying to identify a specific wire.
Purpose of Understanding Ford Radio Wiring Harnesses
Why bother learning about these seemingly complex bundles of wires? Here's a breakdown:
- Radio Replacement/Upgrade: Aftermarket radios often require adapters to interface with the factory harness. Knowing the color codes ensures a proper connection, preventing damage to the radio or vehicle's electrical system.
- Audio System Modifications: Adding amplifiers, subwoofers, or other audio components necessitates tapping into the appropriate signal and power wires. Correct identification prevents shorts and ensures optimal performance.
- Troubleshooting Electrical Issues: A blown fuse, malfunctioning speaker, or other electrical problems can often be traced back to the radio wiring. Understanding the harness layout allows for efficient diagnosis and repair.
- Security System Integration: Certain security systems require connections to the radio's power and accessory wires.
- Educational Purposes: Simply expanding your automotive knowledge is a valuable asset.
Key Specs and Main Parts of a Ford Radio Wiring Harness
The Ford radio wiring harness typically consists of several key components:
- Power Wires: These wires provide the radio with the necessary electrical power to operate. Typically, you'll find a constant 12V (battery) wire and a switched 12V (accessory) wire.
- Ground Wire: This wire provides the return path for the electrical current, completing the circuit. A good ground connection is essential for proper radio operation.
- Speaker Wires: These wires transmit the audio signal from the radio to the speakers. There are typically four pairs of speaker wires, one pair for each speaker (front left, front right, rear left, rear right).
- Antenna Wire: This wire connects the radio to the antenna, allowing it to receive radio signals.
- Illumination Wire: This wire dims the radio's display when the headlights are turned on.
- Remote Turn-On Wire (Amplifier): This wire provides a 12V signal to turn on an external amplifier when the radio is powered on. This is not always present in all harnesses.
- Data Wires (CAN Bus): Modern Ford vehicles use a CAN (Controller Area Network) Bus to transmit data between different modules in the vehicle. Some radios use these wires for communication, such as vehicle speed information or steering wheel control integration.
The harness itself is typically a multi-pin connector that plugs directly into the back of the radio. Different Ford models and years may use different connector types, so it's essential to consult the correct wiring diagram for your specific vehicle.
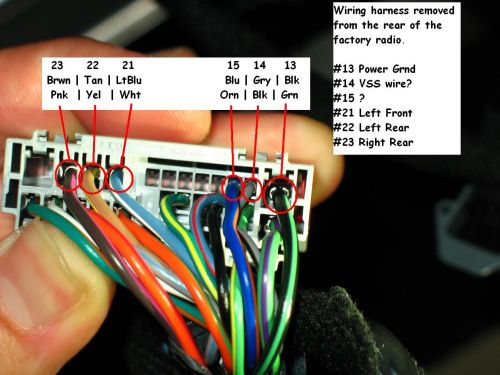
Understanding Ford Radio Wiring Harness Color Codes and Symbols
Ford uses a standardized color-coding system for its wiring harnesses, but there can be slight variations depending on the model year and vehicle trim level. Here's a general guide to common Ford radio wiring harness color codes:
- Yellow: Constant 12V Power (Battery)
- Red: Switched 12V Power (Accessory)
- Black: Ground
- White: Front Left Speaker (+)
- White/Black Stripe: Front Left Speaker (-)
- Gray: Front Right Speaker (+)
- Gray/Black Stripe: Front Right Speaker (-)
- Green: Rear Left Speaker (+)
- Green/Black Stripe: Rear Left Speaker (-)
- Purple: Rear Right Speaker (+)
- Purple/Black Stripe: Rear Right Speaker (-)
- Orange: Illumination
- Blue: Remote Turn-On (Amplifier)
Important Notes on Color Codes:
- Always double-check the wiring diagram for your specific vehicle. Color codes can vary slightly.
- The "stripe" color refers to a thin stripe running along the length of the wire.
- Do not rely solely on color codes. Use a multimeter to verify the function of each wire before making any connections.
Symbols on Wiring Diagrams:
- Solid Line: Represents a wire.
- Dashed Line: Represents a shielded wire or a connection that may not be present in all vehicles.
- Circle with a Number: Represents a connector pin number.
- Ground Symbol (typically three horizontal lines): Indicates a connection to ground.
- Fuse Symbol: Indicates a fuse. The diagram will usually specify the fuse's amperage rating.
- Component Symbols (e.g., Radio, Speaker, Amplifier): Simplified representations of the components connected to the harness.
How It Works: The Electrical Flow
The radio's operation depends on a complete electrical circuit. The constant 12V wire provides power to maintain the radio's memory (e.g., preset stations, clock settings). The switched 12V wire turns the radio on and off with the ignition. The ground wire provides the return path for the current. When the radio is turned on, it amplifies the audio signal and sends it through the speaker wires to the speakers. The antenna wire allows the radio to receive radio signals.
Modern Ford radios, especially those integrated with the vehicle's CAN Bus, also receive data signals that control various functions. This can include displaying vehicle information on the radio screen, integrating steering wheel controls, and automatically adjusting the radio's volume based on vehicle speed.
Real-World Use: Basic Troubleshooting Tips
Here are some common troubleshooting scenarios and how to use your understanding of the wiring harness to resolve them:
- No Power to Radio: Check the constant 12V and switched 12V wires with a multimeter. Verify that the fuses for the radio are not blown. Check the ground connection to ensure it's secure and has good continuity.
- Radio Turns On But No Sound: Check the speaker wires and connections. Ensure that the speakers are properly connected and not damaged. Use a multimeter to check for continuity between the radio and the speakers.
- Blown Fuses: A frequently blowing fuse indicates a short circuit. Inspect the wiring harness for any damaged or exposed wires that could be causing a short.
- Dim or Flickering Radio Display: Check the illumination wire. A loose or corroded connection can cause dimming or flickering.
- Steering Wheel Controls Not Working: If your radio is integrated with the vehicle's CAN Bus, check the CAN Bus wires and connections. Ensure that the radio is properly programmed to recognize the steering wheel controls.
Tip: Always disconnect the negative battery terminal before working on any automotive electrical system. This will prevent accidental shorts and potential damage.
Safety: Highlighting Risky Components
Working with automotive electrical systems involves inherent risks. The constant 12V wire is always "hot" and can deliver a shock or cause a short circuit if mishandled. Be extremely careful when working with this wire. The ignition wire is another one to be careful of. Disconnecting the negative terminal is the best way to mitigate these risks.
The Airbag Control Module (ACM) is often located near the radio. Never tamper with or disconnect the ACM unless you are specifically trained to do so. Improper handling of the ACM can cause the airbags to deploy, resulting in serious injury.
Always use proper safety precautions, including wearing safety glasses and gloves, when working on automotive electrical systems. If you are not comfortable working with electricity, it's best to consult a qualified mechanic.
We hope this article has provided you with a solid understanding of Ford radio wiring harness color codes and how to use them effectively. Remember to always consult the correct wiring diagram for your specific vehicle and take the necessary safety precautions. With this knowledge and a little patience, you can confidently tackle your automotive electrical projects.
As promised, we have a detailed Ford radio wiring diagram available for download. This diagram will provide you with the specific color codes and pinouts for a wide range of Ford vehicles. Click the link below to download the diagram. We do not endorse any liability for misuse of the diagram.
[Download Ford Radio Wiring Diagram Here - Placeholder Link]