Factory Wiring Harness Ford Wire Harness Color Code
Understanding your Ford's factory wiring harness and the associated color codes is invaluable for a variety of reasons. Whether you're diagnosing electrical problems, installing aftermarket accessories, performing repairs, or simply expanding your automotive knowledge, a grasp of the wiring system will save you time, money, and potential headaches. This article provides a deep dive into Ford wire harness color codes, their purpose, and how to effectively use this knowledge in your projects.
Purpose of Understanding Ford Wire Harness Color Codes
Why bother learning about wire colors? The primary reason is efficient and accurate electrical work. Without a solid understanding, you risk making incorrect connections, leading to short circuits, blown fuses, or even damage to sensitive electronic components. Here's a breakdown of the key benefits:
- Accurate Diagnostics: Quickly identify the correct wires for testing voltage, continuity, and resistance, significantly speeding up troubleshooting.
- Safe Repairs: Minimize the risk of accidentally connecting the wrong wires during repairs, ensuring proper functionality and preventing further damage.
- Aftermarket Installation: Simplify the installation of aftermarket accessories like stereos, alarms, lighting, and other electronic devices.
- Custom Modifications: Facilitate custom modifications and electrical upgrades with confidence, knowing you're making the correct connections.
- Enhanced Understanding: Gain a deeper understanding of your vehicle's electrical system, empowering you to perform more complex repairs and modifications.
Key Specs and Main Parts of a Ford Wire Harness
A wire harness, also known as a wiring loom or cable assembly, is an organized set of wires, cables, and connectors that transmit electrical power, signals, and data throughout your vehicle. It's essentially the nervous system of your car. Here's what you need to know about its key specifications and components:
- Wire Gauge (AWG): The American Wire Gauge (AWG) indicates the diameter of the wire. Smaller AWG numbers represent thicker wires, which can carry more current. Common gauges in automotive applications include 18 AWG, 16 AWG, 14 AWG, 12 AWG, and 10 AWG. Heavier gauge wires are used for high-current applications like the starter motor and alternator.
- Wire Insulation Material: The insulation surrounding the wire prevents short circuits and protects the wire from environmental factors. Common materials include PVC (Polyvinyl Chloride), XLPE (Cross-Linked Polyethylene), and GXL (Cross-Linked Polyethylene with a thicker insulation). GXL is common in engine compartments due to its higher temperature resistance.
- Connectors: Connectors provide secure and reliable connections between different parts of the wiring harness and various components. Different connector types are used for different applications, including weather-pack connectors (sealed against moisture), Delphi Metri-Pack connectors (high-performance connections), and Molex connectors.
- Terminals: Terminals are the metal contacts inside the connectors that make the electrical connection. They come in various shapes and sizes and are crimped or soldered onto the wires.
- Ground Straps: These are heavy-gauge wires that provide a direct electrical connection between the vehicle's chassis and various components, ensuring proper grounding and preventing electrical noise.
- Fuses and Relays: Fuses protect the electrical circuits from overcurrent, while relays act as electrically operated switches, allowing a small current to control a larger current. These are critical components for safety and proper operation.
- Harness Wrap/Tape: The wiring harness is typically wrapped in electrical tape, convoluted tubing (split loom), or other protective materials to protect the wires from abrasion, moisture, and heat.
Understanding the Color Code System
Ford uses a standardized color code system to identify the function of each wire within the harness. This system typically involves a base color and, optionally, a stripe color. For example, a wire labeled "RD/WH" would be a red wire with a white stripe. Learning these codes is key.
Symbols and Conventions
Wiring diagrams use specific symbols to represent various electrical components and connections. Here's a quick overview of common symbols:
- Solid Lines: Represent wires. The thickness of the line might indicate the wire gauge.
- Dashed Lines: Often used to represent shielded cables or wires that are part of a sensor circuit.
- Circles: Can represent lamps or other circular components.
- Squares: Often represent relays, switches, or electronic control units (ECUs).
- Resistors: Represented by a zig-zag line.
- Capacitors: Represented by two parallel lines.
- Ground Symbol: Represents a connection to the vehicle's chassis ground.
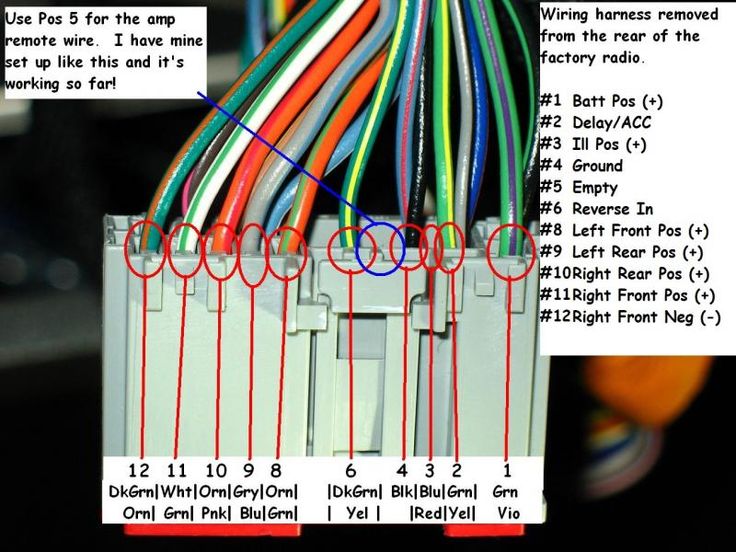
Common Ford Wire Color Codes
Here's a list of common Ford wire color codes and their typical functions. Note that these can vary depending on the model year and specific vehicle application. Always consult the specific wiring diagram for your vehicle.
- BK: Black (Ground)
- RD: Red (Power)
- WH: White (Various signals)
- GN: Green (Various signals)
- VT: Violet/Purple (Various signals)
- YE: Yellow (Various signals)
- BN: Brown (Various signals)
- OG: Orange (Various signals)
- LB: Light Blue (Various signals)
- DB: Dark Blue (Various signals)
- GY: Gray (Various signals)
- PK: Pink (Various signals)
Stripe Colors: When a wire has a stripe, the color of the stripe is indicated after the base color, separated by a forward slash. For example, RD/WH indicates a red wire with a white stripe.
How It Works: Understanding the Electrical Flow
Electrical circuits in a vehicle work by creating a closed loop. Current flows from the battery (positive terminal) through a circuit, powering a component (like a light bulb or motor), and then returns to the battery (negative terminal or ground). A switch in the circuit controls the flow of current, turning the component on or off.
Electronic Control Units (ECUs), such as the engine control unit (ECU) or body control module (BCM), use sensors to monitor various parameters (like engine temperature, vehicle speed, and throttle position). The ECU then uses this information to control actuators (like fuel injectors, ignition coils, and relays) to optimize vehicle performance and efficiency. The wiring harness provides the communication network between these sensors, ECUs, and actuators.
Real-World Use: Basic Troubleshooting Tips
Let's say your Ford's tail lights aren't working. Here's how you can use your knowledge of the wiring harness and color codes to troubleshoot the problem:
- Consult the Wiring Diagram: Obtain the wiring diagram for your specific vehicle model and year. This diagram will show you the wiring circuit for the tail lights, including the wire colors, fuse location, and ground points.
- Check the Fuse: Locate the fuse for the tail lights (usually indicated on the fuse box cover). Use a multimeter to test the fuse for continuity. If the fuse is blown, replace it with a new fuse of the correct amperage.
- Inspect the Bulbs: Check the tail light bulbs themselves. Replace any blown bulbs.
- Check the Wiring: Using the wiring diagram, trace the wires from the tail lights back to the fuse box and ground points. Look for any signs of damage, such as frayed wires, corrosion, or loose connections.
- Test for Voltage: Use a multimeter to test for voltage at the tail light connector. If there's no voltage, there's a break in the circuit upstream.
- Check the Ground Connection: Ensure the ground connection for the tail lights is clean and secure. A poor ground connection can cause all sorts of electrical problems.
Safety Precautions
Working with automotive electrical systems can be dangerous. Here are some essential safety precautions:
- Disconnect the Battery: Always disconnect the negative battery cable before working on any electrical component. This will prevent accidental short circuits and potential electrical shocks.
- Use the Right Tools: Use insulated tools designed for automotive electrical work.
- Wear Safety Glasses: Protect your eyes from sparks and debris.
- Avoid Working in Wet Conditions: Water conducts electricity, increasing the risk of electric shock.
- Be Careful Around Airbags: Airbag systems contain capacitors that can store a significant electrical charge even after the battery is disconnected. Consult your vehicle's service manual for the proper procedure for disabling the airbag system before working near airbag components.
- High-Voltage Components: Do not attempt to repair or modify high-voltage components in hybrid or electric vehicles unless you are specifically trained and qualified to do so. These systems can be lethal.
Understanding Ford wire harness color codes is a crucial skill for any DIY mechanic or car enthusiast. By learning the conventions and practicing safe procedures, you can confidently tackle electrical repairs, modifications, and installations, saving time and money while gaining a deeper understanding of your vehicle.
We have a detailed Ford Wiring Diagram file available for download. This comprehensive diagram will provide you with the specific wire colors and circuit layouts for your Ford model, making your electrical projects much easier. Contact us to obtain the file.