Ford 3 Wire Alternator Wiring Diagram
Understanding your Ford's electrical system is crucial for maintenance, repairs, and even modifications. One of the most common components is the 3-wire alternator, and being able to decipher its wiring diagram is an invaluable skill. This article will walk you through the intricacies of a typical Ford 3-wire alternator wiring diagram, enabling you to confidently diagnose issues, perform repairs, or even upgrade your charging system.
Purpose of Understanding the 3-Wire Alternator Wiring Diagram
Why bother learning about this diagram? Several reasons:
- Troubleshooting: When your battery isn't charging properly, or you're experiencing electrical issues, understanding the wiring diagram helps you pinpoint the source of the problem, whether it's a faulty wire, a bad connection, or a failing alternator itself.
- Repairing: If a wire is damaged or a connector is corroded, the diagram allows you to correctly replace it and ensure proper connections are made.
- Upgrading: Planning to install a higher-output alternator? The diagram is essential to ensure correct wiring and prevent damage to your electrical system.
- Learning: Deeper understanding of your vehicle's charging system empowers you to perform more advanced diagnostics and repairs.
Key Specs and Main Parts of a 3-Wire Alternator System
Before diving into the diagram, let's clarify the essential components and some common specifications:
Main Components:
- Alternator: The heart of the charging system, converting mechanical energy from the engine into electrical energy.
- Battery: Stores electrical energy and provides power to start the engine and run accessories when the engine is off.
- Voltage Regulator: Controls the output voltage of the alternator to prevent overcharging and damage to the battery and electrical components. In a 3-wire system, the regulator is typically internal to the alternator.
- Wiring Harness: The network of wires that connects all the components together.
- Fuses and Relays: Protective devices that prevent damage from overloads and short circuits.
Common Specifications:
- Voltage: Most Ford systems are 12V DC (Direct Current).
- Amperage: Alternators come in various amperage ratings (e.g., 60A, 100A, 130A). Choosing the correct amperage is crucial for supporting your vehicle's electrical load.
- Wire Gauge: The thickness of the wires. Larger gauge wires (smaller AWG number) can carry more current. Use the proper gauge wire to prevent overheating and voltage drop.
A 3-wire alternator is characterized by having three essential connections, which define it from its 1-wire or even older 2-wire predecessors. These wires provide better voltage regulation and load compensation.
Deciphering the Wiring Diagram: Symbols and Conventions
Wiring diagrams use standardized symbols to represent components and connections. Here's a breakdown of what you'll typically see:
- Solid Lines: Represent wires. The thickness of the line may sometimes indicate the wire gauge (thicker lines for larger gauge wires).
- Dotted Lines: May represent shielded cables or grounds, or sometimes, wires that exist but are optional based on the vehicle configuration.
- Color Coding: Each wire is typically color-coded (e.g., Red, Black, Yellow, Blue, Green). The diagram legend will tell you what each color represents. For example:
- Red: Typically indicates a power wire (+12V).
- Black: Typically indicates a ground wire.
- Yellow/White/Blue: Often used for signal wires or field wires.
- Component Symbols:
- Alternator: Often represented by a circle with a "G" inside (for generator).
- Battery: Represented by a series of long and short parallel lines (indicating cells).
- Voltage Regulator: Represented by a rectangle with pins labeled.
- Fuses: Represented by a zigzag line inside a rectangle.
- Relays: Represented by a coil symbol and switch contacts.
- Ground Symbols: Represented by a series of lines descending to a point.
- Connectors: Represented by circles or squares where wires join.
It's crucial to consult the specific wiring diagram for your vehicle's year, make, and model. Generic diagrams provide a general understanding, but the exact wiring can vary.
How a 3-Wire Alternator System Works
Here's a simplified explanation of how the 3-wire alternator system functions:
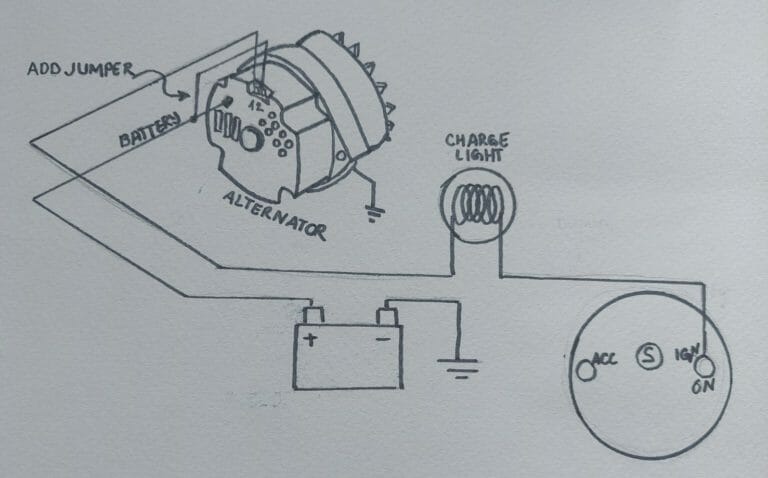
- Battery Connection (B+ or BAT): A heavy-gauge wire connects the alternator's output terminal (B+) directly to the positive (+) terminal of the battery. This wire carries the bulk of the charging current to replenish the battery. It's usually fused near the battery for safety.
- Ignition/Stator Wire (sometimes called the "Exciter" wire): This wire (often colored yellow or white) is connected to a switched 12V source, typically from the ignition switch. When you turn the key to the "ON" position, this wire provides a small amount of current to "excite" the alternator's field windings, initiating the charging process. It also serves as a signal to tell the alternator when the engine is running.
- Voltage Sensing Wire: This wire (often blue or green) is connected to a point in the electrical system that represents the actual voltage at the battery or at a critical load. The internal voltage regulator uses this voltage reading to adjust the alternator's output. This ensures that the battery receives the correct charging voltage, regardless of voltage drops in the wiring. This is the key benefit of a 3-wire system – better voltage regulation.
The alternator uses engine rotation to spin an internal rotor. The rotor has field windings that generate a magnetic field when energized by the ignition wire. This rotating magnetic field induces an AC (Alternating Current) voltage in the stator windings. The AC voltage is then rectified (converted) to DC (Direct Current) by a set of diodes inside the alternator. The voltage regulator controls the amount of current supplied to the field windings, thereby controlling the alternator's output voltage.
Real-World Use: Basic Troubleshooting Tips
Here's how you can use your understanding of the 3-wire alternator wiring diagram for basic troubleshooting:
- No Charging: If the battery isn't charging, start by checking the B+ wire for continuity and proper connection to the battery. Then, verify that the ignition wire is receiving 12V when the key is in the "ON" position. Finally, check the sensing wire connection and its voltage relative to the battery. A multimeter is essential for these checks.
- Overcharging: If the battery is constantly overcharging (indicated by a boiling battery or excessive voltage readings), suspect a faulty voltage regulator or a problem with the sensing wire. Check the sensing wire for shorts to ground or opens.
- Voltage Drop: Use a multimeter to measure the voltage at the alternator's B+ terminal and at the battery's positive terminal. A significant voltage difference (more than 0.5V) indicates excessive voltage drop in the wiring, likely due to corrosion, loose connections, or undersized wires.
Pro Tip: Always disconnect the negative battery cable before working on any electrical components to prevent short circuits.
Safety Considerations
Working with automotive electrical systems can be dangerous. Here are some safety precautions:
- Disconnect the Battery: As mentioned, always disconnect the negative battery cable before starting any electrical work.
- High Amperage: The alternator's B+ terminal carries high amperage, which can cause severe burns and electrical shock. Avoid touching it while the engine is running or the battery is connected.
- Fuses: Never bypass fuses. They are there to protect the electrical system from overloads. If a fuse blows repeatedly, find the underlying cause of the short circuit.
- Correct Wiring: Always double-check your wiring connections against the diagram. Incorrect wiring can damage the alternator, voltage regulator, or other components.
Important: Dealing with automotive electrical systems requires knowledge and caution. If you are not comfortable working with electricity, consult a qualified mechanic.
We've covered the core aspects of understanding a Ford 3-wire alternator wiring diagram. This knowledge should empower you to tackle basic troubleshooting and repairs with confidence. Remember to always consult the specific wiring diagram for your vehicle and prioritize safety. Now you are well equipped to move forward and maintain a healthy charging system on your Ford!
We have a sample wiring diagram available for download to help you get started. Contact us for access to the file.