Ford Blower Motor Resistor Wiring Diagram
Let's dive into the Ford blower motor resistor wiring diagram. This isn't just some schematic; it's your roadmap to understanding, troubleshooting, and potentially repairing the heating and air conditioning (HVAC) system in your Ford. Whether you're facing a finicky fan or planning an upgrade, grasping this diagram is key. We'll break down the core components, explain how the circuit works, and provide practical troubleshooting tips. We have the diagram available for download, so you can follow along.
Purpose of Understanding the Blower Motor Resistor Wiring Diagram
Why bother learning about this diagram? Several reasons:
- Troubleshooting HVAC Issues: If your blower motor only works on certain speeds, or not at all, the resistor or its wiring are prime suspects. The diagram helps you pinpoint the fault.
- Performing Repairs: Need to replace a burnt-out resistor or a damaged wire? The diagram shows you exactly where each wire goes, preventing misconnections.
- Understanding System Operation: Want to know how the blower motor speed is controlled? The diagram reveals the inner workings of the HVAC system.
- Modifications and Upgrades: Planning to install an aftermarket climate control system? The diagram gives you a baseline for understanding the existing wiring and how to integrate new components.
Key Specs and Main Parts in a Ford Blower Motor System
Before we get to the diagram itself, let's define the main players:
- Blower Motor: The electric motor that spins the fan, pushing air through the HVAC system and into the cabin. It requires significant amperage to run.
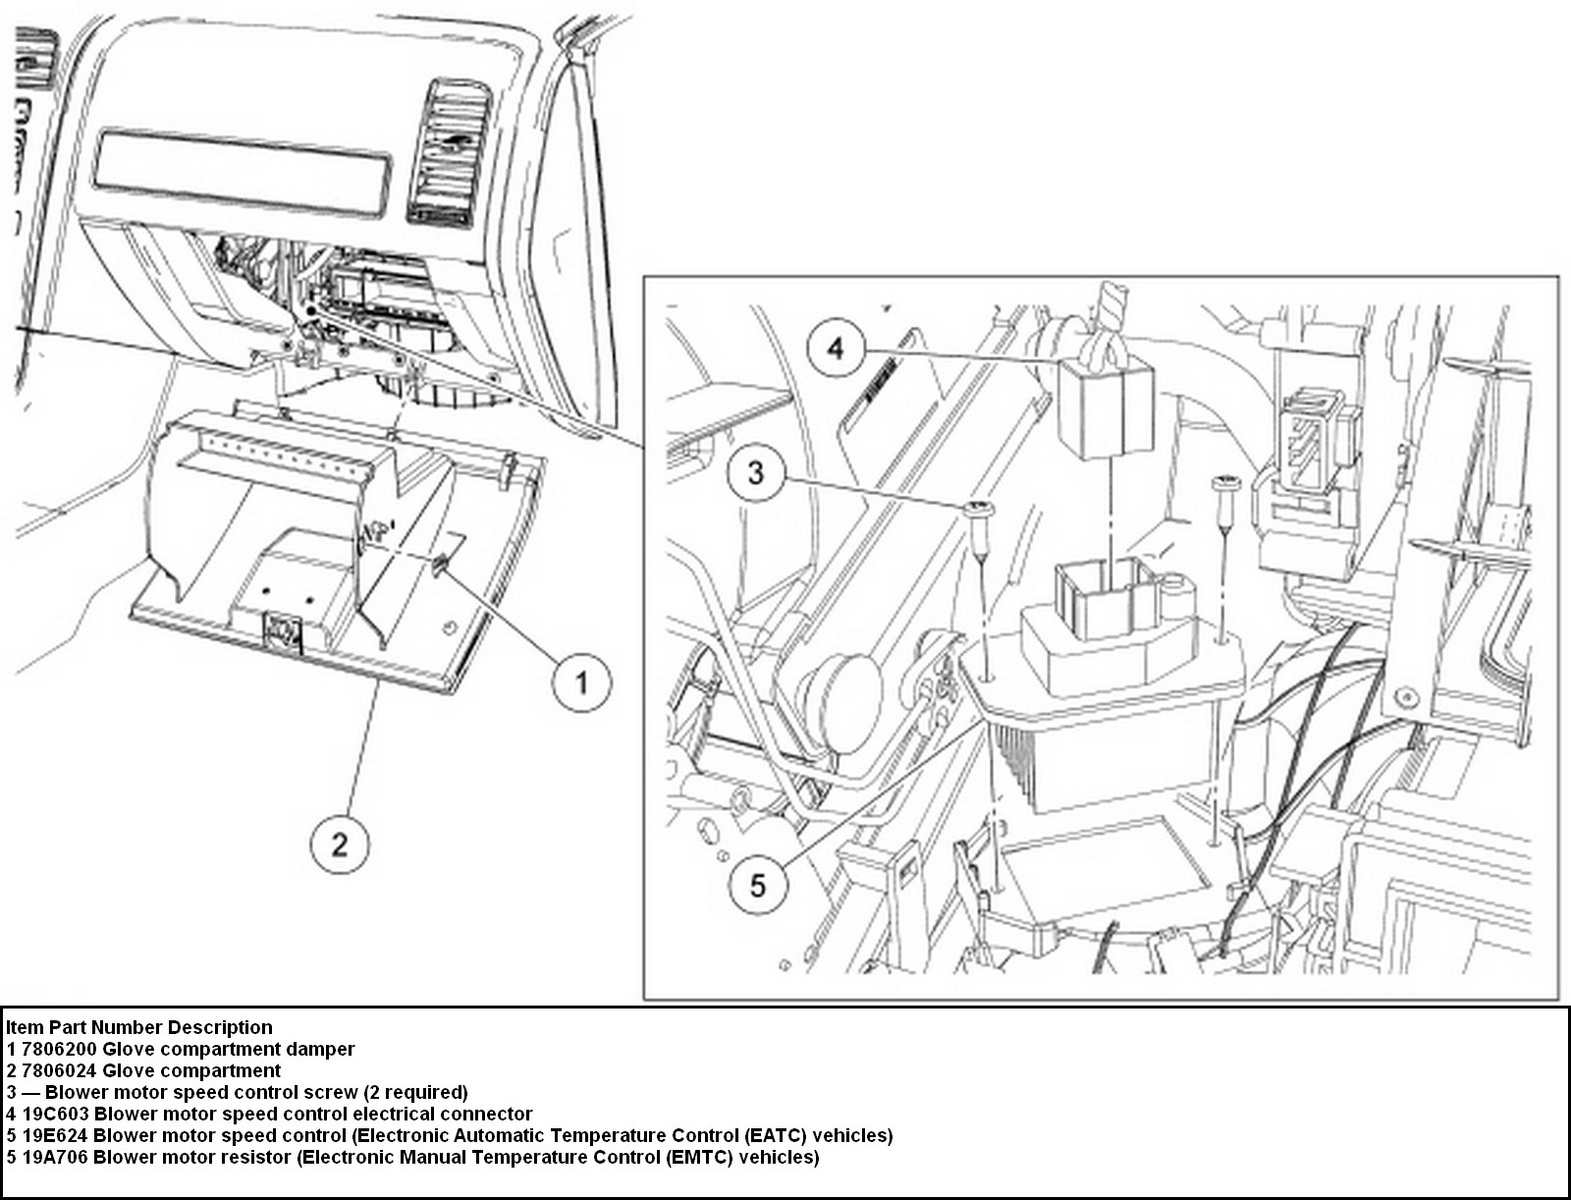
- Blower Motor Resistor: A component that contains a series of resistors used to control the voltage supplied to the blower motor. Each resistor allows a different amount of current to pass, resulting in different fan speeds.
- Blower Motor Switch: The switch on your dashboard that allows you to select the desired fan speed. It directs power through different resistors or directly to the blower motor.
- Relay (If Equipped): Some Ford models use a relay to handle the high current draw of the blower motor, especially at higher speeds. This protects the blower motor switch from excessive wear.
- Fuse: A safety device that protects the circuit from overloads. If the blower motor draws too much current, the fuse will blow, interrupting the circuit.
- Wiring Harness: The collection of wires that connect all the components together.
- Ground Connection: This is a crucial connection that provides a return path for the electrical current. A poor ground can cause all sorts of electrical problems.
Key Specs to consider:
- Voltage: Typically 12V DC in most Ford vehicles.
- Resistance Values: The resistance values of the resistors in the resistor pack vary depending on the specific model and year of the vehicle. These values are crucial for proper speed control.
- Fuse Amperage: The fuse protecting the blower motor circuit will have a specific amperage rating (e.g., 20A, 30A). Using a fuse with a higher rating can be dangerous.
Decoding the Ford Blower Motor Resistor Wiring Diagram: Symbols and Conventions
Wiring diagrams use standardized symbols and conventions to represent electrical components and connections. Here's a breakdown of common elements:
- Lines: Represent wires. Solid lines indicate a direct connection, while dashed lines often indicate a shielded wire or a connection on a different page of the diagram.
- Colors: Each wire is typically identified by a color code (e.g., Red, Black, Blue/White). This is critical for identifying the correct wires in the actual vehicle wiring harness.
- Resistor Symbol: A zig-zag line represents a resistor. The diagram may show multiple resistors within the resistor pack.
- Switch Symbol: Shows the different positions of the blower motor switch and how they connect to the resistors.
- Ground Symbol: Usually a series of descending horizontal lines, indicating a connection to the vehicle's chassis ground.
- Fuse Symbol: A line with a "loop" through it, representing a fuse.
- Component Labels: Each component (blower motor, resistor, switch, etc.) will be labeled with a descriptive name or abbreviation.
- Connectors: Shown as circles or squares where wires connect, often with a number referencing a specific connector in the vehicle.
Important Conventions:
- Wire Gauge: The wire gauge (thickness) may be indicated on the diagram. Using a wire of the correct gauge is essential for handling the current flow.
- Splices: Points where multiple wires connect together are indicated with a dot at the junction.
How the Ford Blower Motor Circuit Works
Here's a simplified explanation of how the blower motor circuit typically operates:
- Power Source: Power from the battery flows through a fuse to protect the circuit.
- Blower Motor Switch: The blower motor switch allows you to select the desired fan speed.
- Resistor Pack: When you select a lower fan speed, the switch directs power through one or more resistors in the resistor pack. Each resistor reduces the voltage supplied to the blower motor, resulting in a slower fan speed. For example, a higher resistance value results in a lower fan speed.
- Direct Power (High Speed): When you select the highest fan speed, the switch typically bypasses the resistor pack and sends full voltage directly to the blower motor.
- Blower Motor: The blower motor receives the voltage and spins the fan, pushing air into the cabin.
- Ground: The blower motor is grounded to the vehicle's chassis, completing the circuit.
In essence, the resistor pack acts as a voltage divider, reducing the voltage to the blower motor to achieve different fan speeds. The higher the resistance, the lower the voltage, and the slower the fan speed.
Real-World Use: Basic Troubleshooting Tips
Here's how you can use the wiring diagram to troubleshoot common blower motor issues:
- No Fan Operation at All: Check the fuse first. If the fuse is blown, replace it with one of the correct amperage. If it blows again immediately, there's a short circuit somewhere in the system. Use the diagram to trace the wiring and look for damaged insulation or pinched wires.
- Fan Works Only on High Speed: This is a classic symptom of a failed blower motor resistor. The high-speed setting bypasses the resistor pack, so it still works. Use the diagram to locate the resistor pack and test it with a multimeter. You're looking for open circuits (infinite resistance) in the lower speed resistors.
- Fan Works on Some Speeds, But Not Others: This also points to a problem with the resistor pack. Use the diagram to identify which resistor corresponds to the non-working speed and test it with a multimeter.
- Intermittent Fan Operation: This could be caused by a loose connection, a corroded terminal, or a failing relay (if equipped). Use the diagram to identify the connections and check for corrosion or looseness. A wiggle test can sometimes help you isolate the problem.
Example Scenario: Let's say your Ford's blower motor only works on high. You consult the wiring diagram and identify the blower motor resistor pack's location. You use a multimeter (set to ohms) to test each resistor within the pack. You find that the resistor for the low-speed setting reads as an open circuit (infinite resistance). This confirms that the resistor is bad and needs to be replaced. You can then use the diagram to ensure you connect the new resistor pack correctly.
Safety Considerations When Working with Electrical Systems
Working with electrical systems can be dangerous. Here are some essential safety precautions:
- Disconnect the Battery: Always disconnect the negative battery cable before working on any electrical components. This will prevent accidental short circuits and electrical shocks.
- Use Proper Tools: Use insulated tools designed for automotive electrical work.
- Check for Voltage: Before touching any wires, use a multimeter to verify that they are not carrying voltage.
- Be Aware of High-Current Components: The blower motor and its associated wiring can carry significant current. Be careful when working around these components, as short circuits can cause burns and fires.
- Replace Fuses with the Correct Amperage: Never use a fuse with a higher amperage rating than specified. This can overload the circuit and cause a fire.
- Work in a Well-Ventilated Area: Some electrical components can release harmful fumes when they overheat.
Specifically regarding the blower motor resistor: These resistors can get extremely hot during normal operation. Avoid touching them immediately after the blower motor has been running, as they can cause burns.
Remember, this guide provides general information. Always refer to the specific wiring diagram for your Ford model and year. Wiring configurations can vary significantly between different vehicles.
Understanding the Ford blower motor resistor wiring diagram empowers you to diagnose and repair HVAC issues effectively. By carefully studying the diagram, identifying the components, and following safe practices, you can tackle these repairs with confidence. As mentioned at the beginning, we have the blower motor wiring diagram file available, ready for you to download and use as a reference.