Ford F150 Turn Signal Wiring Diagram
Understanding the Ford F-150 turn signal wiring diagram is invaluable for anyone tackling electrical repairs, customizing lighting, or simply wanting a deeper understanding of their truck's systems. Whether you're adding aftermarket accessories, diagnosing a faulty blinker, or tracing a short circuit, a clear understanding of the wiring diagram will save you time, money, and potential headaches. We’ve created this detailed guide to help you navigate the complexities of your F-150’s turn signal circuitry. We even have the full diagram available for download at the end of this article.
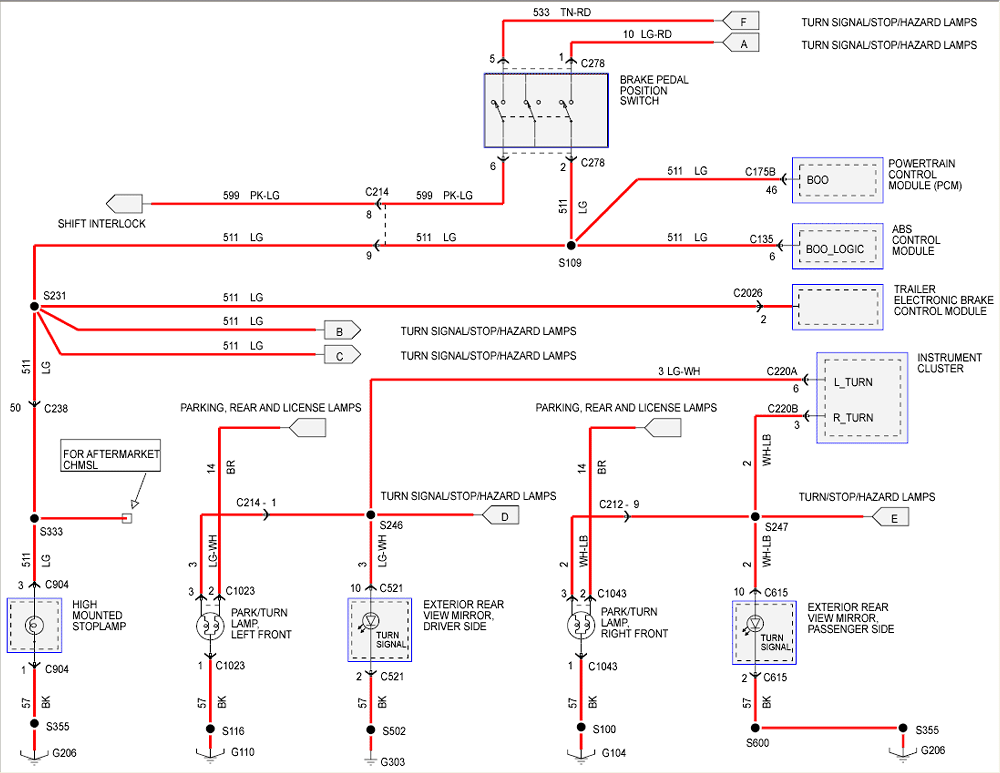
Purpose of the Wiring Diagram
The turn signal wiring diagram is essentially a roadmap for the entire turn signal system. It details how each component is connected, the voltage and amperage requirements, and the flow of electricity. Here's why it's so important:
- Troubleshooting: Pinpoint the exact location of a fault, whether it's a broken wire, a bad bulb socket, or a malfunctioning flasher relay.
- Modification: Safely add aftermarket lighting, such as LED turn signals, auxiliary lights, or custom taillights, without damaging the existing system.
- Repair: Replace damaged wiring, connectors, or components with the correct parts and ensure proper installation.
- Understanding: Gain a comprehensive understanding of how the turn signal system operates, empowering you to diagnose and fix problems yourself.
Key Specs and Main Parts
Before diving into the diagram, let's review the key components of the F-150's turn signal system. Specifics may vary slightly depending on the year and trim level of your F-150, so always refer to the diagram specific to your model.
Essential Components:
- Turn Signal Switch (Multifunction Switch): Located on the steering column, this switch activates the left and right turn signals, as well as the hazard lights. This is often a complex component integrating multiple functions.
- Flasher Relay (Turn Signal Flasher): This device controls the blinking frequency of the turn signal lights. It's typically a thermal or electronic device that interrupts the circuit at a regular interval. Modern vehicles often use the Body Control Module (BCM) to handle this function.
- Bulbs (Turn Signal Lamps): These provide the visible indication of a turn or hazard situation. F-150s use various bulb types, including incandescent, halogen, and LED depending on the year and trim.
- Sockets (Bulb Holders): These hold the bulbs in place and provide the electrical connection.
- Wiring Harness: A network of wires that connects all the components. The harness includes grounds, power supplies, and signal wires.
- Grounds: Connections to the vehicle's chassis, providing a return path for the electrical current. Solid ground connections are crucial for proper operation.
- Fuses: Protect the circuit from overcurrent conditions. If a fuse blows, it indicates a potential short circuit or overload.
- Body Control Module (BCM): In newer F-150s, the BCM plays a significant role in controlling the turn signals, hazard lights, and other lighting functions. It's a sophisticated electronic module that communicates with other vehicle systems.
Symbols and Conventions in the Wiring Diagram
Wiring diagrams use standardized symbols to represent electrical components and connections. Understanding these symbols is essential for interpreting the diagram correctly.
Common Symbols:
- Solid Lines: Represent wires. Thicker lines may indicate higher amperage circuits.
- Dashed Lines: Often indicate shielded wires or wires with a specific function, like a control signal to the BCM.
- Circles: Represent electrical components such as bulbs, relays, or sensors.
- Rectangles: Often represent switches, fuses, or modules like the BCM.
- Ground Symbol: A series of horizontal lines decreasing in length, indicating a connection to the vehicle's chassis.
- Color Codes: Wires are often color-coded (e.g., BK for black, RD for red, WH for white) to help identify them in the harness. The diagram will typically include a color code chart.
- Connectors: Shown as interlocking shapes or simply as a number within a circle, indicating a specific connector in the wiring harness.
Interpreting the Diagram
The diagram will show how each component is connected. For example, it will show the wire running from the turn signal switch to the flasher relay, then to the turn signal bulbs. It will also show the ground connections for each component. Pay close attention to the wire colors and connector numbers, as this will help you locate the correct wires in the vehicle.
How the F-150 Turn Signal System Works
Here's a simplified explanation of how the turn signal system works:
- When you activate the turn signal switch, it sends a signal to the flasher relay (or the BCM in newer models).
- The flasher relay interrupts the power supply to the turn signal bulbs, causing them to blink on and off. The BCM controls the flash rate electronically.
- The switch directs power to the appropriate side of the vehicle (left or right), illuminating the corresponding turn signal bulbs.
- The ground connections provide a return path for the electrical current, completing the circuit.
In modern F-150s with a BCM, the turn signal switch sends a signal to the BCM, which then controls the flasher function and activates the appropriate turn signal lights. This allows for more sophisticated features such as automatic lane change signals and trailer tow monitoring.
Real-World Use: Basic Troubleshooting Tips
Here are some common turn signal problems and how to troubleshoot them using the wiring diagram:
- No Turn Signals on One Side: Check the bulbs on that side first. Then, use the wiring diagram to trace the circuit from the turn signal switch to the bulbs, checking for broken wires, loose connectors, or a faulty socket. A multimeter can be used to test for voltage at each point.
- Rapid Blinking (Hyper-Flashing): This usually indicates a burned-out bulb on one side. However, it can also be caused by a problem with the BCM in newer models or an incorrect bulb wattage. Replace the bulb with the correct type.
- No Turn Signals at All: Check the turn signal fuse. If the fuse is blown, replace it with the same amperage rating. If the fuse blows again, there's a short circuit that needs to be located and repaired. Also, check the flasher relay.
- Hazard Lights Don't Work: The hazard lights share some components with the turn signals, but they also have their own dedicated circuit. Check the hazard light fuse and the hazard light switch.
Example: Let's say your left turn signal isn't working. You consult the wiring diagram and see that the left turn signal circuit runs from the turn signal switch (connector C202a, pin 5, wire color LG/OG (light green with orange stripe)) to the left front turn signal bulb (connector C405, pin 1, wire color LG/OG). You use a multimeter to check for voltage at the connector C405, pin 1 when the left turn signal is activated. If there's no voltage, you know the problem is upstream, likely in the wiring harness between the switch and the bulb. Using the wiring diagram, you can further pinpoint the location of the break or short.
Safety Precautions
Working with automotive electrical systems can be dangerous. Here are some essential safety precautions:
- Disconnect the Battery: Always disconnect the negative battery terminal before working on the electrical system to prevent accidental short circuits.
- Use Proper Tools: Use insulated tools designed for automotive electrical work.
- Avoid Working in Wet Conditions: Water conducts electricity, increasing the risk of electric shock.
- Identify Airbag Components: Be extremely careful when working near airbag components. Accidental deployment of an airbag can cause serious injury. Consult the vehicle's service manual for specific instructions on disabling the airbag system.
- Never Probe Wires: Avoid piercing or probing wires unless absolutely necessary, as this can damage the insulation and lead to corrosion or short circuits. Use back-probing techniques when possible.
High-Risk Components: The airbag system, anti-lock braking system (ABS), and engine control module (ECM) are complex and sensitive systems. Unless you have specialized training and equipment, it's best to leave repairs to these systems to a qualified technician.
This guide provides a solid foundation for understanding your F-150's turn signal wiring diagram. However, remember that each model year may have slight variations. Always consult the specific wiring diagram for your truck. To make things easier, we have the complete Ford F-150 turn signal wiring diagram available for download. Access the file by clicking the button below. Good luck with your project!