Ford Headlight Switch Wiring Diagram
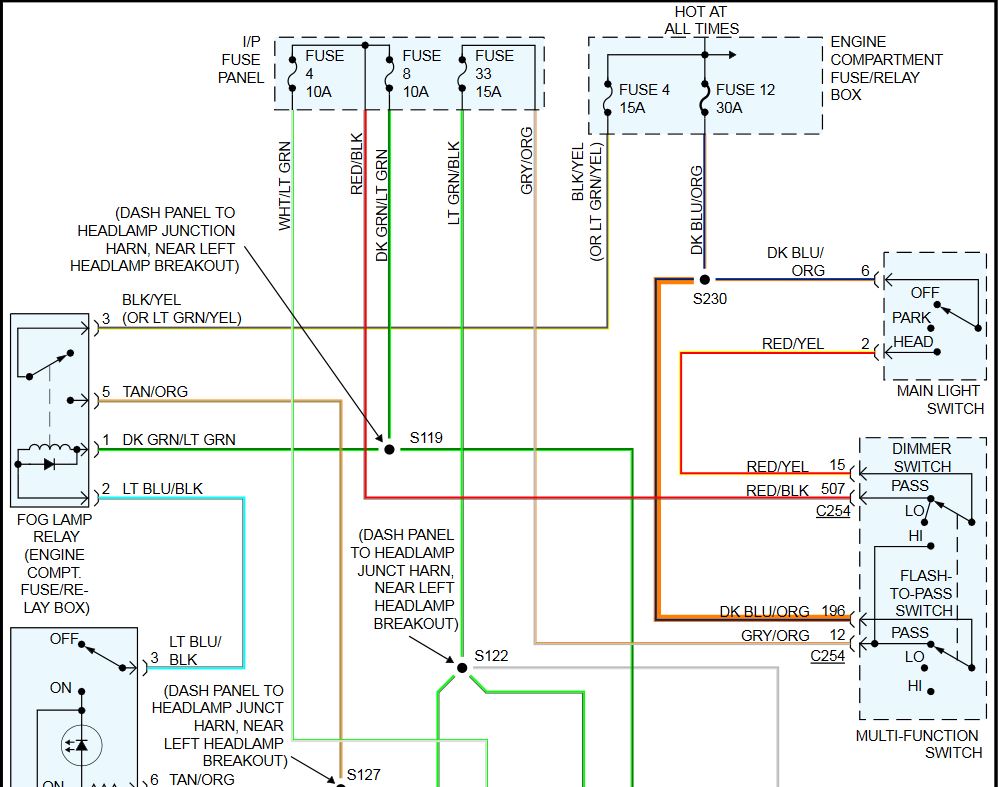
Let's dive into the often-overlooked, yet critically important, world of Ford headlight switch wiring diagrams. This isn't just about flipping a switch; it's about understanding the electrical symphony that illuminates your way on the road. Whether you're tackling a repair, upgrading your headlights, or simply curious about your car's inner workings, deciphering the headlight switch wiring diagram is an invaluable skill. This guide will walk you through the intricacies, from basic components to troubleshooting tips, empowering you to confidently handle your Ford's lighting system.
Purpose of Understanding the Headlight Switch Wiring Diagram
Why bother learning this stuff? There are several key reasons:
- Repair & Maintenance: When your headlights malfunction (dim, flicker, or don't turn on), a wiring diagram is your roadmap to pinpointing the problem. It helps you trace circuits, identify faulty components, and diagnose issues accurately.
- Modification & Upgrades: Want to install aftermarket headlights, add fog lights, or upgrade to LED bulbs? A wiring diagram ensures you connect everything correctly, preventing shorts, blown fuses, and potentially catastrophic damage to your electrical system.
- General Understanding: Even if you're not actively working on your car, understanding the headlight circuit can enhance your overall knowledge of automotive electrical systems. This knowledge can be helpful when explaining issues to your mechanic, improving the communication and accuracy of the repair.
- Safety: Faulty headlight wiring can be a serious safety hazard. Understanding the diagram allows you to identify and address potential problems before they lead to accidents or further damage.
Key Specs and Main Parts of a Ford Headlight Circuit
Let's break down the key components you'll encounter in a typical Ford headlight circuit:
- Headlight Switch: The control center. It selects which lights are active (parking lights, headlights, high beams) and often includes a dimmer function for the instrument panel. Think of it as the conductor of the lighting orchestra.
- Fuses/Circuit Breakers: These are essential safety devices that protect the circuit from overloads. If too much current flows through the circuit (due to a short or other issue), the fuse blows (or the circuit breaker trips), interrupting the current flow and preventing damage.
- Relays: Relays act as electrically operated switches. They allow a low-current circuit (from the headlight switch) to control a high-current circuit (to the headlights). This prevents excessive current from flowing through the switch itself, prolonging its life and increasing safety. The headlight relay carries high current; a control signal actuates it.
- Headlights: The light-emitting devices themselves. These can be halogen, LED, or HID (High-Intensity Discharge) bulbs.
- Wiring Harness: The network of wires that connects all the components. These wires are color-coded to help identify their function.
- Grounds: A good ground connection is critical for proper circuit operation. The ground provides a return path for the current to the battery, completing the circuit. A poor ground connection can cause dim lights, flickering, or complete failure.
- Dimmer Switch (if separate): Older models might have a separate dimmer switch on the floor or steering column to switch between high and low beams. Newer models often integrate this function into the headlight switch.
Understanding the Symbols on a Headlight Wiring Diagram
A wiring diagram is a symbolic representation of the circuit. It uses standard symbols and conventions to convey information. Here's a breakdown of common symbols:
- Lines: Lines represent wires. The thickness of the line doesn't usually indicate wire gauge, but rather emphasizes a major conductor.
- Color Codes: Wires are typically color-coded. The diagram will include a key or legend that explains the color codes (e.g., BLK = Black, RED = Red, WHT = White, GRN = Green, BLU = Blue, YEL = Yellow). These color codes can vary slightly depending on the Ford model and year.
- Circles and Squares: These often represent connectors or terminals where wires are joined.
- Resistor Symbol (Zigzag Line): Represents a resistor, which limits current flow.
- Capacitor Symbol (Two Parallel Lines): Represents a capacitor, which stores electrical energy.
- Diode Symbol (Triangle Pointing to a Line): Represents a diode, which allows current to flow in only one direction.
- Ground Symbol (Series of Horizontal Lines Getting Shorter): Represents a ground connection to the vehicle's chassis.
- Fuse Symbol: A squiggly line within a rectangle or a simple rectangle with the amperage value indicated (e.g., 15A).
- Switch Symbol: Represents a switch, which opens or closes the circuit.
- Relay Symbol: Shows the relay coil and the switch contacts that the relay controls.
Important Note: Always refer to the specific wiring diagram for your Ford model and year. Diagrams can vary significantly between different vehicles.
How the Headlight Circuit Works
Here's a simplified explanation of how a typical Ford headlight circuit functions:
- Power Source: The circuit begins with the battery, which provides the electrical power.
- Headlight Switch Activation: When you turn the headlight switch to the "parking lights" position, power flows from the battery, through a fuse, and to the parking lights. When you switch to the "headlights" position, power flows through a different circuit, often activating a relay.
- Relay Activation (Typical): The headlight switch sends a small current to the relay coil. This energizes the coil, which closes the relay's contacts.
- Headlight Illumination: Closing the relay contacts allows a high-current circuit to flow directly from the battery (through a fuse) to the headlights, causing them to illuminate.
- High Beam Activation: Activating the high beams typically involves another switch (integrated into the headlight switch or a separate dimmer switch). This switch redirects power to the high beam filament within the headlight bulb, or activates a separate high beam bulb.
- Ground Return: After passing through the headlights, the current flows back to the battery through the ground connection, completing the circuit.
Real-World Use: Basic Troubleshooting Tips
Here are some common headlight problems and how a wiring diagram can help you diagnose them:
- Headlights Don't Work At All:
- Check the fuses first! Use the wiring diagram to identify the correct fuse for the headlights.
- If the fuse is blown, replace it with a fuse of the same amperage rating. If the fuse blows again immediately, there's a short circuit somewhere. Use the wiring diagram to trace the circuit and look for damaged wires or components.
- If the fuse is good, use a multimeter to check for voltage at the headlight switch. If there's no voltage, there's a problem upstream (e.g., a bad connection at the battery or ignition switch).
- Check the headlight relay. You can often swap it with a known good relay (like the horn relay) to see if that fixes the problem.
- Headlights Are Dim:
- Check the ground connections. A corroded or loose ground can cause dim lights. Clean and tighten all ground connections related to the headlight circuit.
- Check the voltage at the headlights. If the voltage is significantly lower than battery voltage (typically around 12-14 volts), there's excessive resistance in the circuit. Use the wiring diagram to trace the circuit and look for corroded connectors or damaged wires.
- One Headlight Doesn't Work:
- Check the bulb. Replace it with a new bulb of the correct type.
- Check the wiring and connector at the headlight. Look for corrosion or damage.
- Use the wiring diagram to trace the circuit and see if there's a separate fuse or relay for each headlight.
Safety Considerations
Working with automotive electrical systems can be dangerous. Here are some important safety precautions:
- Disconnect the Battery: Always disconnect the negative terminal of the battery before working on any electrical circuits. This will prevent accidental shorts and shocks.
- Use Proper Tools: Use insulated tools designed for automotive electrical work.
- Never Bypass Fuses: Fuses are safety devices. Never bypass or replace them with a higher amperage fuse. This can overload the circuit and cause a fire.
- Be Careful Around Airbags: Some electrical circuits are related to the airbag system. Disconnecting the battery is especially important when working near airbag components.
- High-Intensity Discharge (HID) Lights: These lights operate at very high voltages. Be extremely careful when working with HID lights, even with the battery disconnected. HID ballasts can store a charge. Consult the service manual for the correct procedure for discharging the ballast.
By understanding the Ford headlight switch wiring diagram, you can confidently diagnose and repair headlight problems, upgrade your lighting system, and gain a deeper understanding of your car's electrical system. Remember to always consult the specific wiring diagram for your vehicle and prioritize safety. We have a comprehensive library of Ford wiring diagrams including headlight circuits. These are invaluable resources for anyone working on their vehicle's electrical system. Access these diagrams to further enhance your troubleshooting and repair capabilities.