Ford Ranger Front Suspension Diagram
Alright, let's dive into the front suspension of your Ford Ranger. Whether you're planning some upgrades, tackling a repair, or just want to understand how things work under the hood, a solid understanding of the front suspension is crucial. This article will break down a typical Ford Ranger front suspension diagram, helping you identify key components, understand their functions, and even troubleshoot common issues. We even have the diagram file available for you to download, which we'll mention at the end.
Purpose of a Front Suspension Diagram
Why bother with a diagram? Simple. It's your roadmap to understanding, diagnosing, and fixing problems. Without it, you're essentially working blind. A detailed front suspension diagram provides a visual representation of all the components, their relationships, and often critical specifications like torque values, angles, and even part numbers. Specifically, a diagram helps you:
- Identify parts: Quickly pinpoint the name and location of any component.
- Understand the system: Grasp how each part interacts with others to control the ride.
- Troubleshoot problems: Use the diagram to trace the potential source of a problem, like excessive wear or unusual noises.
- Perform repairs: Ensure you're reassembling parts correctly and torquing bolts to spec.
- Plan modifications: Visualize how aftermarket parts might integrate into the existing system.
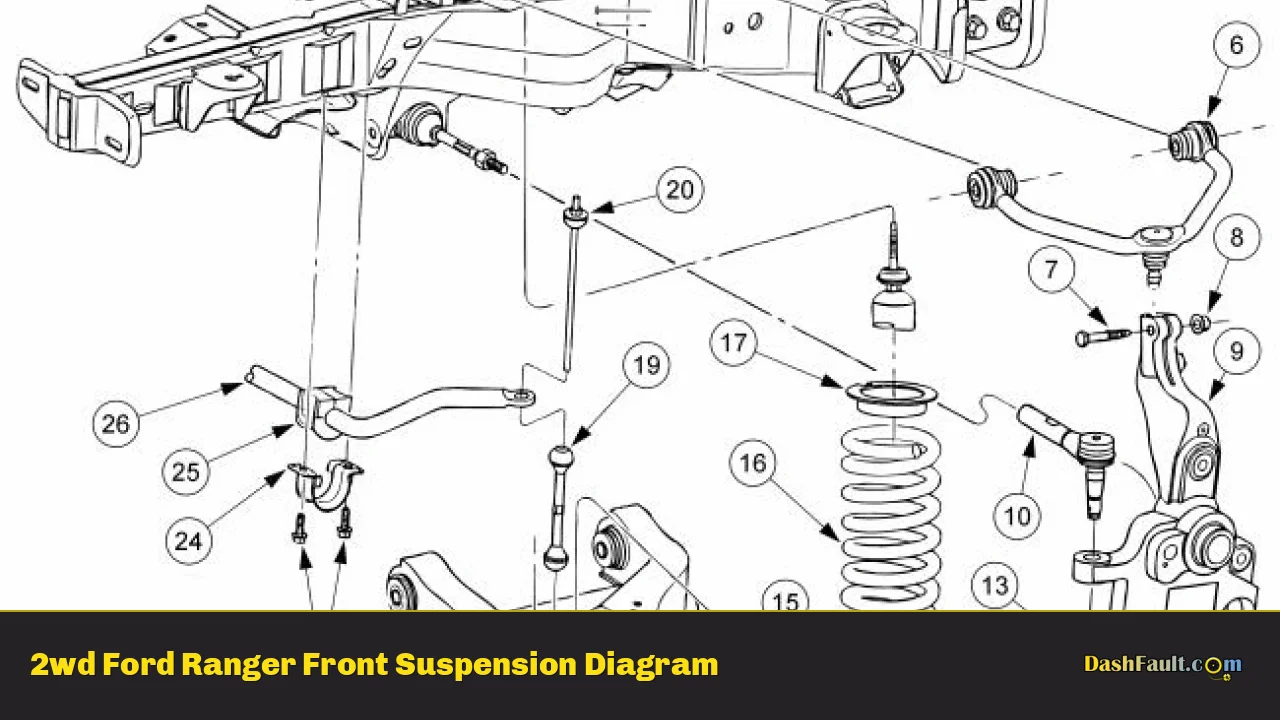
Key Specs and Main Parts of the Ford Ranger Front Suspension
The Ford Ranger, especially models from the late 90s through the 2010s, typically uses a double wishbone, or independent front suspension (IFS) system. This design provides a good balance of ride comfort, handling, and durability. Let's identify the major players:
- Upper and Lower Control Arms: These are the primary linkages that connect the wheel hub to the frame. They allow the suspension to move up and down while maintaining wheel alignment. They are a critical part of the suspension and need to be in good condition.
- Coil Spring: This provides the main spring force to absorb bumps and maintain ride height. Some Rangers use torsion bars instead (more on that below).
- Shock Absorber (Damper): Controls the rate at which the suspension compresses and rebounds, preventing excessive bouncing.
- Steering Knuckle (Spindle): This is the component that houses the wheel hub and bearings, and connects to the control arms and steering linkage.
- Wheel Hub and Bearings: Allows the wheel to rotate freely.
- Tie Rods (Inner and Outer): Connect the steering rack to the steering knuckle, translating steering wheel input into wheel movement.
- Sway Bar (Stabilizer Bar): Reduces body roll during cornering by connecting the left and right sides of the suspension.
- Sway Bar End Links: Connect the sway bar to the control arms or struts.
- Torsion Bars (If Equipped): Some Rangers, especially those with heavier duty suspensions or 4x4 models, use torsion bars instead of coil springs. Torsion bars are long, steel bars that twist to provide spring force. They are adjusted via bolts to set ride height.
- Ball Joints: Allow for articulation between the control arms and the steering knuckle. Worn ball joints are a common source of suspension noise and can affect handling.
- Bushings: Rubber or polyurethane bushings are used at the pivot points of the control arms and other suspension components to absorb vibrations and allow for movement.
Key Specs: When working on your suspension, always refer to the factory service manual for specifications. These typically include:
- Torque values: Critical for ensuring bolts are properly tightened. Overtightening can damage components, while undertightening can lead to failure.
- Alignment angles (Caster, Camber, Toe): These angles determine how the wheels are positioned relative to the vehicle and are crucial for proper handling and tire wear.
- Ride Height: The distance between a specific point on the vehicle and the ground.
Understanding Suspension Diagram Symbols
Diagrams use specific symbols to represent different components and their connections. Here's a breakdown of some common ones:
- Solid Lines: Typically indicate rigid connections, such as bolts or welded joints.
- Dashed Lines: Often represent flexible connections, such as hoses or wiring. Also, they sometimes indicate a component that is behind another component, representing depth on the diagram.
- Different Colors: Some diagrams use different colors to highlight different systems or types of components. For example, blue might represent hydraulic lines, while red represents electrical wiring.
- Arrows: Can indicate the direction of movement or force. For example, arrows might show the direction of spring compression or the flow of fluid.
- Icons: Small icons might represent specific types of fasteners, such as bolts, nuts, or washers.
Pay close attention to the legend or key that accompanies the diagram. This will explain the meaning of each symbol used.
How It Works
The basic principle of the Ford Ranger's IFS is this: When the wheel encounters a bump, the suspension compresses. The coil spring (or torsion bar) absorbs the energy of the impact, while the shock absorber dampens the oscillation. The control arms guide the wheel's movement, keeping it relatively perpendicular to the road. The sway bar limits body roll during cornering.
More specifically:
- A bump pushes the wheel upward.
- The lower control arm pivots upward, compressing the coil spring (or twisting the torsion bar).
- The shock absorber resists the motion, preventing excessive bouncing.
- The upper control arm helps to maintain proper wheel alignment.
- The ball joints allow the steering knuckle to pivot, allowing the wheels to turn for steering.
Real-World Use: Basic Troubleshooting Tips
Here are a few common suspension problems and how the diagram can help you diagnose them:
- Clunking Noise: Could be worn ball joints, loose control arm bushings, or a broken sway bar end link. Use the diagram to visually inspect these components for wear or damage.
- Bouncing: Likely indicates worn shock absorbers. The diagram will show you the location and how to access them for replacement.
- Uneven Tire Wear: Could be caused by misaligned wheels due to worn ball joints, tie rod ends, or control arm bushings. The diagram will help you identify these components for inspection and potential replacement. After replacing any of these parts, you must get a wheel alignment.
- Wandering Steering: Could be caused by loose tie rod ends or worn ball joints. The diagram is critical for locating these steering linkage components.
Pro Tip: Before disassembling anything, take photos! This will help you remember how everything goes back together.
Safety Considerations
Working on suspension systems can be dangerous. Always take the following precautions:
- Use Jack Stands: Never work under a vehicle supported only by a jack.
- Compress Springs Safely: Coil springs store a lot of energy. Use a proper spring compressor to safely remove and install them. Improper use can result in serious injury.
This is not a step to skip or cut corners on!
- Wear Safety Glasses: Protect your eyes from flying debris.
- Disconnect the Battery: Especially if you're working near any electrical components.
- Torque to Spec: Use a torque wrench and follow the manufacturer's torque specifications.
- Ball Joints and Springs are very dangerous when under pressure.
Important Note: If you're not comfortable working on suspension systems, take your vehicle to a qualified mechanic. Your safety is paramount.
We hope this detailed breakdown of the Ford Ranger front suspension diagram has been helpful. Now that you understand the components and their function, you're better equipped to tackle repairs and upgrades with confidence. The information provided in this article is for informational purposes only and does not constitute professional advice. Always consult a qualified mechanic before performing any work on your vehicle.
We have the Ford Ranger front suspension diagram file available for download. It's a valuable resource to have on hand when working on your suspension. Contact us via [insert contact information or link here] to request the file.