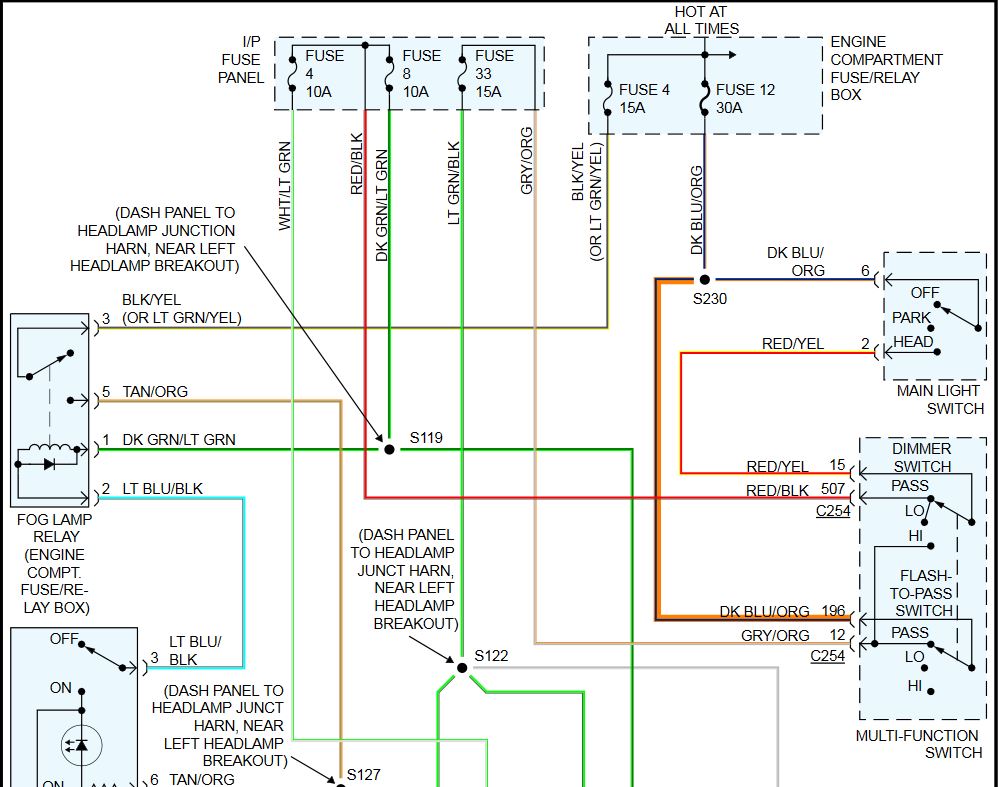
Ford Ranger Headlight Switch Wiring Diagram
Understanding the Ford Ranger's headlight switch wiring diagram is crucial for anyone undertaking electrical repairs, modifications, or even just trying to better grasp their vehicle's systems. Whether you're replacing a faulty switch, adding aftermarket lighting, or diagnosing a lighting issue, having a clear understanding of the wiring is paramount. This article breaks down the diagram, its components, and how it all works, providing you with the knowledge to tackle these projects safely and effectively.
Purpose of Understanding the Headlight Switch Wiring Diagram
The headlight switch wiring diagram serves as a roadmap for the electrical connections within the headlight circuit. It allows you to:
- Diagnose Electrical Problems: Pinpoint shorts, opens, or incorrect connections in the headlight system.
- Perform Repairs: Accurately replace faulty components like the headlight switch itself or damaged wiring.
- Install Aftermarket Lighting: Properly integrate auxiliary lights, fog lights, or LED conversions into the existing system.
- Customize Wiring: Modify the headlight circuit for specific purposes, such as adding a "lights-on" reminder or implementing a different switching configuration (do so at your own risk and understanding).
- General Understanding: Gain a deeper comprehension of your vehicle's electrical system.
Key Specs and Main Parts
While specific details may vary slightly depending on the Ranger's model year and trim level, the fundamental components and wiring principles remain consistent. Here's a breakdown of the key elements:
Main Components:
- Headlight Switch: The central control for activating headlights, parking lights, and sometimes fog lights. It's a multi-position switch that directs power to different circuits.
- Fuse(s): Protective devices that interrupt the circuit if an overcurrent condition occurs, preventing damage to wiring and components. Crucially important for safety!
- Relay(s): Electrically operated switches that allow a low-current circuit (from the headlight switch) to control a high-current circuit (powering the headlights). This prevents the headlight switch from being overloaded.
- Headlights: The primary light source for nighttime driving, typically high and low beam bulbs or LED units.
- Parking Lights: Lower intensity lights that illuminate the front and rear of the vehicle for visibility when parking.
- Fog Lights (if equipped): Auxiliary lights designed to improve visibility in foggy conditions.
- Wiring Harness: A bundle of wires that connects all the components together.
- Ground Connection(s): Essential for completing the electrical circuit; provides a path for current to return to the battery's negative terminal.
Typical Wiring Specs:
- Voltage: 12 Volts DC (Direct Current).
- Wire Gauge: Varies depending on the circuit, but headlight wiring typically uses thicker gauge wires (e.g., 14 or 16 AWG) to handle the higher current. Smaller gauge wires (e.g., 18 or 20 AWG) are used for lower current circuits like parking lights.
- Wire Color Coding: Ford uses a standardized color coding system for its wiring. Understanding these codes can greatly simplify troubleshooting. Refer to the specific wiring diagram for your Ranger model to identify the color codes.
Decoding the Symbols
Wiring diagrams use a standard set of symbols to represent electrical components and connections. Here's a guide to the most common symbols you'll encounter:
- Straight Lines: Represent wires connecting different components. Thicker lines often indicate wires carrying higher current.
- Dotted Lines: May indicate a shielded wire or a connection that is part of a larger harness assembly.
- Circles with Numbers: Represent wiring harness connectors. The number indicates the pin number within the connector.
- Zigzag Lines: Represent resistors, which limit current flow.
- Circles with an "X" inside: Represent light bulbs or lamps.
- Rectangles with a diagonal line through them: Represent fuses.
- Coil Symbol: Represents a relay coil.
- Ground Symbol: Usually a series of descending horizontal lines, indicating a connection to the vehicle's chassis for grounding.
- Color Codes: Wires are often labeled with color codes, such as "RD/BK" for red with a black stripe.
Important: Always consult the specific wiring diagram for your Ranger model year to accurately identify the symbols and color codes.
How It Works: The Headlight Circuit in Action
The basic operation of the headlight circuit involves the following:
- Power Source: The circuit starts with the battery, which provides the electrical power.
- Ignition Switch: In many Ranger models, the headlight circuit is interlocked with the ignition switch. This means the headlights can only be activated when the ignition is in the "ON" or "ACC" position. This prevents accidentally draining the battery.
- Headlight Switch: When the headlight switch is turned to the "Parking Lights" position, it sends power to the parking light circuit, illuminating the parking lights, taillights, and license plate light. Turning the switch to the "Headlights" position directs power to both the parking light circuit and the headlight circuit.
- Relays (Often): The headlight switch typically activates a relay or relays. The relay then closes, allowing high-current power to flow directly from the battery (through a fuse) to the headlights. This design protects the headlight switch from excessive current draw.
- Headlights Illumination: The power reaches the headlight bulbs (or LED units), causing them to illuminate. The switch might have separate positions for low and high beams, activating different filaments or LEDs within the headlight assembly.
- Ground Path: The circuit is completed when the current flows through the headlights and returns to the battery's negative terminal through a ground connection.
Real-World Use: Troubleshooting Tips
Here are some basic troubleshooting tips using the wiring diagram:
- No Headlights: Check the headlight switch, fuses, relays, and headlight bulbs. Use a multimeter to test for voltage at each point in the circuit, starting from the battery and working your way to the headlights. The wiring diagram will show the correct points to test.
- One Headlight Out: Check the bulb first. If the bulb is good, check the wiring and connector to that headlight. Consult the wiring diagram to identify the specific wires for that headlight.
- Parking Lights Not Working: Check the parking light fuse, the headlight switch in the parking light position, and the wiring to the parking lights.
- Headlights Work, But High Beams Don't: Check the high beam switch portion of the headlight switch, the high beam relay (if equipped), and the wiring to the high beam filaments/LEDs.
Important: Always disconnect the negative battery cable before working on any electrical circuits to prevent shorts and potential damage.
Safety Considerations
Working with electrical systems can be dangerous. Here are some crucial safety precautions:
- Disconnect the Battery: Always disconnect the negative battery cable before working on the electrical system.
- Use a Multimeter Properly: Learn how to use a multimeter safely and accurately to test voltage, current, and resistance.
- Avoid Working in Wet Conditions: Never work on electrical systems in wet or damp environments.
- Protect Wiring: Use proper insulation and connectors to protect wiring from damage and shorts.
- Be Aware of Airbag Systems: Some wiring may be related to the airbag system. Do not tamper with airbag wiring unless you are a qualified technician. Incorrect handling can cause accidental airbag deployment, resulting in serious injury.
- Fuses Are Important: Always replace blown fuses with fuses of the same amperage rating. Using a higher amperage fuse can overload the circuit and cause a fire.
We have a copy of the Ford Ranger Headlight Switch Wiring Diagram available for download. Please reach out to our support team to request the file, specifying your Ranger's model year for the most accurate diagram.