Ford Ranger Stereo Wiring Color Code
Alright, let's dive into the fascinating, and sometimes frustrating, world of Ford Ranger stereo wiring. Understanding the color codes for your Ranger's audio system is crucial, whether you're upgrading your head unit, diagnosing a speaker issue, adding an amplifier, or just trying to understand how things are connected. This guide is designed for the intermediate car owner, the modder, or the DIY mechanic who's comfortable with basic electrical work and wants a deeper understanding of their Ranger's audio setup.
Purpose: Why Bother With Wiring Diagrams?
Before we get into the nitty-gritty of color codes, let's address the "why." Why should you care about a wiring diagram? The answer is simple: accurate modifications and effective troubleshooting.
- Upgrading Your Head Unit: Aftermarket head units often require you to splice into the factory wiring harness. Knowing which wire does what is essential to avoid damaging your new stereo or your truck's electrical system.
- Diagnosing Speaker Issues: Is one of your speakers cutting out or sounding distorted? A wiring diagram can help you trace the signal path and identify potential problems like a short circuit or a broken wire.
- Adding an Amplifier: Amplifiers require precise wiring for power, ground, and signal input. Using the wrong wires can lead to poor performance or even damage your amplifier.
- Learning and Understanding: Even if you're not planning any immediate upgrades, understanding the wiring diagram helps you grasp the overall architecture of your truck's audio system.
- Repairs: Accidents happen. If a wire gets cut or damaged, knowing the correct color code is paramount for a proper repair.
Key Specs and Main Parts
Ford Rangers have gone through several generations, and the stereo wiring can vary slightly depending on the model year and trim level. However, the basic principles remain the same. The key components of the stereo system and their wiring considerations are:
- Head Unit: The brain of the system. It provides the audio signal and often includes an integrated amplifier. Wiring involves power (12V constant and switched), ground, illumination, antenna, and speaker outputs.
- Speakers: Usually two to four speakers in a standard Ranger configuration. Each speaker requires a positive (+) and a negative (-) wire.
- Wiring Harness: The bundle of wires that connects the head unit to the truck's electrical system and the speakers. It's typically located behind the dashboard.
- Antenna: Receives radio signals. A single wire connects the antenna to the head unit.
- Factory Amplifier (If Equipped): Some Ranger trims have a separate amplifier. The head unit sends a low-level signal to the amplifier, which then boosts the signal and sends it to the speakers.
Key Specs to keep in mind:
- Voltage: The Ford Ranger audio system operates on a 12-volt DC system.
- Impedance: Speakers usually have an impedance of 4 ohms. Mismatching impedance can damage your head unit or amplifier.
- Wire Gauge: Speaker wires are typically 16-18 gauge. Power and ground wires should be a thicker gauge (e.g., 12-14 gauge) to handle the current.
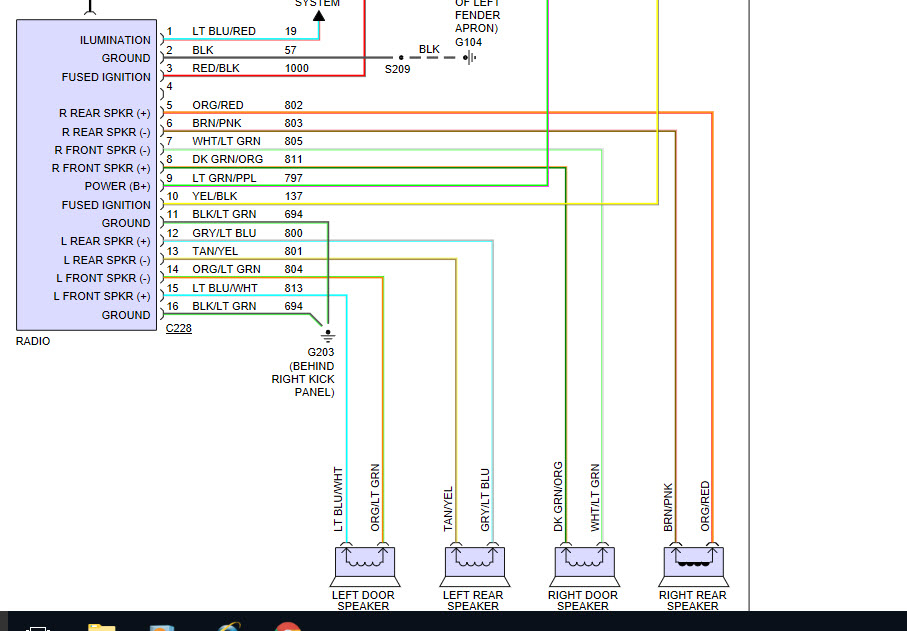
Symbols: Decoding the Wiring Diagram
A wiring diagram isn't just a collection of colored lines; it's a symbolic representation of the electrical connections. Here's a breakdown of common symbols you'll encounter:
- Solid Lines: Represent wires. The thickness of the line does not indicate the wire gauge.
- Colored Lines: Indicate the wire's color. The color code is crucial for identifying the wire's function.
- Circles or Dots: Indicate connection points or splices where wires are joined together.
- Ground Symbol: Typically represented by a series of horizontal lines, indicating a connection to the chassis ground.
- Battery Symbol: Represents the vehicle's battery, providing the power source.
- Fuse Symbol: A zigzag line within a rectangle, representing a fuse that protects the circuit from overcurrent.
- Component Symbols: Rectangles or other shapes representing components like the head unit, speakers, and amplifier. The component may have pins or terminals labeled with numbers or letters.
Understanding these symbols is fundamental to interpreting the wiring diagram accurately. The color codes are the most important aspect for correct identification.
How It Works: Signal Flow and Electrical Principles
The stereo system's operation follows a simple flow. The head unit generates an audio signal. This signal is either amplified internally (in the head unit itself) or sent to an external amplifier. The amplified signal is then transmitted through the wiring harness to the speakers. Each speaker receives two wires: one for the positive (+) signal and one for the negative (-) return path. This creates a closed circuit, allowing the speaker to produce sound.
The head unit also requires power and ground connections. The power connection is typically split into two: a 12V constant power connection (to retain memory settings) and a 12V switched power connection (which turns on the head unit when the ignition is turned on). The ground connection provides a return path for the electrical current.
The antenna receives radio signals and sends them to the head unit for processing. The head unit then selects the desired radio station and outputs the corresponding audio signal.
Real-World Use: Basic Troubleshooting Tips
Let's put this knowledge into practice with some basic troubleshooting scenarios:
- No Sound From One Speaker: Check the speaker wiring connections. Ensure the wires are securely connected to both the head unit (or amplifier) and the speaker itself. Use a multimeter to test for continuity in the speaker wire. If the wire is broken or damaged, replace it. Also test the speaker with another known working source to verify it is not the speaker itself.
- Head Unit Won't Turn On: Check the fuses. Locate the fuse for the radio in the fuse box and inspect it for damage. Replace the fuse if necessary. If the fuse keeps blowing, there may be a short circuit in the wiring. Verify the 12V constant and 12V switched wires are properly connected. Use a multimeter to check for voltage at these wires.
- Distorted Sound: Check the speaker impedance. Ensure the speakers match the head unit's (or amplifier's) impedance rating. Overdriving the speakers can also cause distortion. Reduce the volume level and see if the distortion disappears. Damaged or aging speakers can also cause distortion.
- Static or Noise: Check the antenna connection. Ensure the antenna wire is securely connected to the head unit. A loose or corroded antenna connection can cause static or noise. Also, inspect the antenna wire for damage. Interference from other electrical components can also cause noise. Try moving the antenna wire away from other wires.
Safety: Handle With Care
Working with car electrical systems can be dangerous if you don't take proper precautions. Here are some essential safety tips:
- Disconnect the Battery: Always disconnect the negative terminal of the battery before working on any electrical components. This prevents accidental short circuits.
- Use Proper Tools: Use insulated tools designed for electrical work. This will help protect you from electric shock.
- Avoid Working in Wet Conditions: Water and electricity don't mix. Avoid working on the electrical system in wet conditions.
- Identify Wires Carefully: Double-check the wire colors and their functions before making any connections. Using the wrong wires can damage your equipment or your truck's electrical system. Refer to the wiring diagram.
- Fuses are Important: Never bypass a fuse. Fuses are designed to protect the electrical system from overcurrent. Bypassing a fuse can lead to a fire.
The most risky components are the 12V Constant and 12V Switched wires. Shorting these wires to ground can cause significant damage to your truck's electrical system.
By understanding the Ford Ranger stereo wiring color code, you can confidently tackle audio upgrades and repairs, saving you time and money. Remember to always prioritize safety and double-check your work. We have access to a detailed wiring diagram for your Ford Ranger. Please contact us for download access. Happy modding!