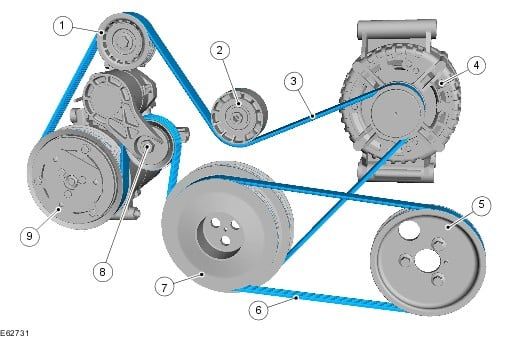
Ford Transit Alternator Belt Diagram
Alright folks, let's dive into the serpentine belt system on your Ford Transit, specifically focusing on understanding the alternator belt diagram. Whether you're tackling a belt replacement, chasing down a charging issue, or just trying to better understand your van's engine bay, this diagram is your key to success. We'll break down the diagram's purpose, its components, the symbols used, how the system works, and some real-world troubleshooting tips. And the best part? We have a downloadable diagram you can use right away – details on that at the end.
Purpose of the Alternator Belt Diagram
So, why bother with a diagram? Simple: accuracy and efficiency. The alternator belt, also known as the serpentine belt, snakes its way around multiple pulleys, driving critical components like the alternator (obviously!), power steering pump, air conditioning compressor, and sometimes even the water pump. A single misrouted belt can lead to serious problems, from a dead battery and loss of power steering to engine overheating. The diagram provides a visual roadmap, ensuring:
- Correct Belt Routing: The most obvious purpose. The diagram shows precisely how the belt should be routed around each pulley.
- Proper Belt Tension: Many diagrams indicate the location of the belt tensioner, a crucial component for maintaining proper belt tension. Incorrect tension can lead to belt slippage (noise, reduced component performance) or premature belt failure.
- Component Identification: Helps you identify all the components driven by the belt, useful for diagnosing issues and understanding the system's overall operation.
- Troubleshooting: A visual aid to help diagnose problems. A quick glance can confirm if the belt is intact and properly routed.
Key Specs and Main Parts of the Ford Transit Serpentine Belt System
Let's identify the main players involved:
- Serpentine Belt: The star of the show. A single, continuous belt that drives multiple engine accessories. Typically made of a reinforced rubber compound.
- Alternator: The electrical power generator. Driven by the serpentine belt to recharge the battery and power the vehicle's electrical system.
- Crankshaft Pulley (Harmonic Balancer): Attached to the crankshaft, this pulley is the driving force for the entire serpentine belt system.
- Belt Tensioner: A spring-loaded pulley that maintains the correct tension on the serpentine belt. This is critical for proper operation. A worn tensioner can lead to belt slippage and noise.
- Idler Pulleys: Smooth pulleys used to guide the belt around the engine and maintain the correct wrap angle on the other pulleys.
- Power Steering Pump Pulley: Drives the power steering pump, which provides hydraulic assistance for steering.
- Air Conditioning Compressor Pulley: Drives the A/C compressor, responsible for cooling the cabin.
- Water Pump Pulley (Sometimes): In some configurations, the water pump is also driven by the serpentine belt. The water pump circulates coolant to regulate engine temperature.
The specific arrangement and number of components can vary slightly depending on the Transit model and engine. Always consult the diagram specific to your vehicle.
Understanding Diagram Symbols
Diagrams use standard symbols to represent components and belt routing. Here's a breakdown:
- Solid Lines: Represent the belt itself. The path of the line shows how the belt is routed.
- Pulleys: Typically depicted as circles or ovals. Some diagrams may include labels identifying the component driven by the pulley (e.g., "ALT" for alternator, "P/S" for power steering).
- Arrows: Indicate the direction of belt travel. This is important for ensuring the belt is installed correctly.
- Tensioner Symbol: Usually a pulley with a small arrow indicating the direction of tension application. Sometimes it will be labeled "Tensioner" or "Auto Tensioner."
- Dotted Lines (Less Common): May represent the backside of the belt, indicating that the belt wraps around a pulley with its smooth (non-grooved) side.
While colors aren't typically used on these diagrams, some enhanced versions might use color to highlight different sections or the path of the belt. Always refer to the diagram's key or legend for clarification.
How the Serpentine Belt System Works
The engine's crankshaft drives the crankshaft pulley, which in turn rotates the serpentine belt. The belt then transfers rotational energy to all the other pulleys in the system. The belt tensioner ensures the belt remains tight against the pulleys, preventing slippage. This efficient system allows a single belt to power multiple engine accessories, simplifying the engine design and reducing the number of individual belts required.
Think of it like a series of gears, but instead of meshing teeth, the serpentine belt uses friction to transfer motion. Proper belt tension is essential for maintaining that friction and ensuring efficient operation.
Real-World Use and Basic Troubleshooting
Here are some common scenarios where you'll need to consult the diagram:
- Belt Replacement: The diagram is your guide to ensuring the new belt is routed correctly. Always double-check the routing before starting the engine.
- Squealing Noise: A squealing noise, especially when the engine is first started or under heavy load, often indicates a slipping belt. Check the belt tensioner and the condition of the belt. Look for cracks, fraying, or glazing.
- Battery Not Charging: If the alternator isn't being driven properly due to a loose or broken belt, the battery won't charge. Verify the belt is intact and properly routed.
- Power Steering Issues: If the power steering pump isn't receiving adequate power due to a slipping belt, you may experience difficulty steering, especially at low speeds.
- A/C Not Working: A slipping belt can also prevent the A/C compressor from operating effectively, resulting in poor cooling performance.
Troubleshooting Tip: Use a belt tension gauge to verify the belt tension is within the manufacturer's specifications. Too loose or too tight can both lead to problems.
Safety Precautions
Working on the serpentine belt system involves potential risks. Here's what to keep in mind:
- Disconnect the Battery: Before working on any electrical components, disconnect the negative battery cable to prevent accidental shorts.
- Hot Engine: Allow the engine to cool completely before working on the serpentine belt system. The engine components, especially the exhaust manifold, can be extremely hot.
- Moving Parts: The serpentine belt system contains moving parts. Keep your hands, clothing, and tools clear of the belt and pulleys when the engine is running. Never attempt to adjust the belt tension while the engine is running.
- Eye Protection: Wear safety glasses to protect your eyes from debris.
Important Note: The alternator itself can retain a small electrical charge even after the battery is disconnected. Avoid touching the terminals directly to prevent a shock. While usually not dangerous, it is best to be cautious.
Remember, if you're not comfortable working on the serpentine belt system yourself, consult a qualified mechanic. Incorrect installation or improper tension can lead to serious damage.
And now, for that promised diagram! We've got a detailed Ford Transit Alternator Belt Diagram ready for you. Simply reach out via [Insert Contact Method Here, e.g., email, form on your website] and we'll happily provide you with the file. Happy wrenching!