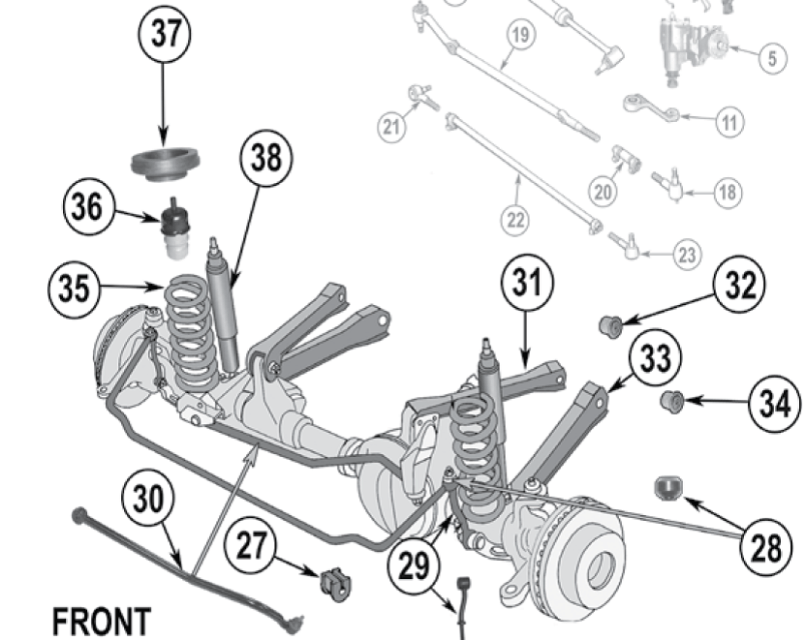
Front End Jeep Grand Cherokee Parts Diagram
Let's dive deep into the front end of your Jeep Grand Cherokee! This isn't just about knowing the names of parts; it's about understanding how they all fit together and function. Knowing this layout, particularly using a front-end parts diagram, is crucial for everything from basic maintenance to complex repairs and even modifications. We're talking about saving money, getting your Jeep back on the road faster, and the satisfaction of doing it yourself. Consider this your detailed guide to understanding the anatomy of your Grand Cherokee's front end.
Why Bother With a Front End Parts Diagram?
Think of a front end parts diagram as the blueprint for the front of your Grand Cherokee. Its purpose is multifaceted:
- Repair Identification: Quickly pinpoint the exact component causing issues, saving time diagnosing problems.
- Part Ordering: Ensure you're ordering the correct replacement parts with the right specifications (e.g., year, trim level). No more guessing or relying solely on descriptions.
- Assembly/Disassembly Guidance: Whether you're replacing a headlight assembly or overhauling the suspension, the diagram provides the proper sequence and location of fasteners.
- Modification Planning: Thinking about adding a lift kit or upgrading your bumper? The diagram shows clearances, mounting points, and potential compatibility issues.
- Educational Tool: Improve your understanding of automotive mechanics and learn how various systems interact.
Key Front End Specs and Main Parts
Before we dissect the diagram itself, let's review the key components you'll encounter:
Suspension System:
The suspension absorbs road imperfections and maintains tire contact. Key elements include:
- Upper and Lower Control Arms: These arms connect the wheel hub to the vehicle's frame, allowing for vertical movement. Different Grand Cherokee models (e.g., WK2, WJ) use varying control arm designs.
- Struts or Shock Absorbers: These dampen oscillations and control suspension movement. Struts combine a shock absorber and a coil spring into one unit, while separate shock absorbers are used with coil springs.
- Coil Springs (or Air Springs): These support the vehicle's weight and provide ride height. Some Grand Cherokees (especially newer models) feature an adjustable air suspension system instead of traditional coil springs.
- Sway Bar (Stabilizer Bar): This bar connects the left and right suspension, reducing body roll during cornering.
- Tie Rod Ends: Part of the steering linkage, they connect the steering rack to the steering knuckle, allowing the wheels to turn.
- Ball Joints: Spherical bearings that allow the control arms to pivot.
- Hub Assembly: Houses the wheel bearings and provides a mounting point for the wheel.
Steering System:
The steering system allows the driver to control the direction of the vehicle.
- Steering Rack (or Steering Gearbox): This converts the rotational motion of the steering wheel into linear motion, which is then transferred to the wheels. Most modern Grand Cherokees use a rack and pinion system.
- Power Steering Pump (if equipped): Provides hydraulic assistance to make steering easier.
- Steering Shaft and Linkages: Connect the steering wheel to the steering rack.
Braking System:
Essential for stopping the vehicle.
- Brake Calipers: Clamp brake pads against the rotors to slow the vehicle.
- Brake Rotors: Rotating discs against which the brake pads are applied.
- Brake Pads: Friction material that contacts the rotors to slow the vehicle.
- Brake Lines: Carry brake fluid from the master cylinder to the calipers.
Front Fascia and Body Components:
- Bumper: Provides protection in low-speed impacts.
- Grille: Allows airflow to the radiator and engine.
- Headlights and Fog Lights: Provide illumination for nighttime driving.
- Fender Liners: Protect the engine compartment from debris.
Understanding Diagram Symbols
Front-end diagrams aren't just pictures; they use a standardized set of symbols and conventions. Here's what to look for:
- Solid Lines: Typically represent visible components or physical connections.
- Dashed Lines: Often indicate hidden components, fluid lines (e.g., brake lines, power steering lines), or wiring harnesses.
- Arrows: Show the direction of fluid flow or movement (e.g., suspension travel).
- Colors: Some diagrams use colors to differentiate systems (e.g., blue for brake lines, green for power steering lines).
- Numbers or Letters: Correspond to a key or legend identifying each part. Always refer to the legend.
- Exploded Views: Show how components fit together in a specific sub-assembly. These are incredibly useful for reassembly.
How the Front End Works (Simplified)
The front end is a complex interplay of systems. In essence:
- Suspension: The suspension absorbs bumps and keeps the tires in contact with the road. When the wheel encounters a bump, the suspension compresses, absorbing the impact. The struts or shocks dampen the oscillation to prevent excessive bouncing.
- Steering: The driver turns the steering wheel, which rotates the steering shaft. This rotation is translated by the steering rack into linear movement, pushing or pulling on the tie rod ends, which in turn pivots the steering knuckles, turning the wheels.
- Braking: When the driver presses the brake pedal, hydraulic pressure is applied to the brake calipers. The calipers clamp the brake pads against the rotors, creating friction and slowing the vehicle.
Real-World Use: Basic Troubleshooting
Let's say you notice excessive bouncing after hitting a bump. Using the diagram, you can quickly identify the struts/shocks as potential culprits. Check for leaks, damage, or excessive wear. Similarly, if you hear a clunking noise when turning, the diagram can help you locate the ball joints or tie rod ends, which are common sources of such noises.
Here are a few quick troubleshooting tips using the diagram:
- Squeaking Suspension: Likely ball joints, bushings, or sway bar links. Grease them (if possible) or replace if necessary.
- Wandering Steering: Could be tie rod ends, ball joints, or a worn steering rack. Have the alignment checked.
- Brake Noise: Could be worn brake pads, rotors, or a loose caliper. Inspect all brake components.
Safety Considerations
Working on the front end of your Grand Cherokee can be risky. Always prioritize safety:
- Springs: Compressed coil springs store an immense amount of energy. Use a proper spring compressor tool. NEVER attempt to disassemble a strut or coil spring assembly without one. Air springs also require special handling to avoid accidental deployment or damage.
- Brake System: Brake fluid is corrosive and can damage painted surfaces. Be careful when handling brake lines. Always bleed the brakes after opening the system to remove air bubbles.
- Power Steering System: Power steering fluid is also corrosive. If the system is pressurized, release the pressure slowly and carefully.
- Jacking and Supports: Always use jack stands to support the vehicle before working underneath. Never rely solely on a jack. Ensure you are using the correct jacking points on the frame to avoid damage.
Always consult your Grand Cherokee's repair manual for specific procedures and torque specifications. These specifications are crucial for safe and reliable repairs.
Remember, this is a general overview. Specific part names, designs, and locations can vary depending on the year, model, and trim level of your Jeep Grand Cherokee. Therefore, refer to a diagram specific to your vehicle.
We have a downloadable front-end parts diagram available for common Grand Cherokee models. Please [link to download]. Use it wisely, and happy wrenching!