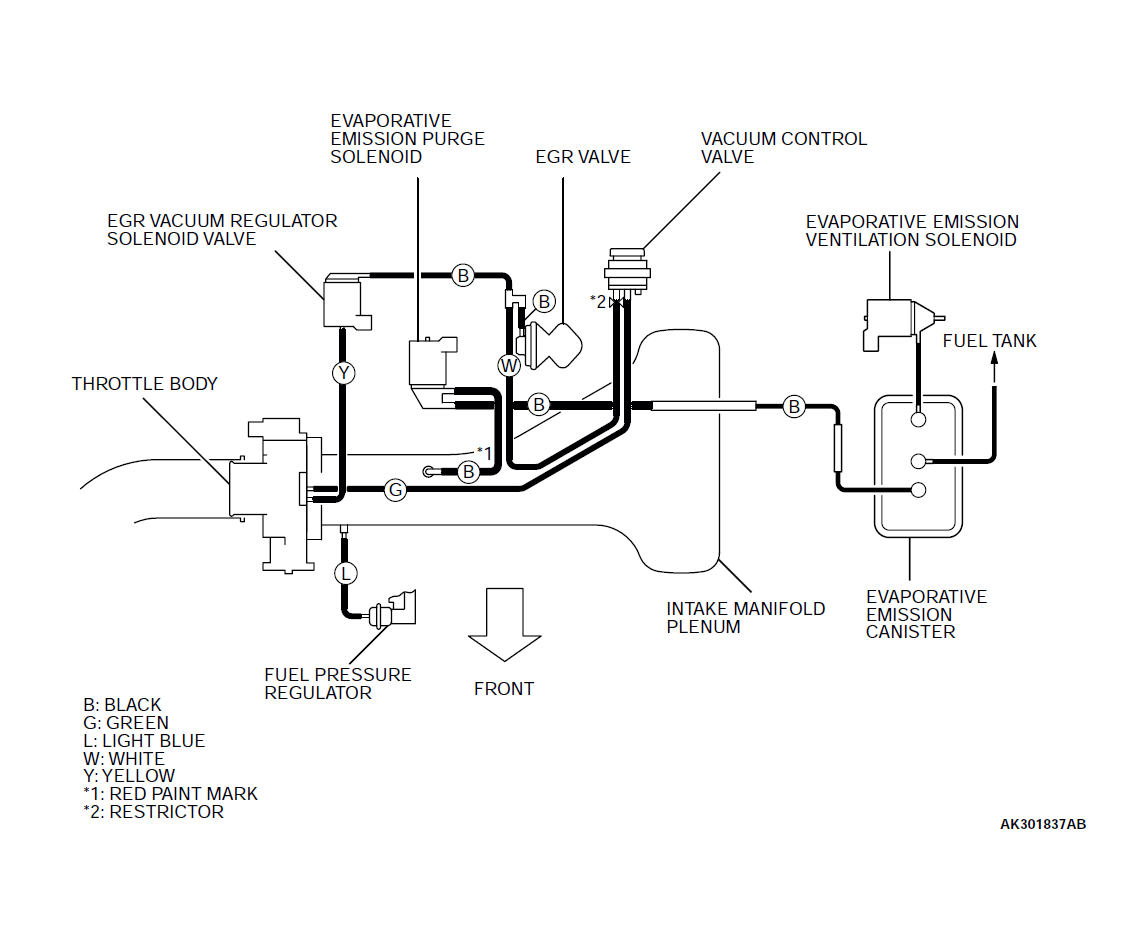
Fuel Pressure Regulator Vacuum Line Diagram
So, you're looking to understand the vacuum line diagram related to your fuel pressure regulator (FPR). Excellent! Whether you're diagnosing a rough idle, improving fuel economy, or embarking on a performance modification, understanding this system is crucial. This article will guide you through the intricacies of the FPR vacuum line diagram, giving you the knowledge you need to tackle repairs and upgrades with confidence.
Purpose of Understanding the FPR Vacuum Line Diagram
Why bother with this diagram? Simply put, it's the roadmap to understanding how your FPR interacts with the engine's manifold vacuum. This understanding is invaluable for several reasons:
- Diagnosis: Vacuum leaks are notorious for causing all sorts of engine problems. A correct diagram allows you to trace lines and pinpoint potential issues like cracked hoses or disconnected lines.
- Repair: Replacing a faulty FPR or vacuum line requires correctly routing the new components. The diagram ensures you connect everything properly, preventing further issues.
- Modification: When upgrading fuel injectors, fuel pumps, or even the ECU, the FPR's vacuum reference may need adjustment or modification. Knowing the diagram helps you make informed decisions and avoid damaging your engine.
- Learning: Comprehending this diagram is a fundamental step towards understanding how a modern engine management system works.
Key Specs and Main Parts
Before diving into the diagram itself, let's review the key components involved:
- Fuel Pressure Regulator (FPR): The heart of the system, it maintains a consistent fuel pressure at the fuel rail. It does this by using manifold vacuum as a reference to adjust the fuel pressure relative to engine load. Generally, a lower manifold vacuum (higher engine load) causes higher fuel pressure, and vice-versa.
- Fuel Rail: The distribution point for fuel, supplying each fuel injector.
- Fuel Injectors: Electrically controlled valves that spray fuel into the intake manifold or directly into the cylinder (depending on the engine type).
- Intake Manifold: Distributes air to the cylinders. It's the source of the vacuum signal used by the FPR.
- Vacuum Hose: The crucial link between the intake manifold and the FPR. It transmits the vacuum signal. This hose is usually made of rubber or silicone.
- Check Valve (if present): Some systems incorporate a check valve in the vacuum line to prevent pressure fluctuations or fuel from entering the intake manifold under certain conditions.
Typical fuel pressure specifications vary depending on the vehicle and engine. Common ranges are 30-60 PSI without vacuum applied, and a decrease of several PSI when vacuum is connected. Always consult your vehicle's repair manual for specific values.
Symbols in the FPR Vacuum Line Diagram
Diagrams are a visual language, so understanding the symbols is key. Here's a breakdown of common representations:
- Solid Lines: Typically represent vacuum hoses or fuel lines.
- Dashed Lines: Often indicate electrical wiring or less critical vacuum lines (e.g., to a charcoal canister).
- Arrows: Show the direction of flow (either fuel or vacuum).
- Circles/Ovals: Represent components like the FPR, vacuum reservoirs, or check valves.
- Rectangles: Can indicate sensors, solenoids, or other electrical components.
- Colors: While not standardized, different colors are sometimes used to differentiate between vacuum lines, fuel lines, and electrical wiring. Refer to the legend on the diagram if colors are present.
- "VAC" or "MANIFOLD": Labels that indicate the source of vacuum – the intake manifold.
It’s crucial to remember that diagrams can vary slightly between manufacturers. Always refer to the specific diagram for your vehicle's make, model, and year.
How It Works: The Mechanics of Fuel Pressure Regulation
The FPR is essentially a pressure relief valve that's vacuum-referenced. Here's how it works:
- The fuel pump delivers fuel to the fuel rail at a constant pressure.
- The FPR is connected to the fuel rail and contains a diaphragm.
- Fuel pressure acts on one side of the diaphragm, while a spring and manifold vacuum act on the other side.
- The balance between these forces determines the fuel pressure.
- When manifold vacuum is high (engine idling or decelerating), the vacuum pulls on the diaphragm, reducing the fuel pressure required to open the valve and return fuel to the tank. This lower fuel pressure is appropriate for low-load conditions.
- When manifold vacuum is low (engine under load), the vacuum signal is weaker. The spring exerts more force on the diaphragm, requiring higher fuel pressure to open the valve. This higher fuel pressure provides the extra fuel needed for increased power output.
The beauty of this system is its ability to dynamically adjust fuel pressure based on engine load, optimizing performance and fuel efficiency. A ruptured diaphragm or a faulty vacuum line disrupts this balance, leading to fuel pressure problems.
Real-World Use: Basic Troubleshooting Tips
Here are some basic troubleshooting tips using the FPR vacuum line diagram:
- Rough Idle: A common symptom of a vacuum leak. Inspect the vacuum hose connected to the FPR for cracks, tears, or loose connections. Use a vacuum gauge to check the manifold vacuum at idle. An abnormally low reading can indicate a leak.
- Poor Fuel Economy: A malfunctioning FPR or a vacuum leak can cause the engine to run rich, leading to poor fuel economy. Check the vacuum line and the FPR itself.
- Fuel Smell: A strong fuel smell, especially near the FPR, could indicate a leaking diaphragm or a cracked fuel line. Immediately inspect the area and replace any damaged components.
- High Fuel Pressure: If your fuel pressure is consistently high, even at idle, the vacuum line might be disconnected or blocked. This prevents the FPR from reducing the fuel pressure.
- Low Fuel Pressure: If fuel pressure is consistently low, the FPR might be faulty, or the vacuum line might be leaking significantly. Also, low fuel pressure can be caused by a faulty fuel pump, fuel filter, or fuel line blockage.
To test the vacuum line: With the engine running, carefully disconnect the vacuum line from the FPR. The engine idle should change. If there's no change, the line might be blocked, or the FPR is not responding to vacuum changes.
Important Note: Always depressurize the fuel system before disconnecting any fuel lines or the FPR. Consult your vehicle's service manual for the proper procedure.
Safety Precautions
Working with fuel systems involves inherent risks. Observe the following safety precautions:
- Disconnect the Battery: Before working on the fuel system, disconnect the negative battery cable to prevent accidental sparks.
- Work in a Well-Ventilated Area: Fuel vapors are flammable and can be harmful. Ensure adequate ventilation to avoid inhaling fumes.
- No Smoking or Open Flames: Never smoke or use open flames near the fuel system.
- Use Approved Containers: When draining fuel, use a container specifically designed for gasoline.
- Wear Eye Protection: Protect your eyes from fuel splashes.
- Proper Disposal: Dispose of used fuel and fuel-soaked rags properly, following local regulations.
The fuel rail and injectors are pressurized even when the engine is off. Relieving this pressure is crucial to avoid fuel spraying out and causing a fire hazard. The fuel pump relay or fuse can be removed and the engine cranked to bleed off some pressure.
Understanding the FPR vacuum line diagram is a valuable skill for any DIY mechanic. It empowers you to diagnose problems, perform repairs, and even enhance your vehicle's performance. With the knowledge and precautions outlined in this article, you can confidently tackle fuel system-related tasks.
We have the detailed FPR vacuum line diagram file available for download. It contains specific diagrams and information to assist you in your work. You can download it here.