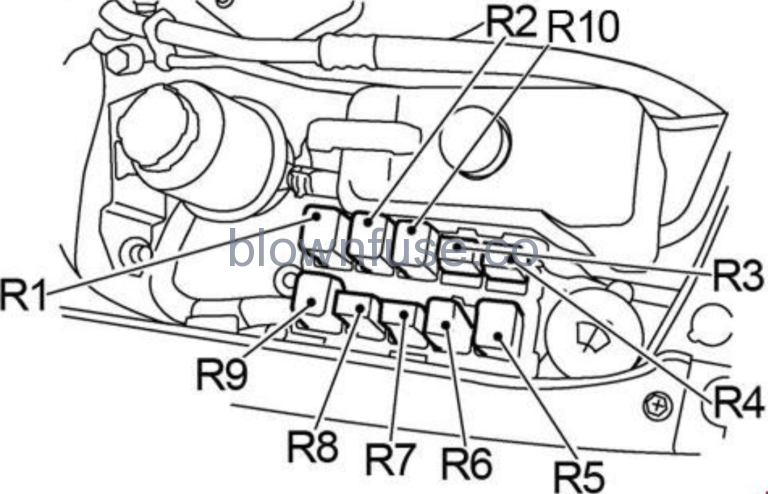
Fuse Box Diagram 2006 Nissan Sentra
Understanding your vehicle's electrical system is crucial for both routine maintenance and complex repairs. A key element of that understanding lies in deciphering the 2006 Nissan Sentra's fuse box diagram. This document acts as a roadmap to your car's electrical components, allowing you to quickly identify and address issues. Whether you're a seasoned DIYer, a budding modder, or simply a car owner looking to save on repair costs, this article will provide you with a comprehensive guide to interpreting this vital resource. We have the full resolution file which you can download at the end of the article.
Purpose of the Fuse Box Diagram
The fuse box diagram serves several essential purposes:
- Troubleshooting Electrical Problems: If a component like your headlights, radio, or windshield wipers stops working, the fuse box diagram is the first place to look. It helps you pinpoint the specific fuse associated with that circuit.
- Performing Repairs: Before attempting any electrical repair, identifying the correct circuit is paramount. The diagram allows you to disconnect power to the affected area, minimizing the risk of short circuits or electrical shocks.
- Installing Aftermarket Accessories: Adding new features like a sound system or auxiliary lighting requires tapping into the vehicle's electrical system. The diagram shows available power sources and appropriate fuses for safe integration.
- Understanding Vehicle Electrical System: Even without immediate issues, studying the fuse box diagram improves your overall understanding of how your car's electrical components are interconnected.
Key Specs and Main Parts of the 2006 Nissan Sentra Fuse Box
The 2006 Nissan Sentra typically has two primary fuse box locations:
- Interior Fuse Box: Located under the dashboard, often near the driver's side footwell. This box usually houses fuses for interior components like the radio, lights, and power windows.
- Engine Compartment Fuse Box: Found within the engine bay, often near the battery. This box contains fuses and relays for critical engine components like the fuel pump, ignition system, and cooling fan.
Here's a breakdown of the key components you'll find:
- Fuses: These are safety devices designed to protect electrical circuits from overcurrent. They contain a thin wire that melts and breaks the circuit if the current exceeds a specified level. Fuses are rated in amperes (amps), indicating the maximum current they can handle.
- Relays: Relays are electromechanical switches that use a small current to control a larger current. They are used to switch high-power circuits, such as those for headlights or the starter motor.
- Circuit Breakers: Some circuits may utilize circuit breakers instead of fuses. These devices automatically interrupt the circuit in case of an overload and can be reset manually.
- Fuse Puller: A small plastic tool used to safely remove fuses without damaging them or the fuse box.
- Diagram Label: Typically located on the inside of the fuse box cover, the diagram shows the location and function of each fuse and relay.
Understanding Fuse Box Diagram Symbols
Fuse box diagrams employ a range of symbols, lines, colors, and icons to convey information effectively.
- Lines: Lines represent electrical circuits. A thicker line might indicate a higher-current circuit. Dashed lines might indicate a ground connection.
- Colors: Wire colors are standardized and often listed in the diagram. These colors correspond to the actual wire colors in your vehicle, helping you trace circuits. For instance, a "BLU" label indicates a blue wire.
- Icons: Icons represent specific components. Here are some common examples:
- Light Bulb: Represents a lighting circuit (headlights, taillights, etc.).
- Horn: Represents the horn circuit.
- Radio: Represents the radio/audio system.
- Windshield Wiper: Represents the windshield wiper motor circuit.
- Engine Symbol: Often indicates a circuit related to engine management.
- Numbers and Letters: Each fuse and relay is typically assigned a number or letter designation, allowing you to easily cross-reference the diagram with the physical fuse box.
How the Fuse Box System Works
The fuse box acts as the central distribution point for electrical power in your vehicle. Power from the battery flows through the main power cables to the fuse box. From there, the power is distributed to various circuits, each protected by a fuse or circuit breaker.
When a circuit experiences an overcurrent (e.g., due to a short circuit or a malfunctioning component), the fuse's internal wire melts, interrupting the flow of electricity and preventing damage to the wiring and other components. The ampere rating of the fuse is crucial; using a fuse with a higher rating than specified can allow excessive current to flow, potentially causing a fire or damaging sensitive electronics.
Relays allow low-current circuits, like those controlled by switches on your dashboard, to control high-current circuits, such as the starter motor. When a low-current circuit is energized, it activates the relay, which in turn closes a contact, completing the high-current circuit.
Real-World Use: Basic Troubleshooting Tips
Here's how to use the fuse box diagram for basic troubleshooting:
- Identify the Problem: Determine which component is not working (e.g., the radio).
- Consult the Diagram: Locate the fuse associated with that component in the fuse box diagram.
- Inspect the Fuse: Visually inspect the fuse. If the wire inside is broken or blackened, the fuse is blown.
- Replace the Fuse: Replace the blown fuse with a new fuse of the same ampere rating. Using the wrong amperage can cause further damage.
- Test the Component: Turn on the component to see if it now works.
- If the Fuse Blows Again: If the new fuse blows immediately or shortly after being replaced, there's likely a short circuit or other underlying problem in the circuit. Further investigation is required. A multimeter can be used to test for continuity and voltage in the circuit.
Safety Considerations
Working with electrical systems can be dangerous. Take these precautions:
- Disconnect the Battery: Before working on any electrical system, disconnect the negative terminal of the battery to prevent accidental short circuits.
- Use Proper Tools: Use insulated tools to avoid electrical shocks.
- Never Bypass Fuses: Do not attempt to bypass a fuse by using a wire or other conductive material. This eliminates the circuit protection and can lead to serious damage or fire.
- Be Cautious with High-Current Circuits: Components like the starter motor and alternator have high-current circuits. Exercise extreme caution when working on these systems.
- Airbags and SRS Systems: Components related to the Supplemental Restraint System (SRS) or airbags are potentially hazardous. Incorrectly handled, they can deploy unexpectedly. It is highly advised to seek professional assistance for these systems.
Important Note: Always refer to your vehicle's owner's manual or a reliable repair manual for specific fuse and relay locations and amperage ratings. The information provided here is a general guide and may vary slightly depending on the specific model year and trim level.
By understanding the 2006 Nissan Sentra's fuse box diagram, you can gain valuable insights into your vehicle's electrical system, perform basic troubleshooting, and even undertake more advanced repairs with confidence. Remember to always prioritize safety and consult a qualified mechanic if you're unsure about any aspect of the work.
As mentioned, we have a high-resolution version of the 2006 Nissan Sentra fuse box diagram available for download. Click here to download.