Fuse Box Diagram For 2006 Pt Cruiser
Understanding the fuse box diagram for your 2006 PT Cruiser is absolutely crucial for any serious DIY mechanic or even just a car owner who wants to troubleshoot simple electrical issues themselves. This guide will walk you through everything you need to know, from deciphering the symbols to basic troubleshooting techniques. Think of it as your personalized roadmap to your PT Cruiser's electrical nervous system.
Purpose and Importance
Why bother understanding your fuse box diagram? Several reasons come to mind:
- Troubleshooting Electrical Problems: A blown fuse is often the culprit behind a malfunctioning component. Knowing which fuse controls which system (e.g., headlights, radio, power windows) allows you to quickly identify and replace the faulty fuse, saving you time and money.
- Performing Modifications: Adding aftermarket accessories like amplifiers, auxiliary lights, or even a new stereo system often requires tapping into the existing electrical system. The fuse box diagram helps you identify appropriate power sources and protects your vehicle from overloading circuits.
- Preventing Further Damage: Replacing a fuse with the wrong amperage rating can cause serious damage to your electrical system. The diagram ensures you use the correct fuse type, preventing potential fires or component failures.
- General Understanding: Simply having a basic understanding of your car's electrical system empowers you to diagnose issues and communicate effectively with mechanics, ensuring you're not taken advantage of.
Key Specs and Main Parts
The 2006 PT Cruiser has two main fuse boxes:
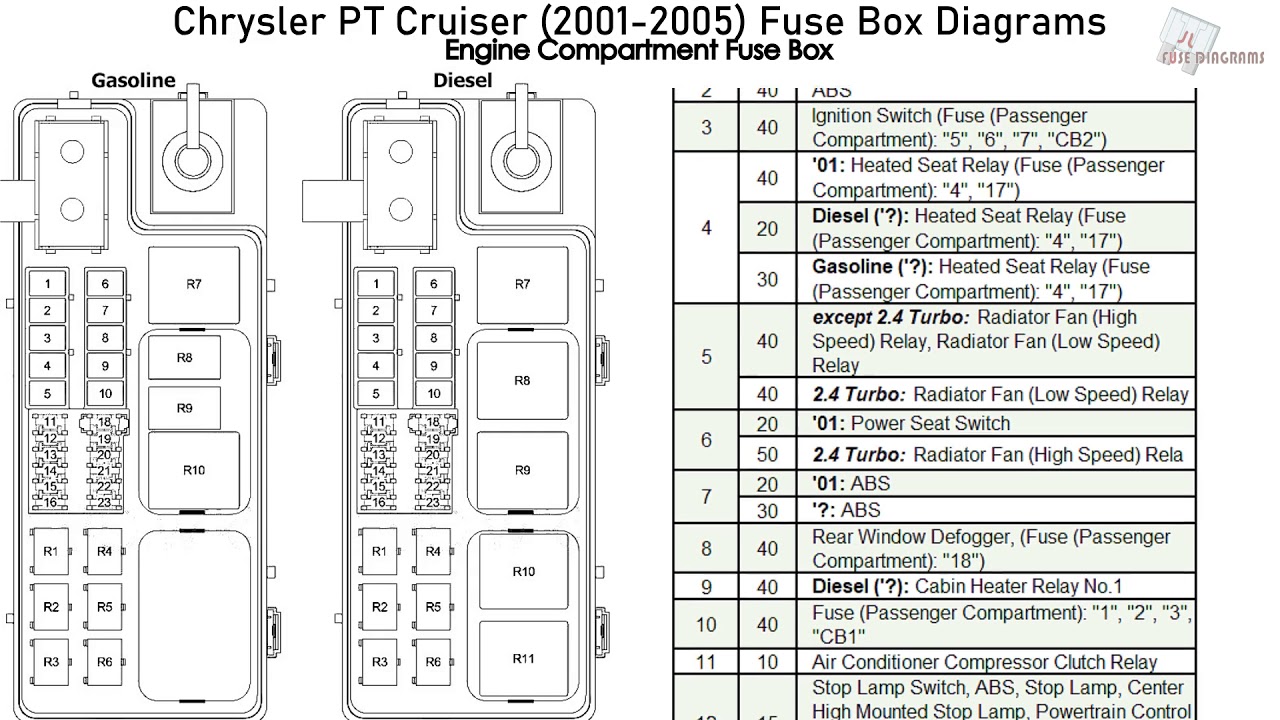
- Underhood Fuse Box (Power Distribution Center): Located in the engine compartment, this box houses higher-amperage fuses and relays that control critical systems like the engine control module (ECM), fuel pump, starter motor, and cooling fan. It's the main distribution point for electrical power throughout the vehicle.
- Interior Fuse Box: Typically located on the driver's side, often behind a panel on the lower dashboard, this box contains fuses for interior accessories like the radio, power windows, locks, lighting, and the instrument cluster.
The diagram shows the layout of these fuses and relays, along with their corresponding amperage ratings and the systems they protect. You'll find the amperage rating printed on the fuse itself (e.g., 10A, 20A, 30A). Relays are electromechanical switches that allow a low-current circuit to control a high-current circuit. They're crucial for components that draw a lot of power.
Decoding the Symbols: Lines, Colors, and Icons
Fuse box diagrams use a standardized set of symbols to represent various components and electrical pathways. Here's a breakdown:
- Lines: Solid lines represent electrical wires. Thicker lines usually indicate wires carrying higher current.
- Colors: While not always explicitly indicated on the diagram itself, knowing standard automotive wiring color codes is helpful. For example, red often indicates a constant power source, black is typically ground, and other colors are used for specific circuits. Refer to your PT Cruiser's wiring diagrams (available online or in service manuals) for complete color coding information.
- Icons:
- Fuse Symbol: Usually a squiggly line or a small rectangle with a line through it. This indicates the location of a fuse.
- Relay Symbol: Often a box with a coil symbol inside, representing the relay's electromagnetic coil, and a switch symbol indicating the contacts.
- Ground Symbol: Three downward-pointing lines, indicating a connection to the vehicle's chassis ground.
- Component Symbols: Diagrams may include simplified icons representing the components powered by each fuse (e.g., a headlight bulb for the headlight fuse, a radio speaker for the radio fuse). These symbols are typically self-explanatory, or labeled with abbreviations (e.g., ECM for Engine Control Module).
Understanding these symbols allows you to trace the flow of electricity through a circuit and identify potential points of failure.
How It Works: Circuit Protection
The basic principle behind a fuse is simple: it's a safety device designed to protect an electrical circuit from overcurrent. A fuse contains a thin wire or strip of metal that melts and breaks the circuit if the current exceeds a certain limit. This "blowing" of the fuse prevents damage to the wiring and components in the circuit.
Think of it like a sacrificial lamb for your electrical system. If there's a short circuit (where electricity finds an unintended path to ground, causing a surge of current) or an overload (where too many devices are drawing power from the same circuit), the fuse blows before anything more expensive gets fried.
Relays, as mentioned earlier, act as electrically operated switches. They allow a small current from the ignition switch or other control module to activate a larger current circuit, powering a component like the starter motor or fuel pump. Without relays, the small switch in your car would have to directly handle the high current required by these components, which would be impractical and dangerous.
Real-World Use: Basic Troubleshooting Tips
Here's a basic troubleshooting scenario using the fuse box diagram:
- Symptom: Your radio isn't working.
- Check the Fuse Box: Consult the interior fuse box diagram. Locate the fuse labeled "Radio" or "Audio System."
- Inspect the Fuse: Remove the fuse using a fuse puller (a small plastic tool designed for this purpose). Visually inspect the fuse. If the thin wire inside the fuse is broken, the fuse is blown.
- Replace the Fuse: Replace the blown fuse with a new fuse of the exact same amperage rating. Using a fuse with a higher amperage rating can overload the circuit and cause a fire.
- Test: Turn on the radio. If it now works, you've solved the problem. If the fuse blows again immediately, there's likely a short circuit in the radio wiring or the radio itself, and you'll need to investigate further.
Other common issues include intermittent problems (where a fuse blows occasionally due to a loose connection or vibration) and parasitic draws (where a component is drawing power even when the car is off, eventually draining the battery). Identifying the affected circuit using the fuse box diagram is the first step in diagnosing these problems.
Safety First: Risky Components and Precautions
Working with automotive electrical systems can be dangerous. Always observe the following safety precautions:
- Disconnect the Battery: Before working on any electrical component, disconnect the negative (-) terminal of the battery. This prevents accidental shorts and electrocution.
- Use Insulated Tools: Use tools with insulated handles to avoid electric shock.
- Never Bypass a Fuse: Don't try to bypass a blown fuse with a wire or other metal object. This eliminates the circuit protection and can cause a fire or damage expensive components.
- High-Voltage Components: Be extremely cautious around high-voltage components like the ignition system. Even with the battery disconnected, residual voltage can be present in these systems.
- Airbag System: The airbag system is electrically triggered. Consult your PT Cruiser's service manual for specific instructions on disabling the airbag system before working near it. Incorrect handling can cause accidental deployment, which can be dangerous.
Working around the ECM (Engine Control Module) and ABS (Anti-lock Braking System) requires extreme caution. Incorrect procedures could damage these sensitive and expensive components. If you're not comfortable working with these systems, consult a qualified mechanic.
Always double-check the fuse box diagram and the amperage rating of each fuse before replacing it. Using the wrong fuse can have serious consequences.
By understanding your 2006 PT Cruiser's fuse box diagram, you can diagnose and repair common electrical problems, perform modifications safely, and gain a better understanding of your vehicle's electrical system. This knowledge empowers you to take control of your car's maintenance and save money on costly repairs.
We have the complete, downloadable fuse box diagram for your 2006 PT Cruiser available. This will allow you to have it on hand and in a printable format for easy reference when you are under the hood or in the cabin, tackling your next repair!