
Fuse Diagram For 2011 Volkswagen Jetta
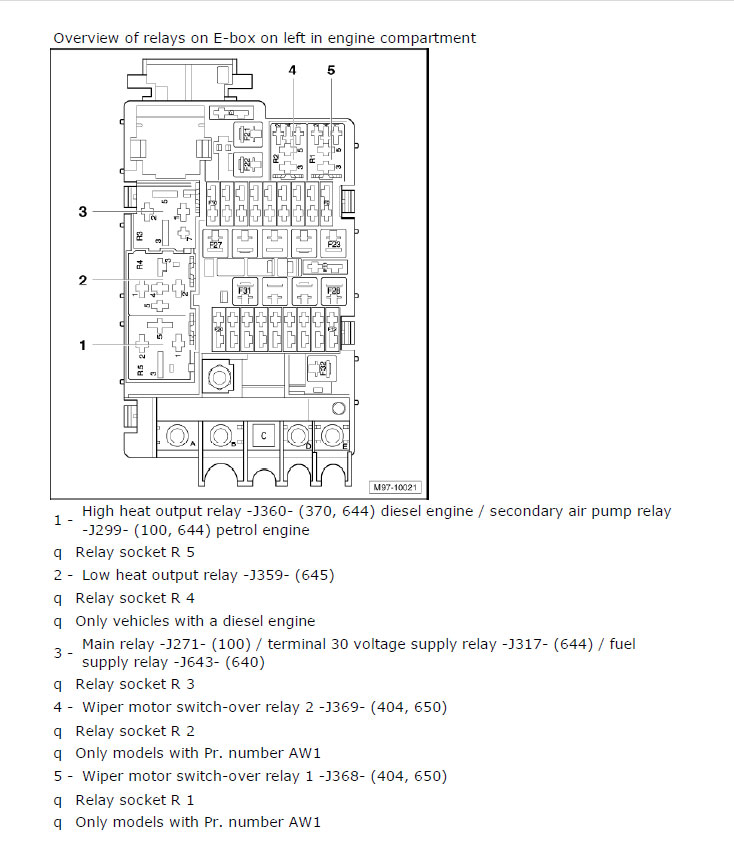
Understanding the fuse diagram for your 2011 Volkswagen Jetta is absolutely crucial for a variety of tasks, ranging from simple maintenance to more complex electrical troubleshooting. Think of it as the Rosetta Stone for your car's electrical system. It allows you to decipher where power is supposed to go, what circuits are protected, and how to safely diagnose and repair issues. Whether you're installing an aftermarket stereo, diagnosing a malfunctioning headlight, or simply trying to save money on repair bills, mastering this diagram will be an invaluable asset.
Why You Need This Diagram
The fuse diagram isn't just some technical document gathering dust in your glove compartment (if you even have it!). It's the key to:
- Troubleshooting Electrical Problems: Identify blown fuses and determine the root cause of the issue.
- Performing Modifications: Safely tap into existing circuits for adding accessories (like a dashcam or aftermarket lighting).
- Avoiding Costly Repairs: Diagnose and fix minor electrical problems yourself before they escalate.
- Understanding Your Car's Electrical System: Gain a deeper understanding of how your Jetta's electrical components are wired and protected.
Key Specs and Main Parts of the Fuse System
The 2011 Jetta typically has two main fuse boxes: one located in the engine compartment and another inside the cabin, usually on the driver's side, behind a panel on the dashboard. The exact location can vary slightly depending on the specific trim level (S, SE, SEL, TDI). Each fuse box houses a collection of fuses, each designed to protect a specific circuit. The amperage (A) rating of each fuse is crucial, as it indicates the maximum current the circuit can handle before the fuse blows, acting as a safety mechanism. Replacing a fuse with one of a higher amperage can be extremely dangerous and lead to electrical fires.
Fuse Box Locations
- Engine Compartment Fuse Box: This box generally houses fuses for high-current components like the starter motor, alternator, ABS system, and cooling fan. It's typically a black plastic box, often located near the battery.
- Interior Fuse Box: This box contains fuses for lower-current components like the radio, interior lights, power windows, cigarette lighter/power outlets, and the instrument cluster.
Fuse Types
The 2011 Jetta typically uses blade-type fuses, also known as spade fuses. These are small, color-coded plastic fuses with two exposed metal prongs. The color of the fuse indicates its amperage rating. Common amperage ratings include 5A, 7.5A, 10A, 15A, 20A, 25A, 30A, and 40A. You might also encounter mini-blade fuses, which are smaller versions of the standard blade fuse.
Decoding the Fuse Diagram: Symbols, Lines, Colors, and Icons
The fuse diagram is a schematic representation of the electrical system. It uses symbols, lines, colors, and icons to convey information about each fuse and the circuit it protects. Understanding these elements is key to interpreting the diagram correctly.
Lines and Circuit Representation
Lines on the diagram represent electrical wires. Thicker lines might indicate wires carrying higher current. Each line connects a fuse to a specific component or circuit. Following the line allows you to trace the path of electricity.
Color Coding
While not always consistently applied in all diagrams, color coding can provide additional clues. For example, a red line might represent a power feed, while a black line might represent ground. However, always rely on the legend of the specific diagram you are using.
Icons and Symbols
The diagram uses icons to represent different electrical components. Here are some common examples:
- Fuse: A small rectangle with a wavy line inside.
- Relay: A square or rectangle with terminals and a coil symbol. A relay is an electrically operated switch that allows a low-current circuit to control a high-current circuit.
- Bulb: A circle with a filament inside.
- Motor: A circle with an "M" inside.
- Switch: A line with a break in it, indicating an open or closed circuit.
How It Works: Protecting the Electrical System
The fuse system works on the principle of overcurrent protection. Each fuse is designed to blow (melt) if the current flowing through the circuit exceeds its rated amperage. This prevents excessive heat buildup and potential damage to the wiring and components connected to that circuit. When a fuse blows, it breaks the circuit, cutting off the flow of electricity and preventing further damage.
Real-World Use: Basic Troubleshooting Tips
Here's how you can use the fuse diagram for basic troubleshooting:
- Identify the Problem: Determine which component or system is not working (e.g., the radio, headlights, power windows).
- Consult the Fuse Diagram: Locate the fuse associated with the malfunctioning component in the fuse diagram. The diagram will specify the fuse location (e.g., "Fuse 12, Interior Fuse Box"), amperage rating, and the circuit it protects.
- Inspect the Fuse: Remove the fuse and visually inspect it. A blown fuse will typically have a broken filament or a blackened appearance.
- Replace the Fuse: Replace the blown fuse with a new fuse of the same amperage rating. Never use a fuse with a higher amperage rating, as this can overload the circuit and cause a fire.
- Test the System: After replacing the fuse, test the component or system to see if it is working again.
- If the Fuse Blows Again: If the new fuse blows immediately or shortly after replacement, it indicates a more serious problem, such as a short circuit. In this case, it's best to consult a qualified mechanic.
Safety Considerations: Handle with Care
Working with your car's electrical system can be dangerous if not done properly. Here are some important safety precautions:
- Disconnect the Battery: Before working on any electrical components, disconnect the negative terminal of the battery to prevent accidental shocks or short circuits.
- Use the Correct Tools: Use insulated tools to avoid electrical shocks.
- Never Bypass a Fuse: Never bypass a fuse by using a piece of wire or other conductive material. This eliminates the overcurrent protection and can lead to a fire.
- Identify High-Risk Components: Be especially cautious when working with components like the airbag system, ABS system, and fuel pump. These systems can be dangerous if mishandled. If you are not comfortable working with these systems, consult a qualified mechanic.
Remember that the airbag system is extremely sensitive. Even static electricity can trigger an airbag deployment, causing serious injury. The fuel pump also requires special care, as sparks near fuel can be catastrophic.
Get Your Copy of the Diagram
Having a readily available copy of the 2011 Volkswagen Jetta fuse diagram is essential for quick and easy reference. We have the file available for download. This diagram provides a detailed layout of both the engine compartment and interior fuse boxes, including the location, amperage, and function of each fuse.
By understanding and utilizing this diagram, you can confidently tackle various electrical issues, saving time and money on repairs while gaining a deeper understanding of your vehicle's systems.